Showing posts with label Sea Salt. Show all posts

Tuesday, August 6, 2019

Malta Vacation

We spent 8 days in Malta in June.  It was beautiful and we loved it.  We had an apartment right on the water (the pic above is our view).  It was really hot there, but there were so many nice places to swim.  We went swimming every day except for one (and that was the day we had to pick up the rental car.)  We went to the island of Comino to see the Blue Lagoon, and also the island of Gozo. 


 Popeye Village, above.  Where the Robin Williams Popeye was filmed.  

 Above, a dry riverbed meeting the sea- perfect swimming spot.  Below, salt flats. They are all over some coastal areas.  We bought sea salt from a lady selling it on the side of the road.  

 Maltese food.  Below, rabbit, the traditional dish.  


**This post and photos are property of http://dishingwithdish.blogspot.com/**

Thursday, December 1, 2016

Easy Salted Caramels


I tried these caramels because they looked SO easy, I love caramels, and I had everything on hand. They were very easy and so good! They only use a handful of ingredients and you don't need a candy thermometer.

Easy Salted Caramels
adapted from Creme de la Crumb

1½ sticks butter (12 tablespoons)
½ cup sugar
3 tablespoons light corn syrup (or honey)
14 oz sweetened condensed milk
½ teaspoon vanilla
coarse sea salt

1.  In a medium sauce pan combine butter and sugar and stir over medium heat until melted. Stir in corn syrup and condensed milk.  Bring to a boil and then decrease to simmer. Cook and stir for 7-10 minutes or until mixture achieves deep golden color, stirring constantly.

2.  Pour caramel into a greased 8x8 inch pan (glass is best, I think) and allow to cool completely. Sprinkle with coarse sea salt if desired. When completely cooled, cut into squares and wrap in wax paper.
**This post and photos are property of http://dishingwithdish.blogspot.com/ **

Monday, April 13, 2015

Microwave Caramels


I made these quite a while ago but have not had a chance to put them up.  Before that, I had bookmarked this for quite some time as a fun project to try.  It worked very well, although there is a bit of babysitting.  But not as much as making caramels on the stove top, and they're done much, much faster!  They taste great, too.  I thought I had corn syrup on hand for these, but I didn't, so I used honey and it worked perfectly.

Microwave Caramels
adapted from Cooking Classy

1/2 cup unsalted butter (don't use salted; it will splatter)
1/2 cup light corn syrup or honey
1/2 cup granulated (white) sugar
1/2 cup packed light-brown sugar
1/2 cup sweetened condensed milk
1/8 tsp salt
3/4 tsp vanilla extract
fancy sea salt or fleur de sel (optional; I used grey salt from Brittany, France)

1.  Butter an 8 by 8-inch baking dish. Place butter in a large microwave safe bowl (do not use plastic, use glass or ceramic), heat in microwave until melted. (Keep in mind mixture will boil up; use a bowl big enough for this.)

2.  To bowl with butter, add corn syrup or honey, granulated sugar, brown sugar, sweetened condensed milk and salt and whisk very well. Return to microwave and cook mixture on HIGH power for 6 to 7 minutes. (Original author recommends taking it out around 6 and testing either with a candy thermometer which should register between 238 - 242 degrees, or placing a small spoon of the caramel in a bowl of ice water then remove it from the water and it should have formed a small pliable ball - nothing too soft or too hard. If it needs a little more time return to microwave and heat in 20 second increments. Mine took a little bit past 7 minutes.)

3.  Using hot pads, carefully remove bowl from microwave. Add in vanilla extract and mix well. Pour mixture into prepared baking dish. Sprinkle top lightly with fancy sea salt or fleur de sel. Place in refrigerator until set, about 20 - 30 minutes. Cut into rectangular pieces and wrap in cut rectangles of wax paper.

**This post and photos are property of http://dishingwithdish.blogspot.com/**

Monday, April 28, 2014

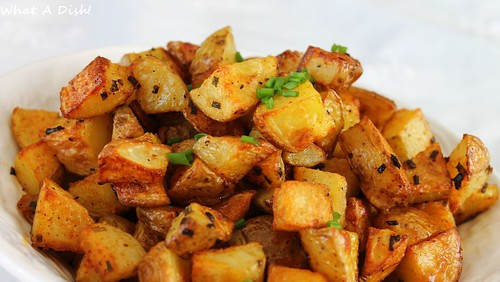
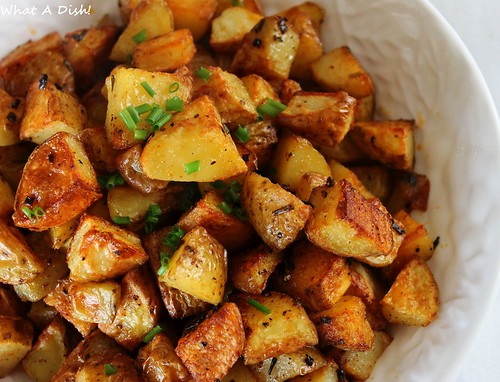
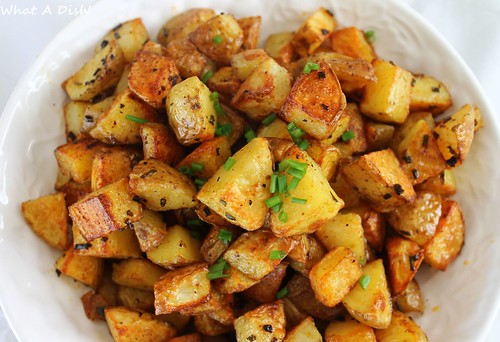
Roasted Potatoes with Smoked Paprika (+ Moving to Italy)

taters2W
In honor of my daughter's birthday today, I'm posting these roasted potatoes.  She LOVES any kind of potatoes, but especially roasted; it doesn't matter what the seasonings are.  Although, one of her fave potato recipes is Roasted Potatoes with Pesto.  Today she asked for mashed potatoes, though (with roasted Greek chicken & Turkish Garden Salad.)
taters5W
We were actually sitting down to eat these a few Saturdays ago when we found out we would be moving. Well, we pretty much knew we'd be moving this summer, and were waiting to find out where.  A friend called my husband and said some had assignments already.  My husband couldn't log onto his work Email at home, so we ate these (and some Turkish Garden Salad) and rushed to his work to check his Email there. On the way we saw a baby cow in the midst of being born.  The calf wasn't out yet, but we saw it come out later, after learning our new location.  
Anyway, we found out that we are moving to Italy this summer!  We are very excited; this was our first choice.  As usual, I won't divulge exact details on here, such as location or exactly when we'll move, but we only have a little bit of time left here in the beautiful Azores, about two months.  We have loved living here and will surely miss it.  

Roasted Potatoes with Smoked Paprika
adapted from Aggie's Kitchen

6-8 large red potatoes, skin on
1/2-1 teaspoon smoked paprika
1/2 teaspoon garlic powder
3 tablespoons olive oil (I used 1 TBS. smoked olive oil)
2 teaspoons chopped fresh chives
big dash of kosher or sea salt and fresh ground pepper

1.  Preheat your oven to 425 degrees.  Wash and cut your potatoes into 1-2" pieces, leaving the skin on. Place in a bowl.

2.  In a separate small bowl, combine olive oil, smoked paprika, garlic powder and chives. Pour over potatoes and gently toss until completely covered. Spread onto a cookie sheet and place in oven. Roast potatoes for about 30-35 minutes, gently tossing halfway through. Once done, generously sprinkle with coarse salt and pepper before serving.
tatersW
**This post and photos are property of http://dishingwithdish.blogspot.com/ **

Wednesday, January 8, 2014

Lemon, Chicken & Orzo Soup

soup2W
I've made a similar soup a few times in the past, but never written down or posted the recipe before.  (I have posted some lemon, chicken and rice recipes, but I really love the use or orzo in this one.)  For New Year's Day, we got everyone in the family their own Cornish Game Hens for dinner.  The kids loved them, but we had a ton of meat leftover.  We froze it and made broth with the carcasses (which I used on Chicken and Dumplings).  For this soup, I just used store-bought broth, but I used the meat from the Cornish Game Hens. 

I love lemon is savory dishes like this chicken soup.  I love, love, love lemon in my chicken soup.  Our fave little Pasterlaria here has delicious Canja- Portuguese chicken soup, usually made with lemon.  Theirs has cloves and other flavors in it.  I love that soup- but have been denied the recipe so far.  We will try again!    
soup1W
Lemon, Chicken & Orzo Soup
by What a Dish!

1 tablespoon olive oil
1 medium onion, chopped
1 garlic clove, minced
2 stalks celery, sliced
2 large carrots, sliced
6 cups chicken broth, store-bought or homemade
3-4 cups cooked, diced chicken meat
1/2 teaspoon dried basil
1/2 teaspoon black pepper
1/2- 3/4 cup dry orzo 
1/4 cup fresh lemon juice

1.  In a large stockpot or soup pot, heat olive oil over medium heat.  Add onion and cook and stir for a few minutes until it begins to soften.  Add garlic and cook for about a minute.  Add celery, carrots and chicken broth and bring to a simmer.  Add chicken, basil and black pepper.  Simmer for 15 minutes, or until carrot is cooked (feel free to simmer longer if desired!).  

2.  Bring the heat up to a low boil.  Add the dry orzo pasta, and stir in.  Lower heat back to simmer, and simmer soup until orzo is cooked through (about 12-15 minutes).  Add the fresh lemon juice and heat through on low heat. Taste and add salt, if needed.  Serve.
*This post and photos are property of http://dishingwithdish.blogspot.com**

Tuesday, December 31, 2013

Salted Butter Caramel Sauce

carm3W
Let's send 2013 off in a good way, with some delicious salted caramel.  :)  There's an ice-cream place here that I love mostly for their salty-sweet homemade caramel sauce.  I wish it was PC to ask for a cupful of that with a spoon, and to skip the ice cream altogether. Because I totally want to.  But now, I don't have to, because I can make it myself at home, and it's even better!!  I loooove this stuff. Thanks, David Lebovitz.  
carmW
Salted Butter Caramel Sauce
adapted from David Lebovitz

6 tablespoons (85g) butter, salted or unsalted*
1/4 cup (150g) sugar
1 cup (250ml) heavy cream
1/2 teaspoon pure vanilla extract
3/4 to 1 teaspoon coarse salt* (good-quality sea salt or kosher salt)

1.  Melt the butter in a large, deep heavy-duty saucepan or oven.  Stir in the sugar and cook, stirring frequently, until the sugar is a deep golden brown (do not let it get too brown or caramel will taste burnt.)

2.  Remove from the heat, and immediately whisk in half of the cream until smooth.  (Wear an oven mitt, since the mixture will steam and may splatter and bubble up.)  Stir in the rest of the cream, then the vanilla, and salt.  *(If using salted butter, use only 3/4 teaspoon salt.  Up the salt to 1 teaspoon if using unsalted butter.)  If there are any lumps or caramel, whisk the sauce gently over low heat until they are dissolved. (I had quite a big lump that never dissolved, despite my trying.  So I just removed the lump from the caramel when it was all done cooking.)  Serve warm.  

Note:  This sauce can be stored in the fridge for up to 2 weeks.  Rewarm it gently in the microwave or in a small saucepan over very low heat.  
carm4W
**This post and photos are property of http://dishingwithdish.blogspot.com/ **

Monday, December 16, 2013

Caramel Cake

cake4W
I made this for my husband's birthday this year.  I had been looking for an excuse to make this for a long time.  It's an America's Test Kitchen recipe.  The frosting is caramel-y and tastes exactly like penuche fudge- it is so good!  This cake also reminds me of these cupcakes I made a long time ago.  
cakeW
I was saving this cake to make for a special occasion because it had a ton of sugar and almost a pound of butter in it (I'm including frosting here).  It was so worth it though!!!  My husband and I both loved this, as well as my oldest child.  I think it was too sweet for the younger ones.  The recipe calls for dark brown sugar, but I didn't realize that until now (oops, ha ha) and used light brown with great results.  That's probably why my frosting was lighter colored than some others I've seen online.  The recipe also calls for 9-inch pans, but I used 8-inch, so they'd both fit in my tiny oven at the same time.  I think there isn't enough cake to fill 9-inch pans, anyway.  My layers were pretty thin using 8-inch.

I've wanted to make a Caramel Cake ever since reading the book "The Help", so I'm glad I finally took the time to!  I have seen other recipes, but this one looked the best, and not too complicated.

Caramel Cake

Cake:
1/2 cup buttermilk, room temperature
4 large eggs, room temperature
2 tsp vanilla extract
2 1/4 cups (11/4 ounces) unbleached all-purpose flour
1 1/2 c ups (10 1/2) ounces granulated sugar
1 1/2 tsp baking powder
1/2 tsp baking soda
3/4 tsp salt
16 TB ( 2 sticks) unsalted butter, cut into 16 pieces and softened
Frosting:
12 TB (1 1/2 sticks) unsalted butter, cut into 12 pieces and softened
2 cups packed (14 ounces) dark or light brown sugar
1/2 tsp salt (I used sea salt)
1/2 cup heavy cream
1 tsp vanilla extract
2 1/2 cups (10 ounces) confectioners sugar

1.  For The Cake: Adjust an oven rack to the middle position ans heat the oven to 350 degrees. Grease two 8- inch round cake pans and line with circles of wax paper.  Grease the paper, and then flour all. Whisk the buttermilk, eggs and vanilla in a large measuring cup. In a large bowl, mix the flour, granulated sugar, baking powder, baking soda, and salt with an electric mixer on low speed until combined. Beat in the butter, 1 piece at a time, until only pea-size pieces remain. Pour in half of the buttermilk mixture and beat at medium -high speed until light and fluffy, about 1 minute. Slowly add the remaining buttermilk, mixture to the bowl and beat until incorporated, about 15 seconds.
2.  Scrape equal amounts of batter into the prepared pans and bake until golden and a toothpick inserted in the center comes out clean, 20 to 25 minutes. cool the cake in the pans for 10 minutes, then turn out onto wire racks.  Let cool completely, at least 1 hour.
3.  For The Frosting: Heat 8 TB of the butter, brown sugar, and salt in a large saucepan over medium heat until small bubbles appear around the perimeter of the pan, 4 to 8 minutes. whisk in the cream and cook until a ring of bubbles reappears, about 1 minute. Off the heat, whisk in the vanilla.
4.  Transfer the hot frosting mixture to a bowl and, with an electric or stand mixer on low speed, gradually mix in the confectioners’ sugar until incorporated. Increase the speed to medium and beat until the frosting is pale brown and just warm, about 5 minutes. Add the remaining 4 TB butter, 1 piece at a time, and beat until light and fluffy, about 2 minutes.
5.  To Assemble: Place 1 cake round on a platter.  Spread 3/4 cup of the frosting over the cake, then top with the second cake round. spread the remaining frosting evenly over the top and sides of the cake. Serve. (Frosting this cake was a tiny bit challenging, but not too hard.  The issue is that the frosting starts to "set" as you frost it.  You also can't start frosting while it is too hot, or it will melt off.  I just did my best.  As usual, I didn't get enough in the middle layer. You can see my frosting woes in the pic below.)
Note: In step 5, the cooled frosting stays soft and spreadable longer than most recipes, but will harden over time.  If frosting begins to stiffen, microwave it for about 10 seconds ( or until it returns to a spreadable consistency).
cake5W
** This post and photos are property of http://dishingwithdish.blogspot.com/ **

Monday, November 11, 2013

New England Clam Chowder

chow4W
Happy Veteran's Day!  This was a delicious Clam Chowder.  I got the recipe from a cooking friend, and took some of her suggestions while making it.  I made this because my son had been begging for clam chowder for months.  He ate it on both the East and West Coasts during our Summer 2012 trip.  I made this Maine-style clam chowder last year, but it wasn't thick at all.  I wanted to try another recipe (and I guess it took me a while!)  We didn't even eat any clam chowder this last summer in the States; we spent almost the whole time in the Southwest.  It was too hot to eat any kind of soup there!  
chow3W
New England Clam Chowder
adapted from Allrecipes

4 slices bacon, diced
1 1/2 cups chopped onion
1 (8 oz.) bottle clam juice + reserved clam juice from cans
4 cups peeled and cubed potatoes
1 1/2 teaspoons salt
ground black pepper to taste
3 cups light cream OR half-and-half
3 tablespoons butter
3 tablespoons flour
3-4 (10 oz.) cans minced clams, juice reserved

1.  Place diced bacon in large stock pot over medium-high heat. Cook until almost crisp; add onions, and cook 5 minutes. Stir in clam juice (from bottle and cans of clams) and potatoes, and season with salt and pepper. Bring to a boil, and cook uncovered for 15 minutes, or until potatoes are fork tender.

2.  In a small saucepan, melt butter.  Add flour and whisk for a few minutes.  Carefully whisk in one cup of light cream or half-and-half, whisking constantly until thickened.   Into the pot with potatoes, add the rest (2 cups) of the half-and-half or light cream.  Add as much of the roux mixture needed to thicken the chowder to your liking.  Stir clams into the soup. Cook on low for about 5 minutes, or until heated through. Do not allow to boil.
chow2W
**This post and photos are property of http://dishingwithdish.blogspot.com/ **

Monday, April 1, 2013

Mini Pretzel Sliders


Mini Pretzel Sliders
I have no energy to make any April Fool's treats today, but for some ideas, you can see my sidebar to the right.  :)  We're all sweeted out over here anyway, with Easter just yesterday.  I don't want/need to make anymore sweets right now!  And now we're working on ham leftovers.  If you have some too, try these mini pretzel sliders with your ham; I made these a few weeks ago and just used deli ham, but leftover Easter ham would be amazing!  The dough for these comes together very nicely and it's always fun boiling and then baking pretzels.  The way they brown and take on that pretzel taste is just...... awesome. 
Mini Pretzel Sliders
The dough is basically the same recipe I used for these pretzel rolls a while ago.  I left some plain (not made into sandwiches) for any of my kids who would rather not eat them as sandwiches.  They are SO good with the ham, cheese, and spicy mustard, though!

Mini Pretzel Sliders
adapted from Seeded at the Table

4 Tablespoons butter, melted
1 Tablespoon sugar
2 teaspoons kosher salt, plus more for topping
1 1/2 cups warm water (110 to 115 degrees F)
1 package (2 1/4 teaspoons) yeast
22 ounces (about 4 1/2 cups) all-purpose flour
Vegetable oil (nonstick) spray, for pan and bowl
10-12 cups water
2/3 cups baking soda
1 large egg yolk, beaten with 1 Tablespoon water (for egg wash) (I skipped this)
Kosher or large-crystal sea salt
Thinly sliced deli ham or leftover ham
Thinly sliced deli cheese (I used Swiss)
Mustard (use your favorite; fancy is better)
Optional: unsalted butter and garlic salt


1.  In the bowl of a stand mixer, combine the butter, sugar, salt and 1 1/2 cups warm water. Sprinkle the yeast on top. Add the flour and mix with the dough hook attachment on low speed. Once the dough comes together, increase the speed to medium and mix for another 4 to 5 minutes (adding bits of flour as necessary), until the dough is smooth and pulls away from the sides of the bowl. Remove the dough from the bowl, wipe the bowl and then spray with the vegetable oil. Return the dough to the bowl, turning once to cover both sides with the oil. Cover tightly with plastic wrap and let rise in a warm place for approximately 45-50 minutes, or until doubled in size.
2.  Preheat the oven to 450 degrees F. Line two large baking sheets with parchment paper and lightly spray with vegetable oil; set aside.
3.  Bring the 10-12 cups of water to a boil in a large sauce pan or stock pot, then add the baking soda.
Meanwhile, turn the dough out onto a slightly oiled work surface or pastry mat. Divide into 24 equal large pieces (about 1.5 oz each). Shape each into a ball, then place onto the parchment lined baking sheets.
4.  Working with six pretzels at a time, boil each pretzel for 30 seconds. Use a large slotted spoon or spatula to remove from the water and return to the pan. Brush the top of each pretzel with the egg wash (optional) then sprinkle with kosher or sea salt (I just sprinkled salt on the wet dough). Use a sharp knife to gently score a vertical line in the center of each dough ball.
5.  Bake in the preheated oven until dark golden brown, about 10 to 12 minutes, rotating the baking sheets halfway through. Allow to cool on a wire rack for at least 5 minutes.
6.  Preheat oven to broil. Slice each pretzel roll in half and place open-faced on a baking sheet. Lightly butter the top side and sprinkle with garlic salt (optional). On the bottom half, layer a small thin slice of ham and top with a small thin slice of cheese. Repeat with as many of the pretzel rolls you can fit on a baking sheet. Broil, open-faced, for about 2 minutes or until the cheese is melted and the edges of the pretzels are crispy. Remove from oven, let cool until able to handle then spread a little bit of mustard on each top roll and close the sandwiches. Place on serving platter. Repeat with remaining rolls. Serve immediately.

Mini Pretzel Sliders
**This post and photos are property of http://dishingwithdish.blogspot.com/ **

Friday, December 14, 2012

Homemade Sea Salt

salt4W
This is a project my husband and I have been wanting to do for over a year now.  A friend posted about this back then; she had found instructions on Not Without Salt.  After talking about making it, and never doing it, my husband finally stopped to gather some sea water last weekend and started making salt with it right away.  He actually did this all by himself on a Saturday while I was busy with other things.  I saw him doing it, and then the day before yesterday, made a batch all by myself while everyone was at school/work.  It was so fun, and amazing that you can make salt out of only some ocean water! 
IMG_4564_smallW

salt9WWe gathered the water from a secluded, non-populated, rocky beach, pictured above.  My husband is a science guy, and he knew we should visit a beach that was not part of a bay, since bays can trap pollution and other contaminants.  The water here in the Azores always looks so clean and crystal clear anyway.  And when we brought it home and he filtered it, there was hardly anything to get caught in our filter.  (To filter, we used a cloth yogurt- cheese making bag.  But one can use anything set over a strainer- a few layers of cheesecloth, paper towels, coffee filters, even a clean kitchen towel.)

After filtering, you boil the clean sea water on the stove until it drastically reduces (by about 4/5 of the original volume), and you are left visible salt crystals suspended in very little water.

seasalt1W
 
seasalt2W
After that step, you just want to transfer to a glass or ceramic oven-safe vessel and gently dry it out in the oven.  We used our convection oven setting, which is perfect for this, because it blows out hot air and cooks and dries at the same time.  Don't bake at too high of a temperature, or you will scorch the salt.  You can bake until most of the water is gone and then let it air-dry overnight, if you want.  Here, we have so much humidity that the salt actually absorbs MORE moisture if left out overnight, unless we turn our dehumidifiers on.  So that is an option, too- leave out overnight with a dehumidifier.  That way you dry it out without scorching it.  (Photo below is of salt drying in the oven- you can still see a little water left at this point). 
seasalt3W
Have fun with this-it's so cool to make, and the kids love getting involved, as well! Our 8-year old LOVES anything science and helped my husband with the whole process.  Our 6-year old kept saying how we were going to "save so much money" because we didn't have to buy salt at the store anymore!!  Ha ha.  And last night, he tried roasted cauliflower for the first time ever because he knew I used "Daddy's Sea Salt" on it.  He tried it, LOVED it, and ate only that for dinner, even though we were having other things he really liked. 

You can use sea salt for almost any food, but here are some ideas to get you started.  My fave out of that list- Sea Salt Caramels

Homemade Azorean Sea Salt
adapted from Not Without Salt, and other places on the Web

fresh ocean or sea water (easiest to work with 1-2 liters at a time)
a filtering device- cheesecloth, kitchen towels, coffee filters, etc
fine mesh strainer
big pot
ceramic or glass baking dish (not too large)

1.  When gathering your sea water, try to keep the following in mind.  Sea Water for this is best when it comes from an isolated, non-populated, open beach, so, not a bay or lagoon, etc.  Try to find a clean beach, obviously.  Gather a few gallons, if possible; you want to have enough on hand.

2.  At home, set up your filtering device and filter 1-2 liters of water.  My husband just suspended my yogurt-cheese making bag from a pitcher and poured the water through that into the pitcher, then poured it into the pot.  When I made sea salt a few days later, I simply got out the pot I was going to be using, set a fine-mesh strainer over it, and set a clean kitchen towel over that.  I poured the sea water directly into my pot through the filter and was ready to start boiling. 

3.  Boil your filtered water until it reduces to only about 1/5 of the original volume, and you have just a little bit of water with visible salt crystals suspended.  I just boiled on the highest setting on my (induction) stove.  It took less than an hour to reduce enough.  By the time my baby and I had eaten lunch and I had cleaned the kitchen, it was done boiling. 

4.  Transfer everything to a small-ish glass or ceramic oven-safe dish.  Using convection if possible (or just a regular oven), bake at about 250 degrees for 30-60 minutes.  Check on it frequently; you do not want to scorch it.  Bake until all the water has evaporated.  Only salt crystals should remain when you're done.  Let the salt cool.  You can then break it up into smaller crystals or just leave as-is.  (We got a lot of flaky crystals.)  Store in an airtight container. 
salt8W
**This post and photos are property of http://dishingwithdish.blogspot.com/**/