Showing posts with label ice cream. Show all posts

Monday, October 10, 2022

No-Churn Fluffernutter Ice Cream

This is a recipe I meant to post a few months ago, in the summer, but it got away from me. Well, here it is now. :) I love making no-churn ice creams; they are so quick and easy and they whole fam loves them. I took the original recipe, which was 3 ingredients, and added 2 more to make it 5. 
No-Churn Fluffernutter Ice Cream 

adapted from 30 Seconds

2 cups heavy cream

1 can (14 ounces) sweetened condensed milk

1 jar (7 ounces) marshmallow fluff

1/2 cup creamy peanut butter

1/2 cup mini marshmallows

1. Whip the heavy cream until stiff peaks form. Fold in the sweetened condensed milk, marshmallow fluff, peanut butter, and mini marshmallows. Pour into a loaf pan. Freeze until solid; a few hours or overnight.

**This post and photos are property of http://dishingwithdish.blogspot.com/ **

Wednesday, August 3, 2022

Lingonberry-Buttermilk No-Churn Ice Cream


Here's a new recipe for the popular no-churn ice cream. I have a few on my blog, all using a combo of heavy cream and sweetened condensed milk to get a nice ice cream texture without the use of a home ice-cream maker. This recipe is supposed to have strawberry ice cream, but I didn't have any- I had some IKEA Lingonberry jam in the fridge, so I used that instead. Use any of your favorite jam (I think a berry jam would be best here, but go ahead and experiment). The corn syrup in here gives the ice cream a smoother texture- I've never used it in a no-churn recipe before, but I really liked what it did. It did make it pretty sweet, but hey, it's ice cream. 

Lingonberry-Buttermilk No-Churn Ice Cream 

adapted from Cook's Country

2 cups heavy cream, chilled

1 cup (NOT one can) sweetened condensed milk

1/2 cup buttermilk

1/4 cup light corn syrup

2 tablespoons sugar

1 teaspoon lemon juice1/4 teaspoon salt

1/2 teaspoon vanilla extract

1/3 cup lingonberry or strawberry jam

1. Process cream in blender until soft peaks form, 20-30 seconds (less for a Vitamix). Scrape down sides of blender jar and continue to process until stiff peaks form, about 10 seconds longer (less for a Vitamix). Using a rubber spatula, stir in condensed milk, buttermilk, corn syrup, sugar, lemon juice, salt and vanilla. Process until thoroughly combined, about 20 seconds, scraping down sides of blender jar as needed.

2. Pour cream mixture into 8 1/2 by 4 1/2 inch loaf pan. Dollop jam over top and swirl into cream mixture using tines of fork. Press plastic wrap flush against surface of cream mixture. Freeze until firm, at least 6 hours. Before serving, let sit at room temp 5-10 minutes to soften (will freeze very hard). 

                                            **This post and photos are property of http://dishingwithdish.blogspot.com/ **

Saturday, June 20, 2020

Homemade Ice Cream- No Churn (No Machine)


Lately, I've been making lots of ice cream recipes without using an actual ice cream maker. I first posted about this method back in 2013 and posted some flavors one could make. This method is super easy. As long as you can make whipped cream, you can make this recipe. The formula is just 2 cups of whipping cream and one can of sweetened condensed milk, along with whatever add-ins you want to create different flavors of ice cream. I whip the cream in my stand mixer, fold in the sweetened condensed milk, and then add the extras. Stick it right in the freezer- no need to churn this in a machine. 

The first flavor I'll share is the chocolate, marshmallow and pretzel. You could add nuts instead of pretzels to make Rocky Road. This one was my favorite. I just added 1/3 cup sifted cocoa powder when I was whipping the cream. It turned out perfectly. The other flavor I'll share is Mint Oreo- pretty self-explanatory.
Chocolate, Marshmallow & Pretzel No-Churn Ice Cream
By What A Dish!

2 cups heavy whipping cream
1 can (14 oz) sweetened condensed milk (NOT evap. milk)
1/2 teaspoon vanilla extract
pinch salt
1/3 cup cocoa powder
1 cup mini marshmallows
1 cup crushed pretzel pieces

1. Whip the heavy cream until it forms stiff peaks. I used my stand mixer and it's very quick and easy. Add the cocoa powder.  With mixer on low, slowly add the sweetened condensed milk, vanilla and pinch salt. Fold in the marshmallows & pretzels with a rubber spatula. Transfer to a large freezer-safe container and freeze for 6-8 hours or overnight before serving.
Mint Oreo No-Churn Ice Cream
By What A Dish!

2 cups heavy whipping cream
1 can (14 oz) sweetened condensed milk (NOT evap. milk)
1/2 teaspoon vanilla extract
1/2 teaspoon mint or peppermint extract
pinch salt
15-20 Mint Oreo cookies, coarsely chopped (I used the Mint Oreo Thins and they were great)

1. Whip the heavy cream until it forms stiff peaks. I used my stand mixer and it's very quick and easy. With mixer on low, slowly add the sweetened condensed milk, vanilla and salt. Fold in the chopped Oreos gently with a rubber spatula. Transfer to a large freezer-safe container and freeze for 6-8 hours or overnight before serving.
 **This post and photos are property of http://dishingwithdish.blogspot.com/ **

Friday, June 12, 2020

Easy Caramel Sauce


Yum- I loved this caramel sauce.  I have a few caramel sauce recipes on here already, but they're all different and so, so good.  Lol.  This reminds me of this caramel sauce, in that it uses simple ingredients that you just cook together on the stove.  No candy thermometer, no cooking plain sugar alone first, no corn syrup.  It's not grainy, either.  It's perfect.
Easy Caramel Sauce 
adapted from Carlsbad Cravings

3/4 cup butter
1 1/2 cups light brown sugar, packed
2 tablespoons water
1/4 teaspoon salt
1/2 cup evaporated milk plus more as needed depending on desired consistency
1 tablespoon vanilla extract

1.  Add butter, brown sugar, water, and salt to medium saucepan and heat over medium-low heat, stirring until butter melts.

2.  Bring to a boil then reduce to a vigorous simmer, whisking constantly until thickened, approximately 5-7 minutes. The caramel sauce will thickens more as it cools. 

3.  Remove from heat and stir in 1/2 cup evaporated milk (it will bubble) and vanilla. Add additional evaporated milk to reach desired consistency, if needed.
**This post and photos are property of http://dishingwithdish.blogspot.com/ **

Friday, October 26, 2018

Butterscotch & Peanut Butter Hot Fudge (2 recipes)

These hot fudge sauces are SO good!!  They come from Mel's Kitchen Cafe.  She has 3 recipes posted there for hot fudge and I've already made and posted the original flavor, here.  All 3 recipes are stellar.  So delicious, quick and easy, and use mostly pantry ingredients.  (I always keep some Euro shelf-stable boxed cream on hand at my house, so for me, it does use pantry ingredients.)

The first 3 pics are of the Butterscotch flavor; the rest of the pics are of the Peanut Butter flavor.


Butterscotch Hot Fudge Sauce
adapted from Mel's Kitchen Cafe

4 ounces (about 2/3 cup) semisweet chocolate chips
4 ounces (about 2/3 cup) milk chocolate chips
4 ounces  (about 2/3 cup) butterscotch chips
3/4 cup heavy cream
6 tablespoons butter
1/4 cup light corn syrup
1 tablespoon natural unsweetened or Dutch-process cocoa powder
1 teaspoon pure vanilla extract

1.  In a medium saucepan, stir together the chopped chocolate (or chocolate chips), butterscotch chips, heavy cream, butter, corn syrup, and cocoa powder. Heat the mixture over medium heat, stirring constantly, until the chocolate is melted and the mixture is smooth, 3-5 minutes. Don’t let the mixture overheat or scorch! Add additional milk or heavy cream, if needed, for a thinner consistency. Remove the pan from the heat and stir in the vanilla.

Peanut Butter Hot Fudge Sauce
adapted from Mel's Kitchen Cafe

8 ounces milk chocolate chips chocolate chips
3/4 cup heavy cream
4 tablespoons (2 ounces) butter
1/4 cup light corn syrup
2 tablespoons natural unsweetened or Dutch-process cocoa powder
1/3 cup creamy peanut butter
1 teaspoon pure vanilla extract

1.  In a medium saucepan, stir together the chocolate chips, heavy cream, butter, corn syrup, cocoa powder, and peanut butter. Heat the mixture over medium heat, stirring constantly, until the chocolate is melted and the mixture is smooth, 3-5 minutes. Don’t let the mixture overheat or scorch! Add additional milk or heavy cream, if needed, for a thinner consistency.  Remove the pan from the heat and stir in the vanilla.
**This post and photos are property of http://dishingwithdish.blogspot.com/ **

Friday, July 7, 2017

Orange Buttermilk Sherbet

This is a nice, creamy orange sherbet.  The buttermilk adds a slight tang without being really evident. I bought a little European ice cream maker after my other one stopped working and tried this recipe first.  I miss my old machine, as the new one took forever.  But anyway, the whole family loved this and wants me to make it again.
Orange Buttermilk Sherbet
adapted from the Kitchn

1 1/2 cups orange juice
1 cup half-and-half
1/2 cup buttermilk
1/2 cup granulated (white) sugar
1/4 cup light corn syrup
1 tablespoon freshly squeezed lemon juice
1 teaspoon vanilla extract

1.  Chill the ice cream bowl, if needed. If your ice cream machine has a bowl that needs to be frozen before churning, put it in the freezer the night before you plan to make ice cream. (If you forget, you can make the base and refrigerate it overnight while the bowl is freezing, and churn the sherbet the next day.)

2.  Combine all the ingredients in a blender and blend until smooth, about 3 minutes.  Transfer the sherbet base to the bowl of your ice cream machine. Churn until the base has thickened to a consistency somewhere between a very thick milkshake and soft-serve ice cream. In most ice cream makers, this takes about 20 minutes — check the instructions for your particular machine.
3.  Transfer the thickened sherbet to a freezer container. Press a piece of wax paper, parchment paper, or plastic wrap against the surface of the ice cream to prevent ice crystals from forming and freeze until solid, at least 4 hours. The sherbet will keep in the freezer for about 2 weeks before becoming icy.
**This post and photos are property of http://dishingwithdish.blogspot.com/ **

Friday, June 5, 2015

White Chocolate Cherry Ice Cream

 I love David Lebovitz's ice cream book.  We have a cherry tree in our yard (yay! we thought it was an apple tree; lol.) that is full of cherries right now.  Or, was.  It's winding down now.  But anyway, we picked a bunch of them and I wanted to make ice cream.  In his book, there were many good ideas for using cherries in ice cream recipe, but this one jumped out at me because I love white chocolate.
You make a white chocolate custard base, and then cook cherries in sugar and water until they turn into a candy-like consistency.  Let both cool (I did overnight), and use the drained cherries in the ice cream and the leftover syrup on top.  Very good!  


White Chocolate Cherry Ice Cream
adapted from David Lebovitz

For the candied cherries:
1 pound fresh or frozen cherries, pitted (I measure after pitting)
1 1/2 cups water
1 cup granulated sugar
1 Tablespoon lemon juice
1/4 teaspoon pure almond extract

For the white chocolate ice cream:
8 ounces white chocolate, finely chopped
1 cup whole milk
2/3 cup sugar
Pinch of salt
5 large egg yolks
2 cups heavy cream

1.  Cherries: (Make the cherries ahead of time.) In a large heavy saucepan, combine the cherries, water, sugar and lemon juice. Heat over medium to medium high heat, until the liquid starts to boil.

2.  Turn down the heat to a low boil and cook, stirring frequently at first and then occasionally, for another 25 to 35 minutes, until the juice reduces to a thin syrupy consistency. Remove from the heat, stir in the almond extract and allow to cool to room temperature.

3.  Set a strainer over a bowl, and drain the cherries for at least 1 hour before folding into churned ice cream.  Overnight is good, too.  Coarsely chop the cherries or you can keep them whole. Reserve the liquid and store the candied cherries and syrup separately in the refrigerator for up to 2 weeks. To use, fold cherries into ice cream or drizzle the syrup as a topping.

4. Ice Cream Base: Place the chopped white chocolate in a large bowl with a mesh strainer set over top; set aside.

5.  In a medium heavy saucepan, heat the milk, sugar, and salt over medium-low heat until warm. In a separate medium bowl, beat the egg yolks together. Slowly pour the warm milk into the bowl with the egg yolks, whisking constantly, then transfer the mixture back into the saucepan.

6.  Set the saucepan back on the stove and heat the mixture over medium heat, stirring constantly with a heat-proof spatula or whisk, until the mixture thickens slightly. Pour the custard through the strainer over the white chocolate bowl. Stir the strained custard and white chocolate together until the white chocolate is completely melted and smooth. Stir in the cream.  Partially cover the bowl (at first) and chill the ice cream mixture in the refrigerator overnight. The next morning, freeze according to your ice cream maker's manufacturer's directions.

7.  As the ice cream comes out of the ice cream maker, place it into a freezer-safe container and fold in the candied cherries.  Cover, and freeze until hardened (or until desired consistency is reached.  My ice cream had a hard time freezing this time around; not sure why.)

**This post and photos are property of http://dishingwithdish.blogspot.com/ **

Wednesday, May 6, 2015

Siena, Italy

Spring Break was almost exactly a month ago.  I'm just getting to posting about this now, but we went to Tuscany for the first time!  My parents came to visit and we traveled down together.  We only did three days, so we didn't get a ton of time to explore, but we saw Siena, Florence, and Vinci (were Leonardo da Vinci was born), plus a ton of beautiful countryside.  I'll just share the pics from Siena today and do the rest of them in another post.  We just spent a few hours in Siena but enjoyed this beautiful Tuscan town.  (Above: gates of the city of Siena.  You can drive through them and parking is immediately to the right, I think.  Below, view of the city from where we parked.) PS: We were in Siena just one day after Rick Steves was!!!!  :D  Lol.


Siena main plaza, where they do the famous horse races.
**This post and photos are property of http://dishingwithdish.blogspot.com/ **

Thursday, July 3, 2014

Italy! (Food Pics)

We're really enjoying Italy so far.  We arrived about a week and a half ago. We haven't eaten out at very many restaurants, but we've been to a few, and some food stands, and a very nice and huge grocery store. I'll just share some pics of the food we've eaten here, and of food in the grocery stores.  Above is actually leftovers from a very good restaurant we went to on our second day.  We got appys, 1st and 2nd course.  The leftovers are of the 2nd course and veggie sides.  Grilled salmon, swordfish, grilled veggies, and roasted potatoes.  It was sooo good!!  
These are grocery store pastries, but they were unbelievably good!!  I disagree with buying doughnuts in Europe, but my fam doesn't. There are so many other pastries; why choose doughnuts??!!  Lol.  


The previous 4 pics was part of dinner last night; fried calamari, my Quattro Formaggi pizza (my daughter ordered the same), my husband's pizza with raw prosciutto, fresh buffalo mozzarella, and tomatoes, and some of our drinks.  I love the tall skinny soda cans here. The orange Fanta is quite different than Portuguese; it's not nearly as sweet and not as orange because they don't add any food coloring (not sure if Portugal does).  And they have lemon soda and some places have lemon Fanta here... I LOVE lemon soda and so do the kids now!!  
We took the kids out for their first gelato experience (my husband and I had already had some alone.. oops) and they loved it, of course.  I love how beautiful it all is. I got hazelnut (had pistachio before), my sons got Kinder Egg flavor, cookie flavor, and mango flavor.  My husband got Panna Cotta flavor.  
Italian flag Nutella for the World Cup!!!  Plus, mini nutella jars and Nutella to go.  Love it.  I don't love Nutella, but I think I may start to, living here, in its birthplace.  :)  My kids DO love it and have already gone through some of this huge jar, and all of another (small) one we got when we first got here.

The two pics above are of some young Asiago cheese we bought.  It was good; soft and mild.  It's made kind of close to us; in the mountain town of Asiago.  I can't wait to go.

Aisles and aisles of pasta!!  There are SO many kinds!!  These two pics are just the dry stuff; there are whole aisles of fresh refrigerated pasta and then another whole section just for fresh gnocchi.  We love pasta so we're in for a treat.  And I haven't had good gnocchi in such a long time!!  There are whole restaurants here just dedicated for gnocchi.  I think I'm in heaven.  :)
                                                **This post and photos are property of http://dishingwithdish.blogspot.com/ **

Monday, May 19, 2014

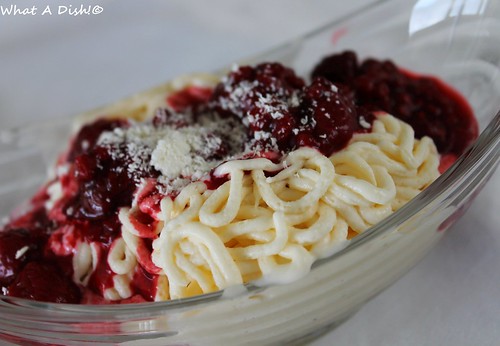
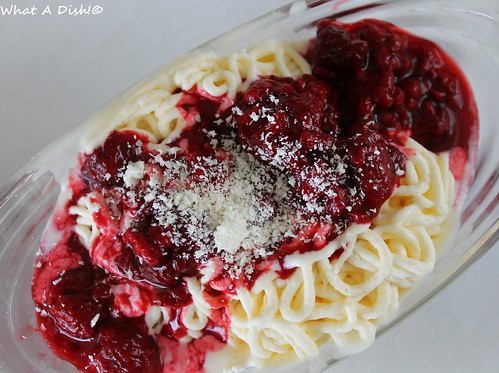
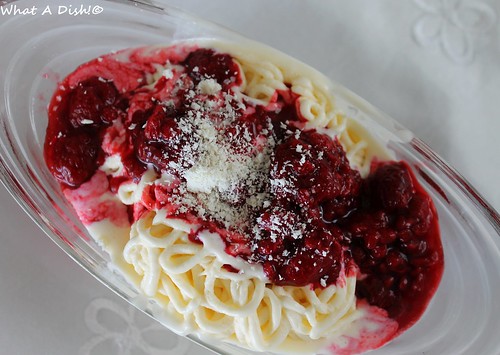
Spaghettieis- German "Spaghetti Ice Cream"

eis1W
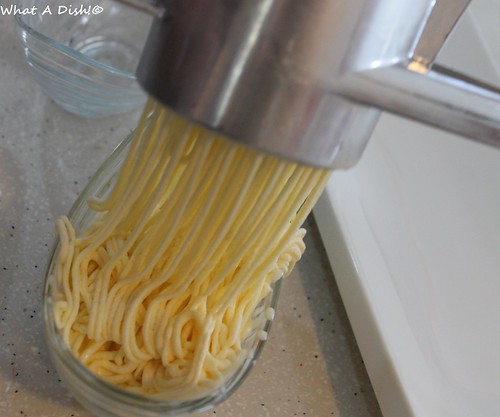
In Germany, there is an ice-cream delicacy called Spaghettieis- there are ice cream parlors in towns that serve this, and other delicious ice cream treats.  It's just vanilla ice cream pressed through a machine, to resemble spaghetti noodles, and topped with red berry sauce (for the spaghetti sauce), and "shaved" white chocolate for Parmesan cheese.  I've never actually had real Spaghettieis, but have seen it in Germany a few times, and wanted to make it at home.  To make it at home, we pushed softened vanilla ice cream through our spaetzle press, pictured somewhere in that post.  
eisW
We actually made this on a day that our freezer got left open all night on accident.  We had softened ice cream on hand, a 1 and a half bags of frozen raspberries, totally thawed out.  It was perfect- we squeezed the ice cream out, topped it with the delicious raspberries and their juice, and grated a white chocolate bar on top using my microplane.  
eis2W
Spaghettieis- German "Spaghetti Ice Cream"
by What A Dish!

vanilla ice cream, softened
frozen raspberries, thawed- juice and all
white chocolate bar
Equipment needed: Spaetzle press

1.  Press the ice cream through the Spaetzle press, into a bowl.  Top with totally thawed raspberries and their juice; top with grated white chocolate bar and serve immediately.  
eis3W
**This post and photos are property of http://dishingwithdish.blogspot.com/ **