Wednesday, November 30, 2011

Bombshell Brownies

These are good brownies, and a very popular recipe on Allrecipes.com.  I first made them years ago, before they were so popular.  ;)  I was actually one of the first 20 (or so) reviewers.  Now, the recipe has almost 2,000 reviews- crazy! 

These turn out absolutely perfect & chewy if you bake them just right- I am a chronic over-baker with the oven I have now.  (Yes, I have an oven thermometer!  I don't wanna talk about it.)  Bake until these are just set; a toothpick should come out with just a few moist crumbs.  If it comes out clean, the brownies are probably a bit too done and won't be nice and chewy.  Even though I baked these a tad too long, they were still really good and stayed good for a few days.  I reduced the sugar from 3 cups to 2 1/4 cups with good results.  This recipe is also good with walnuts added.

We had these as brownie sundaes with friends the same night we had these almond blondies
Bombshell Brownies
adatped from Allrecipes

1 cup unsalted butter, melted
2 1/4 cups white sugar
1 tablespoon vanilla extract
4 eggs
1 1/2 cups all-purpose flour
1 cup unsweetened cocoa powder
1 teaspoon salt
1 cup semisweet chocolate chips

1.  Preheat oven to 350 degrees F (175 degrees C). Lightly grease a 9x13 baking dish.               

2.  Combine the melted butter, sugar, and vanilla in a large bowl. Beat in the eggs, one at a time, mixing well after each, until thoroughly blended.               

3.  Sift together the flour, cocoa powder, and salt. Gradually stir the flour mixture into the chocolate mixture until blended. Stir in the chocolate morsels. Spread the batter evenly into the prepared baking dish.               

4.  Bake in preheated oven until an inserted toothpick comes out clean, 15-30 minutes, or until a toothpick inserted comes out with a few moist crumbs. Remove, and cool pan on wire rack before cutting.               

**This post and photos are property of http://dishingwithdish.blogspot.com/ **

Tuesday, November 29, 2011

Corn Chowder with Smoked Sausage

This soup was very good, filling, and pretty easy as well.  It's supposed to be Cajun-inspired, so I added some hot sauce because I couldn't find my Cajun seasoning.... lol.  I did add some smoked paprika as well.  I also used turkey smoked sausage to cut down on some fat.  1% milk worked well for this recipe, and I used frozen corn instead of canned. 

Corn Chowder with Smoked Sausage
adapted from Allrecipes

1 (16 ounce) package smoked sausage (I used turkey)
1 medium onion, chopped
1/4 cup butter or margarine
1/4 cup all-purpose flour
salt, to taste (remember smoked sausage is salty)
1/8 teaspoon ground black pepper
2 cups frozen corn
4 cups milk
2 cups cubed potatoes, cooked, drained
Chopped parsley (optional)
Shredded Cheddar cheese (optional)

1.  Slice sausages and then cut each piece into 4's.  Melt butter in large saucepan over medium heat. Add onion; cook and stir until tender. Add smoked sausage and cook for a few minutes.  Add flour, salt and pepper; cook, stirring constantly for 1 minute.               

2.  Add milk. Increase heat to medium-high and bring to a boil, stirring constantly. Boil and stir 1 minute. Add corn; return to a boil.  Reduce heat to medium-low and simmer 10 minutes. Stir in potatoes; heat through.  Top each serving with parsley and cheese, if desired.

**This post and photos are property of http://dishingwithdish.blogspot.com/ **

Thursday, November 24, 2011

Slow Cooker Creamed Corn (for Thanksgiving!)

corn2W
Happy Thanksgiving!  This corn was sooooo good!!  I took so many little tastes of this while I was making T-giving dinner; I should have made more!  Ha ha.  I cut the recipe in half, using about 8 oz. of corn, and I used Neufchatel instead of full fat cream cheese.  This was delicious and I want to make it another time when I can enjoy it even more. (We had so much food today!)

Slow Cooker Creamed Corn
adapted from Allrecipes

8 oz (approx.) frozen corn kernels
4 oz. Neufchatel or cream cheese, cut into cubes
1/4 cup salted butter, cut into cubes
1/4 cup milk
1-1/2 teaspoons white sugar
salt and pepper to taste

1.  In a small slow cooker, combine corn, Neufchatel or cream cheese, butter, milk, and sugar. Season with salt and pepper to taste.  Cook on High for 2 to 4 hours, or on Low for 4 to 6 hours.  (I cooked on High until everything melted, and then switched to Low, and then Keep Warm for the last 30 minutes.)       
corn3W
**This post and photos are property of http://dishingwithdish.blogspot.com/ **

Almond Blondies

These were so good.  I overbaked them a bit, but they were still good.  They would have been a little chewier if I had baked them less (I love chewy).  We had them with some friends, as the base of ice cream sundaes (I made brownies, too) with homemade caramel and hot fudge on top. 
I used the rest of my homemade almond paste mentioned here.  I did not have as much as I needed, but these turned out just fine.  I added a little almond extract in here to get some extra almond flavor. 

Happy Thansgiving tomorrow!!  I've already made mini Key Lime Pies (for the kids), Maple Pecan Pie, and Cranberry Sauce.  Tomorrow I'll do everything else- turkey and gravy, taters, stuffing, finish baking my par-baked rolls, and I'm going to try a new (slow cooker) creamed corn recipe.  (Love having three slow cookers!)  And.... throw in some fresh steamed green beans so we don't all die from carb and fat overload. 
Almond Blondies
adapted from Odense

1 cup flour
1 teaspoon baking powder
1/4 teaspoon salt
5-7 oz Almond Paste
1/2 cup chocolate chips
1/4 cup chopped almonds, optional
1 stick (1/2 cup, or 4 oz) butter
3/4 cup light brown sugar
1 large egg
1/2 teaspoon vanilla extract
1/4 teaspoon almond extract

1.  Preheat oven to 350° F. Grease an 8x8 inch baking pan.

2.  Sift the flour, baking powder and salt into a medium bowl.

3.  Grate the Almond Paste (using the large hole side of the box grater) into the flour. Add the chocolate chips and almonds.  Mix well until all the ingredients are coated with flour.

4.  Melt the butter and while still hot, beat into sugar using an electric mixer. Beat on high until sugar is dissolved and mixture is smooth, not granular.  Add egg, vanilla, and almond extract. Beat until well mixed.

5.  Stir in the flour mixture just until incorporated.  Spoon into prepared pan and bake for 25 to 30 minutes, or until slightly golden and toothpick comes out clean.


**This post and photos are property of http://dishingwithdish.blogspot.com/ **

Monday, November 21, 2011

Goat Cheese Rounds for Salad

This is an idea I got from a cooking friend.  This is pretty much the only way I like goat cheese, but it's delicious this way!!  The outside is all crispy, and it's melty and warm on the inside- so good over a salad.  You can dip these rounds into any coating you choose.  This time around, I used a few different ones- Panko bread crumbs, Italian bread crumbs, and plain sesame seeds.  I think I liked the sesame seeds one the best, but the Panko ones were good too (pictured above is a Panko one; below are the rounds before sauteeing.  You can make these ahead- just get them ready and ready to sautee.  When ready to cook, just take them out of the fridge and sautee in hot olive oil).

Goat Cheese Rounds for Salad

4-8 oz goat cheese rounds (I use 4 oz. and get 6 rounds)
1 egg white
Panko or Italian bread crumbs for topping, OR sesame seeds
olive oil

1.  Cut goat cheese into rounds- make sure it is very cold.  It still might crumble.  Just press it back together with your hands- it is very easy to shape.

2.  Place crumbs or sesame seeds in a shallow bowl.  Beat egg white in another shallow bowl, and dip each round into egg white.  Then, dip the round into coating of choice.

3.  Heat olive oil to medium heat.  Sautee goat cheese rounds until browned on both sides.  Cast-iron works well for this!  :)  Let cool slightly, draining on paper towels, and serve as toppings for salads. 
**This post and photos are property of http://dishingwithdish.blogspot.com/ **

Sunday, November 20, 2011

Eat Your Veggies!

These cupcakes were so fun to make!!  My daughter had friends over, so all of the kids got involved in decorating these.  We did "Peas and Carrots", "Mashed Potatoes", and "Corn on the Cob".  The peas are Chewy Sweet Tarts that I bought locally, the carrots are orange Starbursts, quartered, the mashed potatoes are just white frosting, the butter is a yellow starburst, and the gravy is purchased caramel sauce! 

Thanks to the Hello, Cupcake book for all of these ideas- love that book!  This book has also provided awesome recipes for Goldfish Cupcakes, Spaghetti & Meatball Cupcakes, and my 1st attemp at Corn Cupcakes (scroll down).  On the Corn Cupcakes, the kernels are Jelly Belly Buttered Popcorn flavor with a handful of other yellow flavors thrown in, the butter is a yellow Starburst softened in the microwave, and the "pepper" (on the mashed taters, as well) is black sugar I had on hand from a Halloween sprinkles kit. 

I used my favorite cupcake recipe for these- using Greek yogurt.  It's the same one I've used for other cupcakes I've made from this book.  The recipe makes 15 cupcakes.
Mashed Potatoes Cupcakes

For each cupcake:
cupcake, baked in silver foil liner
3 Tablespoons vanilla frosting
1 yellow Starburst candy
Storebought caramel syrup
Black sugar, optional

1.  Spread vanilla frosting on cupcake, mounding it slightly. Use a small spoon to create a well in the center of the frosting. Place cupcake in aluminum baking tray, if desired. Place yellow fruit chew in the well at an angle. Drizzle caramel sauce on top of cupcake so that it fills the well and spills over like gravy.  Top with black sugar "pepper" if desired.
Peas and Carrots Cupcakes

For each cupcake:
3 orange fruit chews, such as Starbursts®, cut into 1/4-inch cubes
2 tablespoons Vanilla Frosting
Green gel food coloring
2 tablespoons green candies, like Chewy Sweet Tarts, Skittles or M&M’s

1.  Color vanilla frosting with green food coloring and spread on top of cupcake. Arrange orange fruit chews and green candies on top of cupcake, pressing them into the frosting. Place cupcake in aluminum baking tray (if desired).

Corn on the Cob Cupcake
from Hello, Cupcake

cupcakes, baked in pale yellow liners
pale yellow frosting
white and yellow Jelly Belly jelly beans (buttered popcorn flavor works well)
yellow Starburst
black decorating sugar

1.  For each ear, press rows of jelly bean kernels onto three frosted cupcakes. Line up the cupcakes and sprinkle decorating sugar across the tops.

2.  To make a candy butter pat, microwave a Starburst for about eight seconds, stretch it into a melted-butter shape, then set it on top of the center cupcake.

3.  Add a corn holder to each end of the cob, and serve.  (I could not find my corn-cob holders, but these were fine without them.)
Yogurt Cupcakes
Adapted from Allrecipes
Makes 15 cupcakes

1/2 cup butter, softened
1 cup sugar
1 whole egg
1 egg yolk
1/2 teaspoon vanilla extract
1-3/4 cups all-purpose flour
1/2 teaspoon baking soda
1/4 teaspoon baking powder
1/4 teaspoon salt
1 cup plain, Greek-style yogurt, or sour cream

1. Preheat oven to 350 F. Line 15 muffin cups with paper liners.

2. In a mixing bowl, cream butter and sugar. Beat in eggs, one at a time. Add vanilla; mix well. Combine dry ingredients; add to creamed mixture alternately with Greek yogurt sour cream (batter will be thick). Fill greased or paper-lined muffin cups with 1/4 cup of batter.

3. Bake at 350 degrees F for 15-25 minutes or until a toothpick inserted near the center comes out clean. Cool for 10 minutes; remove to wire racks to cool completely.

Easy Butter Frosting
by What a Dish!

1/2 cup salted butter, softened
1 pound powdered sugar
1 tsp. vanilla extract
milk, as needed for desired consistency (1-4 tablespoons)

1.  With electric beaters (or in stand mixer) combine first three ingredients.  Gradually add milk, beating until desired consistency is reached.
**This post and photos are property of http://dishingwithdish.blogspot.com/ **


Friday, November 18, 2011

More Hot Fudge Sauce

A while ago, I bought a small container of light cream with this recipe in mind.  Well, I never got around to making it.  I had to use the cream in something else before it spoiled, so I chose hot fudge sauce, because I could make it and store it in the fridge and not have to eat it right away.  Although, I had to take a photo, so of course I ate the ice cream and hot fudge (above) after I was done! 

I'm glad I had that cream to use up, because this is delicious!  It rivals my favorite hot fudge in both taste and simplicity. 

I made the whole recipe on the stove, not using the microwave, as the original recipe suggests.  There will be a point where it looks all grainy, separated, and weird, but just get out your whisk.  Whisk the heck out of it, and it'll come together all nice and smooth for ya.
Creamy Hot Fudge Sauce
adapted from Allrecipes

4 (1 ounce) squares unsweetened chocolate
1 cup white sugar
1/8 teaspoon sea salt
1 tablespoon butter
1 cup heavy or light cream
1/2 teaspoon vanilla extract

1.  In a heavy-bottomed saucepan over low heat, melt chocolate until mostly melted.  Stir in sugar, salt and butter.   Whisk in cream, a little at a time until smooth. Heat through, without boiling, then remove from heat and stir in vanilla. Serve warm, and store in refrigerator.  Can re-heat, gently, in the microwave.

**This post and photos are property of http://dishingwithdish.blogspot.com/**/
               

Wednesday, November 16, 2011

Yorkshire Pudding

We had these Yorkshire Puddings with this Pot Roast a few weeks ago.  These are little savory puffy thingies made from a flour-milk-egg batter, cooked in oiled or buttered muffin tins, and served up with roast beef and gravy.  It's a British (English) recipe, traditionally using beef drippings instead of butter or oil.  My husband and I love these, but my kids seem wary of them for some reason, so I'll wait a little bit before I make them again, just because this makes so many (12).  Though I might try halving the recipe at some point.  (Maybe using a yolk for the 1/2 egg).
Yorkshire Pudding
adapted from Allrecipes

3 eggs
1 cup milk
1 cup all-purpose flour
2 tablespoons butter*

1.  Preheat oven to 375 degrees F (190 degrees C).  In a medium bowl, beat eggs with milk. Stir in flour. Set aside.               

2.  Divide butter evenly into the twelve cups of a muffin tin, about 1/2 teaspoon per cup. (*See below).  Place tin in oven to melt butter, 2 to 5 minutes. Remove tin from oven, and distribute batter evenly among buttery cups.

3.  Bake in preheated oven 5 minutes. Reduce heat to 350 degrees F (175 degrees C), and bake 20-25 minutes more or until puffed and golden.      
         
*To easily divide butter:  Use cold butter.  Cut into 2 separate tablespoon slices using the markings on butter wrapper.  Now, cut each slice into 6 equal pieces, equaling 12 total.  Drop one piece into each muffin cup. 

**This post and photos are property of http://dishingwithdish.blogspot.com/**/

Slow Cooker Pot Roast

This is a recipe I would have totally avoided in the past, because it calls for "cream of something" soup.  But, thanks to Pacific Natural Foods, now I have access to an all-natural, made-with-quality-ingredients cream of chicken soup and it's opened up a whole new world, recipe-wise!  I'm not going to cook with this every day or anything, but it's SO nice to have this in my pantry to whip up super fast and easy meals, like this pot roast.  I also used it for this Poppyseed Chicken Casserole.  Having these recipes on hand has been a life-saver lately with a new baby that wants to be held (and/or eating) pretty much all the time.   (PS:  I prefer using Cream of Chicken instead of Cream of Mushroom and it still works wonderfully for this recipe.)  (PPS:  This is not an ad for Pacific Foods!  Ha ha.)

I've done my share of slow cooker beef roasts in the past, but they were always lacking a bit in flavor.  I had never seared the meat first before- that's why!  Seriously, searing all sides of your hunk o' meat makes SUCH a difference, flavor-wise.  I use my cast-iron and it's a beautiful thing, this searing.  The meat doesnt' stick to the cast-iron, and cast-iron is just wonderful for searing.  How many times can I stay "searing" and "cast-iron" in one paragraph??  Hmmm......

I've made this roast a handful of times since discovering good ol' Pacific Foods Cream Soups, and the last time I made it, I de-glazed my cast-iron pan with a bit of water (after SEARING!) and added it to the crockpot.  It added even more flavor!  I've made this recipe 3 times in the past month and a half.... before this recipe, I hadn't made a roast in like 4-5 years!

I add a bunch of cubed potatoes to this dish; they are wonderful.  When you put the veggies, meat, and then the cream soup in, you'll think there's no way there will be enough "juice" or gravy out of what is in there.... but just turn on your crock-pot and walk away, because magic will happen and you will have a delicious, tender and flavorful roast, perfectly cooked veggies, and plenty of gravy to ladle over everything!  My fam loves this with some steamed peas on the side. 

I find that I don't need to cook it as long as the original recipe says; the first time, I cooked in on High for about 2 hours, and then low for 2-3 more, and I used a meat thermometer to see if it was done, and it was cooked to perfection in that time.  Last time, I just cooked it on high the whole time (about 4-5 hours) and again, it was perfect.  It probably won't hurt to let it go longer and lower (instead of High), though, if you want.  And remember that all crockpots cook differently!
Slow Cooker Pot Roast
adapted from Allrecipes

2-3 pounds boneless beef roast
1 teaspoon olive oil
salt and pepper to taste
1 onion, peeled and quartered
1 pound bag baby carrots
3-4 medium potatoes, washed, unpeeled, and cubed
1 (12 oz.) box natural condensed cream of chicken OR mushroom soup
4 cloves garlic, minced
2 tablespoons chopped fresh parsley, optional

1.  In a large skillet (cast-iron is good!) over medium high heat, saute the roast in the oil for 15 minutes, or until all sides are well browned. Season with salt and pepper to taste and set aside.               

2.  Place the onion, carrots, potatoes, garlic and parsley in the bottom of a slow cooker. Place the roast on top of the vegetables and pour the soup over the roast and the vegetables.  Cover the slow cooker and cook on low setting for 8 to 10 hours, or on high for about 4-5 hours, stirring once.  Checking the temperature with a meat thermometer is a good way to ensure it is cooked through, especially if you cook it for the shorter amount of time. 

3.  Transfer roast to a serving platter and place the vegetables around it. Pour the roast gravy from the slow cooker into a gravy boat (if you own one of those things). 

**This post and photos are property of http://dishingwithdish.blogspot.com/**/

Monday, November 14, 2011

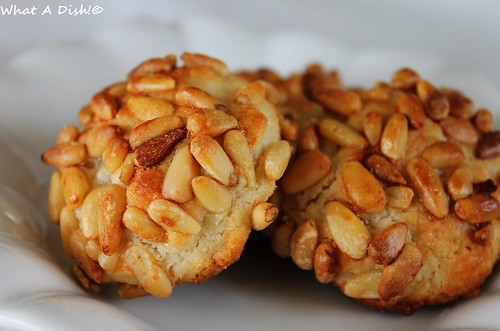
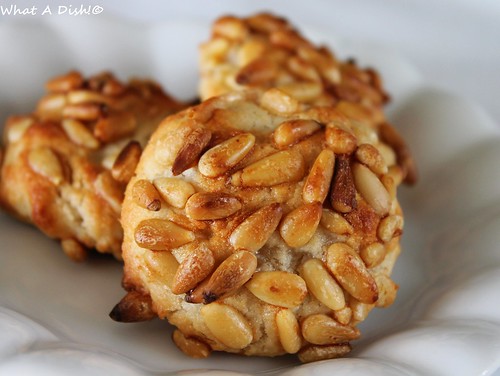
Pignoli Cookies + Homemade Almond Paste

pignoli2W
I loooooove these cookies!!!!  They are so good- some of my favorite cookies ever.  Chewy inside, firm on the outside, and the nice crunch of pine nuts.  I toasted my pine nuts first, but the toasting went a little overboard because I thought I had a few minutes for a bathroom break.... oops.  It turns out they toast in the oven anyway though, so you don't really need to.  I can't buy almond paste here, but never fear, because I made my own quite easily with ground almonds, powdered sugar, and egg whites.  I used my food processor to make the almond paste first (a few days before making the actual cookies) and then used it again to make the actual cookies.  Sadly, my food processor died while I was making the cookies.  :(  I don't think the dough was really to blame, but the fact that my food processor is about 6 years old now.  :(  Poor food processor (and me). 

I'm not sure if these cookies are authentic Italian or Italian-American, but either way, they are delicious.  :) For the almond paste, I just used purchased pre-gound almonds.  You can grind them yourself, if you want, OR just use purchased almond paste.  It is fun to make it yourself though, and you control the ingredients.  Also, my Almond Paste recipe makes one pound (16 oz); you only need 12 oz. for the Pignoli cookies.  You can use the rest of the Almond Paste in another recipe.
pignoli1W
When making the Pignoli dough, just add one egg white first and see how that is- you want a firm, almost stiff, but not dry, dough.  Mine was too wet at first- maybe because of the homemade almond paste, but I added 1-2 more tablespoons ground almonds and it fixed it.  It was still a bit too wet- hence the spreading, but it still worked ok and they tasted great.  I think they're supposed to look like these Spanish cookies- a little more mound-like.  Anyway, start with one egg white, then add half of the other one, and the rest of that one if needed.  Also, sticking the dough in the fridge helps to firm it up a little. 

Note: I made these again May 2014 and took some new photos (first two pics above; the photo below if from original post) and used only one egg white so they didn't spread as much.  I didn't bother toasting the pine nuts first, either, and it was fine.
Pignoli Cookies
adapted from Allrecipes

12 ounces almond paste
1/2 cup white sugar
1 cup confectioners' sugar
2-3 egg whites, divided use
almond extract, to taste, optional
1 1/2 cups pine nuts (I just used 1 cup)

1.  Preheat oven to 325 degrees F (165 degrees C). Line 2 cookie sheets with parchment paper.               

2.  Mix almond paste and granulated sugar in food processor until smooth. Add confectioners' sugar and 1 egg white; process until smooth.  If you think the mixture needs another egg white (or part of one) add one until the right texture is achieved.  If desired, add some almond extract at this point.

3.  Whisk remaining  egg white in small bowl. Place pine nuts on shallow plate. With lightly floured hands roll dough into 1 inch balls. Coat balls in egg whites, shaking off excess, then roll in pine nuts, pressing lightly to stick. Arrange balls on cookie sheets, and flatten slightly to form a 1 1/2 inch round.               

4.  Bake 12 to 15 minutes in the preheated oven, or until lightly browned. Let stand on cookie sheet 1 minute. Transfer to wire rack to cool.
Homemade Almond Paste
from Food
makes one pound

8 ounces almonds, blanched and very finely ground (OR 8 oz. pre-ground almonds)

8 ounces powdered sugar
1 egg white 

1.  Grind your almonds in a food processor, if you don't have pre-ground almonds.  Add add the sugar and grind.  Gradually add your egg white while running the food processor.  Process until firm and smooth.

2.  Stores in the fridge for a while (a few weeks, I think).


**This post and photos are property of http://dishingwithdish.blogspot.com/ **

Saturday, November 12, 2011

Lebanese Meatballs (Dawood Basha)

I really don't make meatballs very much, but there was that Spanish Meatball Soup recently, and I've had my eye on this recipe for a long time!  (I guess I'm just attracted to exotic meatball recipes from other countries, lol.)  Anyway, I'm glad I finally took the time to make these Lebanese meatballs, because they were so good!  I loved the rice too- a nice, buttery Basmati.  I loved the mix of spices in them (cinnamon and allspice), and the carmelized onions and the pine nuts. 

You must make the meatballs tiny; the size of marbles.  Just allot yourself some time for this part; it is fairly easy, just time-consuming.  The kids (all of them) loved this dish and especially loved how small the meatballs were. 

After making these, I realized the recipe called for beef and not ground beef, like I had thought; however, I did use ground beef and it turned out well. 
This recipe comes from the blog Taste of Beirut; I have a lot more recipes from that blog bookmarked to make; everything looks so good!  It is a joy to look at.  :)

Lebanese Meatballs (Dawood Basha)
slightly adapted from Taste of Beirut

1/2 pound of beef, 96% lean
1 small onion+ 2 large onions
1 egg yolk (optional)
1/3 cup of pine nuts
3 tbsp. of tomato paste
2 cups of beef stock or chicken stock
1 1/4 cup of Basmati rice
1/2 lemon, juiced
3 tbsp. of butter (for the rice)
Spices: 1/2 tsp. of salt, 1 tsp of cinnamon and 1/2 tsp. of allspice or 1 1/2 tsp. of seven-spice

1.  Soak the rice in warm water with a dash of salt for 30 minutes or longer (after rinsing it a few times under running water)

2.  Chop the small onion and douse it in salt and let it spit out its water for a few minutes. Place the meat in the food processor, add the spices, egg yolk, drained onion and process until smooth. Form marble-sized balls and either bake them in the oven for 5 minutes at 350F or pan-fry them.  (I baked them.  And.... I made the meatballs ahead of time to cut down on prep time closer to dinner.  I formed the meatballs and placed them onto a foil-lined baking sheet (I lightly greased the foil) and stuck it in the fridge-covered w/plastic wrap.  When ready to bake, just heat the oven and bake them!  Or, pan-fry in hot oil when ready). 

3.  Slice the large onions in rings and pan-fry them in some olive oil until translucent and golden; add the meatballs and 2 cups of beef stock along with the tomato paste (if desired). Let the mixture simmer gently for 25 minutes until the liquid is reduced and thickened and the meatballs are thoroughly cooked.

4.  Pan-fry some pine nuts in a little butter and add to the meatballs at the end.

5.  Drain the rice and boil in several cups of water till tender. Drain and rinse the rice. Place 2 tablespoons of butter in the pan and let the butter melt, add 1/4 cup of water to the butter. Place the rice over the butter and water and with the handle of a wooden spoon, dig holes in the rice in 3 places; cover the pan and let the rice steam for 30 minutes (my water was all gone in about 10 minutes, so I just took it off the stove then), first on medium-high heat, then on very low heat. Uncover after 30 minutes to check and add more butter to the rice if desired. Serve with the meatballs.

**This post and photos are property of http://dishingwithdish.blogspot.com/ **

Thursday, November 10, 2011

Creamy Pesto Pasta

We had this super easy, tasty pasta dish last week.  I love dishes where the only "cooking" is boiling some pasta.  You do need your blender for this.  When adding the broth to the cream cheese (Neufchatel) mixture, start with 1/2 cup and add more as needed; mine was a bit thin with the whole cup in there.  Also, next time I'd do 14oz. or so of pasta instead of a full pound, so there's more sauce. 

If you want meat with this, some lemon-garlic grilled chicken would be good.  We just had it with steamed, lemony-buttery broccoli.  I used the last of my beloved wagon-wheel pasta for this.  The kids loved this, and had the leftovers for lunch the next day.  I also used some homemade pesto I had stashed in the freezer.  See the original recipe for a fresh tomato topping recipe; we just topped ours with plain chopped tomatoes because of lazyness on my part. 

Creamy Pesto Pasta
adapted from A Little Less Meat

14 oz (or so) favorite short pasta shape (wagon wheels, radiatore, mini shells, etc)
1 cup veggie or chicken broth
6 Tablespoons (more or less) prepared basil pesto
8 oz. Neufchatel cream cheese (softened)

1.  Boil pasta according to package directions and drain.

2.  Meanwhile, combine the broth (start with a half cup; add more if desired), pesto, and softened Neufchatel in a blender and blend until smooth.  Pour the sauce over the cooked pasta and toss to combine.  Top with fresh tomatoes if desired.

**This post and photos are property of http://dishingwithdish.blogspot.com/**/

Wednesday, November 9, 2011

Chocolate Fondue + Yummy Pound Cake Recipe

Last weekend, my husband and I went on a lunch date to a local restaurant.  We got the daily special (steak with an egg on top!  Oh yeah!  Plus the typical double carbs of rice and fries, lol).  Anyway, we decided to share a dessert.  White chocolate fondue was on the menu, but they were out, so we went with chocolate (it was called "Brown chocolate fondue" on the menu, lol).  It was very good, and served with bananas, grapes, and fresh pineapple.  As we were eating it, my husband and I were talking about how our kids would have loved this as well.  We decided to go purchase some ingredients and make it with them the next day (although- the recipe I used is so easy I already had everything on hand; we just needed some more fruit).  I really want to make white chocolate fondue sometime, by the way, it sounds so good!  That will be our next fondue adventure. 

PS:  We just used our metal barbecue skewers for our fondue dippage.... ha ha ha!  Elegant... that's what we are. 
We had this on a lazy Sunday night.  Instead of a "real" fondue recipe, I just used my go-to, never-fail, favorite, delicious, hot fudge sauce recipe.  It's easy, smooth, creamy, and delicous!  It was absolutely perfect for using as fondue.  I used mini chocolate chips, which helped it melt faster.  It was seriously done in like 5 or 6 minutes.  My kids LOVED this.  For dippers, we used fruit, large and mini marshmallows, pretzel sticks, and cubed pound cake.  I'll post that recipe below; it was from my Southern Living Cookbook.  I made a half recipe in a loaf pan so it was easy to slice into cubes.  It had the perfect pound cake texture and was wonderful for dipping- firm, easy to cut, and not crumby.
Chocolate Fondue (or Hot Fudge Sauce)
original post here

1 (12 ounce) can evaporated milk
1 (12 ounce) package semi-sweet chocolate chips (mini works best here)
1/2 cup sugar
2 tablespoon butter
1 teaspoon pure vanilla extract

1.  Place milk, chocolate chips and sugar in a medium saucepan. Heat to boiling over medium heat, stirring constantly. Remove from heat, and stir in butter and vanilla (sauce will thicken while it is cooling). Serve warm with dippers- assorted fruit, cubed pound cake, Nilla Wafers, pretzels, marshmallows, etc.  (Leftovers will store nicely in fridge for quite a while). 
Old-Fashioned Pound Cake
Note:  This is a half-recipe

1 cup butter, softened
1 1/4 cup + 2 Tablespoons sugar
3large eggs
1 3/4 cup + 2 Tablespoons cups all-purpose flour
pinch salt
1/4 cup milk
1/2 tsp. vanilla extract

1.  Beat butter at medium speed with an electric mixer 2 minutes or until creamy. Gradually add sugar, beating 5 to 7 minutes. Add eggs, one at a time, beating just until yellow disappears.

2.  Combine flour and salt in a large bowl; add to butter mixture alternately with milk, beginning and ending with flour mixture.

3.  Mix at low speed after each addition just until mixture is blended. Stir in vanilla. Spoon batter into a greased and floured 8 or 9 inch loaf pan. 

4.  Bake at 325 degrees for 45-60 minutes or until wooden pick inserted in center comes out clean. Cool in pan on a wire rack 10 to 15 minutes; remove from pan, and cool completely on wire rack.

5.  After cooling, if using for fondue, cut into thick, 1-inch cubes.
**This post and photos are property of http://dishingwithdish.blogspot.com/ **

Monday, November 7, 2011

Homemade Refrigerator Pickles- Two Ways

Here are two easy, quick, and non-canning pickle recipes.  I love that I don't have to know how to can in order to make pickles!  First up is Dill Pickles (the long spears).  These are so quick and easy to make, and they're crunchy and tasty.  My kids loved these and ate them very quickly.  And, I know everything that went into them, so no food coloring or un-natural preservatives.  I'll post the Dill Pickle recipe first, and after that will be the sweeter, Bread and Butter type picks (those are the round ones; cut into "coins".

Pictured below are my pickle spears stored in an old Classico Pasta sauce jar..... lol.  Ghetto pickles!  I need to get some cute jars. 
Refrigerator Dill Pickles

1-1/2 cups distilled white vinegar
3 tablespoons sugar
3 teaspoons kosher salt
1 teaspoon coriander seeds
1/2 teaspoon mustard seeds (I used brown mustard seeds)1/2 teaspoon fennel seeds
1-1/2 cups water, plus extra
4 Kirby cucumbers (or more, if desired), about 1 pound total
1 jalapeƱo pepper, sliced into thin rings (I used a pickled jal.)
3 to 4 cloves garlic, coarsely chopped
12 sprigs fresh dill (plus more, if desired)

Special equipment: 2 wide-mouthed jars tall enough to accommodate the cucumber spears.

1.  Combine vinegar, sugar, salt and coriander, mustard and fennel seeds in a medium sauce pan. Bring the vinegar to a boil over medium high flame, stirring frequently, until sugar and salt dissolve. Remove from heat and cool completely.

2.  Wash and dry the jars. Rinse the cucumbers carefully and pat them dry. Quarter the cucumbers lengthwise and pack slices into the jars. Divide the chopped garlic and jalapeƱo slices between the jars, tucking between the cucumber slices. Tuck 6 sprigs of dill into each jar.

3.  Add 1-1/2 cups of water to the vinegar. Divide vinegar mixture between jars, making sure the seeds get divided as well. If necessary, add a little water to completely submerge the cucumber slices.  Close jars tightly and shake to mix in added water. Refrigerate at least 24 hours before eating. Pickles should keep up to a month refrigerated.

Sweet Bread-and-Butter Pickles
from Savoring Time in the Kitchen

1 cup white vinegar
1 cup granulated sugar
1 cup water
1-2 teaspoons celery seed (I use 2)
1 teaspoon salt

3 cups sliced cucumber
1-3 small onions, thinly sliced (if desired)

1. Place sliced cucumber and onions in a large container or bowl. In a separate bowl, stir vinegar, sugar, water and salt together until dissolved. Add celery seed. Pour mixture over cucumber and onions and refrigerate.  Keeps for 2-3 months.
**This post and photos are property of http://dishingwithdish.blogspot.com/ **

Sunday, November 6, 2011

Spanish Bread

We had this Pan De Horno with our Spanish Meatball Soup.  It was good, so easy to make, and the dough itself is very simple.  The bread is crunchy on the outside and soft on the inside.  I have not been to Spain for 10 years now, so I don't remember the bread exactly, but I think this is pretty close.  This is supposed to be an authentic recipe from a panaderĆ­a and we really enjoyed it.  I used one cup of whole wheat pastry flour.
Spanish Bread
from Food

3/4 tablespoon of bread yeast
1 1/2 cups warm water
3 1/2 cups flour, unbleached (can use 1 cup ww pastry)
1 teaspoon salt
2 tablespoons extra virgin olive oil

1.  Mix the yeast in the warm water let sit in a warm place for 10 minutes.  Mix in the oil and add the salt and most of the flour.  Knead, adding more flour if necessary, until dough is firm, smooth and elastic. 

2.  Grease a bowl and place the dough in it.  Cover the bowl with a moist sheet and set in a warm place until the dough has doubled in volume.

3.  Once again, knead it again over a floured tabletop (or just in the rising bowl, like I did), to remove air pockets and until the dough feels smooth. Return the dough to a covered bowl and let it rest, 15 minutes should be sufficient.

4.  Cut the dough as desired to form loafs or rolls and place on greased pans.  Cut slits in top of bread as desired.  Let bread raise on pans 30 more minutes or until the tops of the loaves begin to flatten.

5.  Place in a very hot oven (450 degrees F) for 20 to 40 minutes, or until the tops of the loaves become toasted and they sound hollow when knocked on the bottom. Remove the bread from the pans and let cool.


**This post and photos are property of http://dishingwithdish.blogspot.com/ **

Saturday, November 5, 2011

Catalan (Spanish) Meatball Soup

This recipe- Sopa de AlbĆ³ndiguillas Catalana- is yummy and a little bit different- a brothy, tomato-y soup filled with pasta and small pork meatballs, and flavored with fresh mint and white pepper.  I decided, once again, that I needed to make more recipes from my Spanish cookbooks.  This recipe looked fun and easy enough. 

This recipe comes from Catalonia, Spain- the Northeastern part of the country.  Like many countries, the cooking of Spain is very regional, so even though I lived there, I never came across (or noticed) a soup like this.  If you don't like white pepper (the taste is very distinct here), just substitute black.  If you can't find fideos noodles, you can use broken vermicelli.  I used all ground pork for this- make sure you buy plain ground pork and not sausage.  Also, I didn't bother peeling my tomatoes.  I kinda sorta removed most of the seeds, though.  I usually don't worry too much about stuff like that.

I made a very simple Spanish bread that we enjoyed with this; I'll share that recipe later.
Catalan (Spanish) Meatball Soup
adapted from Spanish Country Kitchen

5 cups chicken stock
2 tablespoons tomato puree
4 tomatoes, seeded and finely chopped
1 cup fideos noodles,
fine sea salt and freshly ground white pepper
mint leaves, to serve

Meatballs:

8 oz. ground pork
8 oz. ground beef or veal (can use all pork OR all beef- 1 lb.)
1 small onion, peeled and grated
1 garlic clove, crushed
1 egg, beaten
1 tbsp chopped fresh mint
2 tbsp chopped flat-leaf parsley
1 tbsp fresh breadcrumbs
A pinch of cinnamon
Sea salt and freshly ground black pepper
Plain flour for dusting
2 tbsp olive oil for frying

1.  To make the meatballs, put the ground meats in a bowl with the onion, garlic, egg, mint, parsley, breadcrumbs, cinnamon and seasoning.

2.  Using your hands, mix into a smooth paste, then make into 1.5cm (½ inch) balls.  Coat lightly in flour. Fry the meatballs in hot oil to give a little colour and to firm up, shaking the pan to ensure even colour and to stop them sticking. 

3.  Put the stock in a large pan and bring to the boil, add the tomato purĆ©e, tomatoes and fideos or vermicelli and seasoning. Add the meatballs and simmer gently for about 5 minutes until the noodles and meatballs are cooked through.

4.  Scatter with mint and parsley leaves to serve.
**This post and photos are property of http://dishingwithdish.blogspot.com/ **

Friday, November 4, 2011

NY Times Olive Oil Granola

Wow- I absolutely loved this granola.  This love made me feel guilty about "cheating" on my first love, "The Granola", but after making The Granola regularly for the last 5+ years, I got the itch to try a new recipe and was so glad I did!  (I still love you, first love Granola.  It's ok). 

I was intrigued, first of all, by the use of olive oil in this recipe.  There was actually so much olive oil in here that I had to add an extra cup of oats because the mixture was so wet.  Next time, I would try 1/3 cup olive oil instead of 1/2 cup.  This recipe calls for 3/4 cup of maple syrup- I used 1/2 cup maple syrup and 1/4 cup agave nectar (trying it out for the first time).  I totally forgot to add the 1/2 cup brown sugar and was glad, because it was plenty sweet with all of that maple syrup and agave nectar.  I will omit that from the recipe posted below.

I LOVED the pistachios, pepitas (hulled pumpkin seeds), cinnamon, and especially cardamom in this!  The flavor combo was SO good!!  You might notice the almonds in the photo- that's because I ran out of pistachios and had to use part almonds/part pistachios.  I've since bought more pistachios, so next time (and it will happen soon), I'm going to use 1 cup raw pistachios and 1/2 cup whole almonds, because I really do like almonds in my granola.  After baking (and after taking these pics), I added some dried cranberries to this (instead of the dried apricots called for). 

In the recipe below, I changed the oats amount from 3 to 4 cups.  I also suggest you start out with 1/3 cup olive oil and add a bit more if needed.  PS:  I made this over a month ago when I could still get a few good nectarines here and there.  :(  Those days are over!  Waaaah!

Note:  If your oats are gluten-free, this granola is a gluten free food!  (Many oats are processed in the same facilities as wheat and other gluten-containing products, so many oats are "contaminated" with gluten.)  I'll include a Gluten-Free tag on this; chances are, if you cook gluten-free, you already know to look for gluten-free oats.  :)
NY Times Olive Oil Granola
from the NY Times :)

4 cups old-fashioned rolled oats
1 cup raw pistachios, hulled
1/2 cup raw whole almonds
1 cup raw pumpkin seeds, hulled
1 cup coconut chips (any unsweetened, dried coconut) 
1/2 cup pure maple syrup
1/4 cup agave nectar
1/2 cup extra virgin olive oil (first try 1/3 cup and see if that's enough-add more if needed)
1 teaspoon kosher salt
1/2 teaspoon ground cinnamon
3/4 teaspoon ground cardamom
3/4 cup dried cranberries, optional

1. Preheat oven to 300 degrees. In a large bowl, combine oats, pistachios, pumpkin seeds, coconut chips, maple syrup, agave nectar, olive oil, salt, cinnamon and cardamom. Spread mixture on a lightly greased, rimmed baking sheet in an even layer and bake for 60 minutes, stirring every 15 minutes, until golden brown and toasted. (May need to bake a bit longer.)  Cool on baking sheet.

2. Transfer granola to a large airtight container and add dried cranberries, tossing to combine.
**This post and photos are property of http://dishingwithdish.blogspot.com/ **