Showing posts with label Halloween. Show all posts

Friday, October 31, 2025

Sugar Cookies Bars

These soft sugar cookie bars from Mel's Kitchen Cafe were everything I wanted- quick, easy, delicious, with a great soft texture. I made them as a Halloween treat, but one could change up the colors of the frosting and the sprinkles to match any holiday. I added almond extract because I really like that in sugar cookies. I added to both the base and the frosting.

Sugar Cookies Bars
adapted from Mel's Kitchen Cafe

Bars:
¾ cup (170 g) salted butter, softened to cool room temperature
¾ cup (159 g) granulated sugar
¼ cup (29 g) powdered sugar
2 large eggs
1 teaspoon vanilla extract
½ teaspoon almond extract, optional
2 ¼ cups (320 g) all-purpose flour
1 teaspoon baking powder
½ teaspoon salt

Frosting:
6 tablespoons salted butter, softened
2 ½ cups (285 g) powdered sugar
3 tablespoons milk or cream
¼ teaspoon vanilla extract
½ almond extract
Sprinkles, optional

1.  Preheat oven to 375 degrees F.

2.  For the bars, in a large bowl, cream together the butter, granulated sugar and powdered sugar until light and fluffy. Add the eggs and vanilla and mix for 1-2 minutes. Stir in the almond extract (optional), flour, baking powder and salt. Mix until combined.

3.  Lightly grease a 9X13-inch baking pan with cooking spray or line with parchment paper and grease. Press the sugar cookie dough into an even layer in the bottom of the pan. Bake for 10-13 minutes. Don’t overbake! The bars should have hardly any color around the edges and barely be set in the middle. Let the bars cool completely before frosting.

4.  For the frosting, cream together the butter and powdered sugar until smooth (if the mixture has trouble coming together, add a drop or two of milk). Add in the vanilla, milk or cream, and food coloring (if using), and mix until the frosting is light and fluffy, 1-2 minutes. Spread the frosting over the cooled bars and top with sprinkles.

**This post and photos are property of http://dishingwithdish.blogspot.com/ **

Monday, October 30, 2023

Halloween Mummy Cookies

Mummy Cookies! You can make any fave cookie recipe into mummy cookies with some white frosting (it helps to have a #46 Wilton tip, too) and candy eyes. Just fill a piping bag with frosting, and make zig-zags on your cookies, then stick the eyes on. I chose these drop sugar cookies and the frosting that goes with that recipe. I cut the recipe in half, though, because I wanted to make regular-size cookies, and not have 60 of them. 


Halloween Mummy Cookies

Favorite drop sugar cookies (like these; can cut recipe in half)
Candy Eyes

1. Bake and cool the cookies. Make the frosting. 

2. Fit a piping bag (I use disposable ones) with a #46 Wilton tip or similar. Fill your piping bag with frosting. Pipe zig-zags onto your cooled cookies (like shown). Before the frosting has set, place your candy eyes near the top of each cookie. Let set, and enjoy!

**This post and photos are property of http://dishingwithdish.blogspot.com/**

Sunday, October 29, 2023

Black Halloween Brownies

I recently heard of black cocoa powder from a friend and was intrigued. I had never heard of it before and was excited to try it. It's not available to me locally, so I found the King Arthur brand on Amazon. After it arrived, I used it a few days later in this brownie recipe. I reduced the flour a bit, so they'd be fudgier. The color of the cocoa powder really came through and these looked so good for Halloween. 


Black Halloween Brownies 
adapted from here 

Brownies:
1 cup butter, melted
½ cup black cocoa powder
4 eggs
1½ Tbsp vanilla
1 3/4 cups sugar
1 1/2 cups flour

Frosting:
¼ cup butter
¼ cup black cocoa powder
¼ cup milk
sprinkle of salt
2½ cups powdered sugar

1. Preheat oven to 350° Spray a 9x13 pan with cooking spray. Set aside.

2. Use a medium (not small) saucepan to melt the butter. After the butter is melted, remove from heat. In the same saucepan, stir in sugar and black cocoa powder. Then vanilla and eggs. Last, stir in flour. Spread in prepared pan and bake 12-17 minutes until center is just set.

3. Right after removing brownies from oven, prepare your frosting by melting the butter and black cocoa powder together in a medium saucepan. Remove from heat. Add in milk and powdered sugar and whisk until smooth. Spread on frosting (it sets quickly). The brownies will still be warm. Allow brownies to cool completely before cutting into squares.
**This post and photos are property of http://dishingwithdish.blogspot.com/**

Sunday, October 30, 2022

Halloween Cream Cheese Brownies

Happy Halloween!! Enjoy this simple and fun brownie recipe. The brownie base is perfect; chewy and fudgy. The cream cheese layer adds a layer of *fun*!! (Lol)
 

Halloween Cream Cheese Brownies
adapted from Persnickety Plates

For the Brownie Layer:
1 cup granulated white sugar
½ cup all-purpose white flour
½ cup Hershey’s Special Dark cocoa powder (makes the brownie darker)
½ teaspoon salt
¼ teaspoon baking powder
2 large eggs
⅓ cup vegetable oil
1 teaspoon vanilla extract

For the Cream Cheese Layer:
8 oz cream cheese at room temp
¼ cup granulated white sugar
1 large egg
½ teaspoon vanilla extract
orange food coloring

1.  Preheat oven to 350 degrees. Line an 8 x 8 baking dish with parchment paper or foil and spray with non-stick spray. Set aside. (I skipped the foil/parchment... we just served right from the pan.)

2.  For the Brownie Layer: In a medium bowl, add the sugar, flour, cocoa powder, salt, and baking powder. In a small bowl, add the eggs, oil, and vanilla. Mix with a whisk until well combined. Pour the wet ingredients into the dry ingredients and mix with a spatula until just combined. Reserve 1/4 cup of the batter for the swirls then pour the remaining batter into the prepared baking dish. (I forgot to reserve batter and just swirled up from the bottom with a knife... worked fine.)

3.  For the Cream Cheese Layer: In a medium bowl, add the cream cheese, sugar, egg, & vanilla. Blend until smooth. Add in the orange food coloring and stir to combine. Gently spread the cream cheese layer on top of the brownie batter. Drop tablespoons of the remaining brownie batter on top and gently swirl with a knife or skewer. Bake for 20-25 minutes or until set. Remove and let cool completely before slicing.


**This post and photos are property of http://dishingwithdish.blogspot.com/ **

Saturday, October 30, 2021

Happy Halloween! Halloween Peanut Butter Cookies

These cookies are easy to make, delicious, and fun.  I saw the idea on Facebook, but then lost the recipe. I googled it and found a similar recipe/method, but decided to go with Smitten Kitchen's recipe for flourless peanut butter cookies.  They use an entire jar of smooth Skippy, which is convenient, and they make more than most recipes.  I skipped the salted top because I was already topping them with something else.  These cookies were gone in no time around here!
Halloween Peanut Butter Cookies
Idea from I Heart Natptime; cookie recipe from Smitten Kitchen

1 3/4 cups (335 grams) packed light brown sugar
2 large eggs, at room temperature
1/2 teaspoon vanilla extract
1 3/4 cups (450 grams) smooth peanut butter (a 16.3-ounce jar of Skippy is perfect)

Peanut butter cups (Reese's), unwrapped
Candy eyes (white or red)
Nutella

1.  Preheat the oven to 350°F. Line a rimmed baking sheet with parchment paper.

2.  In a medium bowl, whisk together the light brown sugar and eggs until smooth. Whisk in the vanilla extract, then the peanut butter until smooth and completely incorporated; you shouldn’t be able to see any ribbons of peanut butter. 

3.  You can chill the dough here for 15 minutes in the freezer to get better-formed cookies (or the fridge for 30), or you can bake them right away.   Scoop the dough into balls using a cookie scoop. Place on prepared pan.

4.  Bake cookies for 8 to 10 minutes. When finished, cookies should be golden at edges. They’ll need to set on the sheet for a minute or two before they can be lifted intact to a cooling sheet.

5.  A few minutes after they come out of the oven, set an unwrapped Reeses into the middle of each cookie, upside-down.  Place eyes into the Reeses; it will melt slightly so you can stick them on.  After the cookies cool completely, use a small ziplock bag with a tiny corner snipped off and spoon some nutella into the bag. Pipe 4 spider "legs" on each side of the spider body (the Reese candy).  

**This post and photos are property of http://dishingwithdish.blogspot.com/**

Wednesday, October 31, 2018

Happy Halloween 2018!!

Yesterday school was cancelled here because of bad weather.  I finally got a chance to make these Halloween treats with the kids- we never have time to do stuff like this anymore.  It was fun and we had a great day.  We made ghost pretzels and white chocolate Reeses's chocolate PB cookies. 


White Chocolate Ghost Pretzels
adapted from Dessert now Dinner Later

30 (or so) pretzels
10 oz. bag white chocolate chips (I used Trader Joe's)
1 tsp coconut oil or shortening, for thinning the chocolate
1 (.88oz/25g) pkg Wilton Candy Eyeballs

1.  Line a baking sheet with wax paper, parchment paper, or a silicone baking mat. Set aside.

2.  Melt the white chocolate and coconut oil (or shortening) in a glass bowl in the microwave, for short 10-20 second bursts, until melted.  You can also use a double boiler.  I always do this for white chocolate because it seizes so easily.

3.  Immediately dip pretzels, one at a time, in the bowl, using a fork to turn the pretzel over. Shake off excess chocolate from the pretzel with the fork. Be sure to shake the chocolate out of the bottom hole, so it looks like an open mouth -- screaming. Place chocolate dipped pretzels on the prepared baking sheet.

4.  Immediately press two eyeballs into the top two holes for eyes -- add a little extra chocolate if needed.
Repeat with remaining pretzels. Work quickly. Heating the chocolate again only once, if needed.
Allow pretzels to rest and harden. Place in freezer for 10 minutes to speed up the process. Peel pretzels off the baking sheet and enjoy!

White Peanut Butter Cup Cookies
adapted from Allrecipes via here 

1 3/4 cups all-purpose flour (I used 1/2 cup whole wheat pastry flour)
1/2 teaspoon salt
1 teaspoon baking soda
1/2 cup butter, softened
1/2 cup white sugar
1/2 cup chocolate creamy peanut butter
1/2 cup packed brown sugar
1 egg, beaten
1 teaspoon vanilla extract
2 tablespoons milk
40 miniature white chocolate Reeses's peanut butter cups, unwrapped and stuck in freezer for 30 min.
sprinkles for decoration, if desired

1. Preheat oven to 375 degrees F (190 degrees C). Sift together the flour, salt and baking soda; set aside.

2. Cream together the butter, sugar, chocolate peanut butter and brown sugar until fluffy. Beat in the egg, vanilla and milk. Add the flour mixture; mix well. Shape into 40 balls (I just used my smallest cookie scoop- it's probably about 1 teaspoon) and place each into an ungreased mini muffin pan.

3. Bake at 375 degrees for about 8 minutes. Remove from oven and immediately press a mini white peanut butter cup into each ball. Cool and carefully remove from pan. 
**This post and photos are property of http://dishingwithdish.blogspot.com/ **

Tuesday, October 30, 2018

Halloween Spider Cupcakes


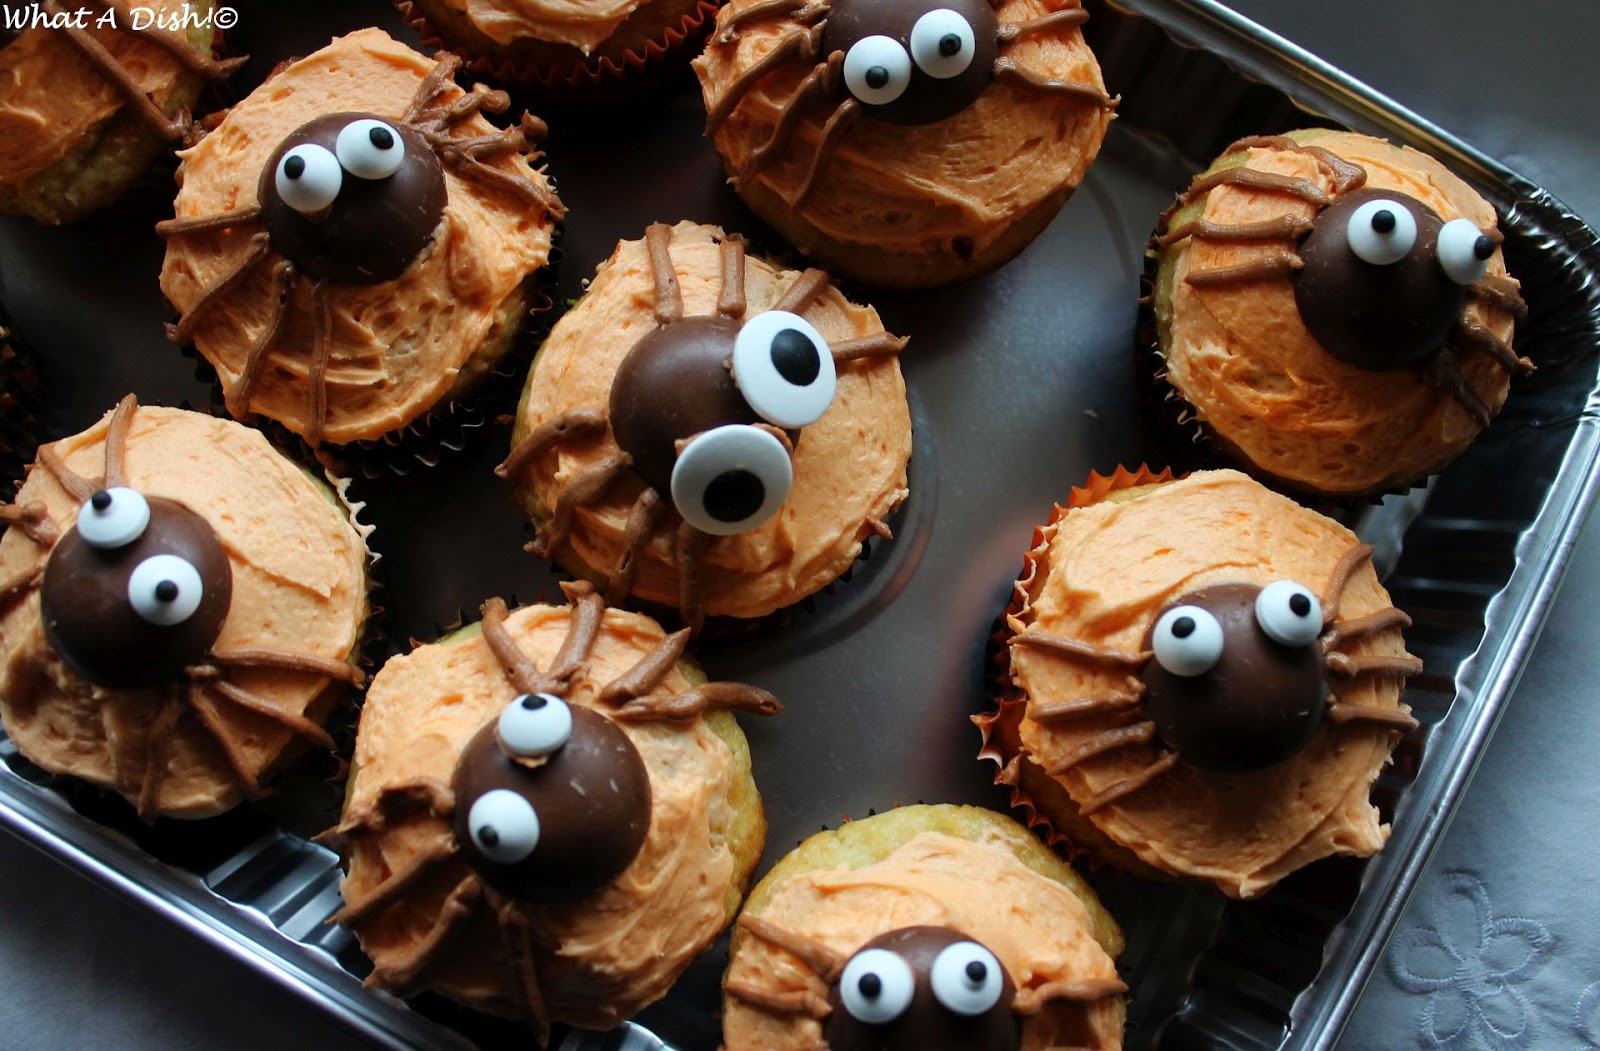
 We made these cute Halloween cupcakes for a party this weekend.  I got the idea from some cookies on Allrecipes.  You're supposed to use Lindt truffles cut in half, but I couldn't find any, so I used some German chocolates that were, funnily enough, wrapped up to look like spiders.  So I had my son unwrap all the spider chocolates to then use to decorate as spiders on these cupcakes.  Lol. 

You just place the chocolates on top of frosted cupcakes (before the frosting sets).  Then use a bit of frosting to stick the candy eyes on, and use chocolate frosting to form the legs.  Pipe it from a sandwich bag with a tiny corner cut off.
Halloween Spider Cupcakes
idea from Allrecipes

cupcakes
orange frosting
Round chocolates (or Lindt balls truffles cut in half)
candy eyeballs
chocolate frosting (a small amount; or use Nutella)

1.  Frost the cupcakes orange.  Place a chocolate in the middle of each one.  Use a dab of frosting to secure two candy eyeballs to each chocolate.  Use chocolate frosting to make legs.  To pipe legs, spoon a small amount of chocolate frosting (or Nutella) into a ziploc sandwich bag and snip off one small corner.  Pipe 4 legs on each side. 

**This post and photos are property of http://dishingwithdish.blogspot.com/ **

Wednesday, October 30, 2013

Eyeball Cookies


These were a fun little treat to make in the days before Halloween.  They are similar to these Halloween eyeballs from the days of yore, but much easier in that they use Nilla wafers instead of a peanut butter ball concoction.  (But the peanut butter ones are soooo good.  I just didn't have time for that this year.)  

For these ones, you just dip a Nilla wafer in melted white chocolate, use leftover white chocolate tinted blue for the "iris" and then the "pupil" is a mini M&M or a chocolate chip.  When I melted the chocolate, I melted it with one teaspoon of oil.  You need to add the oil before you turn the heat on, or the chocolate might seize. The oil makes it easier to work with, but even with the oil, the chocolate still melted all lumpy, but it ended up being fine.  I don't think anyone cares if these are lumpy or not....


Eyeball Cookies
adapted from Taste of Home

5 ounces white baking chocolate, chopped
1 teaspoon oil (canola, grapeseed, sunflower, veggie)20 to 25 vanilla wafers
Blue food coloring
mini M&M's OR regular semisweet chocolate chips
Red liquid food coloring

1.  In a double boiler or heat-proof bowl set over a pan of barely simmering water, melt the white chocolate and oil together; stir until smooth. Dip vanilla wafers in melted chocolate; allow excess to drip off (use a spoon or knife to spread, if needed). Place on a waxed paper-lined baking sheet. Chill until set.

2.  To remaining white chocolate, add a drop of blue food coloring; stir until smooth.  (If you didn't use oil when melting the chocolate, food color will cause it to seize).  Spread a small amount onto the center of each cookie; place an M&M or chocolate chip in the center.

3.  For bloodshot eyes, use a toothpick dipped in red food coloring to draw lines from blue circles to outer edges of wafers (I did this before making the pupil.). Chill until set. Store in an airtight container. Yield: 20-25 servings.

**This post and photos are property of http://dishingwithdish.blogspot.com **

Monday, October 28, 2013

Goblin Goo


We made these pudding parfaits for our little fam Halloween party on Saturday night.  The boys helped out and were so excited about them, but they turned out to be too sweet for them when it came down to eating the treat.  I think it was because of the Oreos; I reduced the sugar in the pudding.  I also used whole milk instead of the heavy cream called for.  The cornstarch thickened this pudding SO fast, and made it so thick; I have no idea why heavy cream was called for!  I'm sure 2% or 1% milk would have been fine, as well.  

Goblin Goo
adapted from Baked by Rachel
Makes 6 servings

2 1/2 cups whole milk
1/2 cup white sugar
pinch of salt
1/3 cup cornstarch
2 eggs
2 Tbs butter
2 tsp. pure vanilla extract
green and yellow food coloring (to make "neon" green)
10-15 Oreo cookies, crushed

1.  In a medium saucepan over medium heat, warm 2 cups milk, sugar, and salt until warm and steaming.  

2.  In a small bowl, combine cornstarch and remaining milk, whisking until completely smooth.  Add to hot milk in saucepan, stirring constantly until thickened- 2-5 minutes.  Be careful- can thicken very quickly.  Keep whisking!  Turn the heat to low when pudding thickens.  

3.  Reduce heat to low.  In another small bowl, whisk eggs continuously, and slowly drizzle in some of the hot milk mixture to temper.  Transfer egg back to saucepan and continue cooking over low heat for a few minutes.  Remove from heat.  Stir in butter and vanilla until butter is melted. Stir in food coloring until desired color is reached.  Serve warm or let cool a bit, and layer in clear cups with crushed Oreos.  Store in fridge.  

**This post and photos are property of http://dishingwithdish.blogspot.com/ **

Tuesday, October 30, 2012

Halloween Spider Eggs + Mummy Dogs

We had some fun Halloween-themed food last night for dinner.  I saw these deviled eggs online recently and they were easy enough to make quickly from things I already had in the house.  Just make your fave deviled egg recipe and chop up a can of olives to resemble spider bodies and legs. 

To make deviled eggs, you take hard-boiled eggs and slice them in half.  Mash the yolk together with mayo, mustard, salt and pepper, and whatever herbs/spices you want.  I used a bit of smoked paprika this time.  Use all the ingredients to taste. 
We also had the Mummy Dogs I've seen all over the internet for the last few years.  Sadly, these were not a hit with the kids.  None of my kids like hot dogs.  One of my boys used to love them, but won't eat them anymore.  So, not all of these got eaten, but it wasn't the poor mummy dogs' fault.  I really wanted to make them and now it's out of my system.  :) 
Spider Deviled Eggs
idea from Apron Strings

deviled eggs- your fave recipe
1 can black olives

1.  Prepare deviled eggs and set on a platter.  For spider bodies, cut olives in half and stick in the middle of deviled eggs (use large or bigger olives).  For legs, cut in half and then cut thin strips, tapering at the end.  Place 4 legs on each side of spider's body. 

Mummy Dogs
adapted from My Recipes

1 1-oz. tube refrigerated bread stick dough
8-12  hot dogs
mustard for garnish
1.  Separate dough into strips and flatter strips slightly. Wrap one strip of dough around each hot dog, leaving 1/2 inch uncovered for face. Arrange on a lightly greased baking sheet.
2.  Bake at 350° for 12 to 15 minutes, or until golden. Dot mustard on hot dogs with a toothpick to form eyes, if desired. 
**This post and photos are property of http://dishingwithdish.blogspot.com/ **

Monday, October 29, 2012

Ghost Pizza & Halloween Muddy Buddy Chex Mix

On Saturday, we had a little family Halloween party that our kids have been planning for at least a month.  We had purchased decorations, and they spent part of the day getting everything ready all by themselves.  I picked out some fun foods I wanted to make and they all met their approval.  We played games, did some crafts, ate a fun dinner, and visited their "Haunted House". 

First we had this Ghost Pizza.  I had actually put the ghosts on the pizza before baking, but they all melted and bubbled away into oblivion, and then I was almost out of cheese, so I added one little ghost after it came out of the oven, and all my little green olive spiders. 
We also had Slimy Eyeballs (grapes) and Blood (Frozen Raspberry lemonade).  The Chex Mix we made was for that day too, but we were all too full, so we just ate it the next day (yesterday).  The kids all helped me make it.  It is regular Muddy Buddy Chex mix combined with a variation of that- white chocolate and pb. 

Ghost Pizza
idea from Chefmom

1 unbaked pizza crust (we used this one)
pizza sauce
sliced Provolone or Mozzarella cheese
green olives
dried rosemary

1.  Preheat oven to 400 F.  Spread pizza sauce all over your pizza crust.  Using a ghost cookie cutter, cut ghost shapes out of your sliced cheese.  You may want to wait until after baking to add ghosts- or add some before and the rest later.

2.  Bake for 10-15 minutes or until pizza crust is done.  Top with additional ghosts if desired.  Stick 8 sticks of dried rosemary into each green olive for spider legs; top the pizza with the green olive spiders.  Serve.

Halloween Muddy Buddy Chex Mix
adapted from Your Cup of Cake

Peanut Butter White Chocolate Puppy Chow:
4 1/2 cups rice Chex cereal
1/2 cup white chocolate chips or chopped white chocolate
1/4 cup peanut butter, creamy
2 Tablespoons butter
1/2 tsp. vanilla extract
3/4 cup powdered sugar
 
Peanut Butter Chocolate Puppy Chow:
4 1/2 cups rice Chex cereal
1/2 cup semi-sweet chocolate chips
1/4 cup peanut butter, creamy
2 Tablespoons butter
1/2 tsp. vanilla extract
3/4 cup powdered sugar
1/2 Tbsp. unsweetened cocoa powder, optional
Peanut Butter Candies (Reese's Pieces)- 1 cup or more
 
1.  Peanut Butter White Chocolate: In a bowl with lid, measure out rice cereal and place in a large bowl.  In a small saucepan, melt chocolate chips, peanut butter and butter over low heat until smooth.  Stir in vanilla extract and then pour chocolate mixture over cereal. Stir to coat cereal.  Pour powdered sugar over cereal mixture; place lid on bowl, and shake until everything is coated. 
 
2.  Peanut Butter Chocolate: Follow steps above (using a different lidded bowl) but use semi sweet chocolate chips instead, and add cocoa powder to powdered sugar.
 
3. After all cereal is cooled, mix together and add Reese's Peanut Butter Candies.
**This post and photos are property of http://dishingwithdish.blogspot.com/ **

Friday, October 26, 2012

Mini Pumpkin Cupcakes with Cream Cheese Frosting

I needed something to take to a school bake sale, so I made these that I had recently seen on Cooking Classy.  Sadly, there were no pumpkin candies on our island this year (that I could find, anyway).  So, I topped each cupcake with a candy corn.  They would have been so cute with pumpkins, though! (Check out Cooking Classy to see what they look like with pumpkin candies.)

This made a ton, at least 40, I think, maybe more.  I didn't really count.  My husband and I enjoyed these.  My kids are not crazy about pumpkin-flavored baked goods, so while everyone (except one) tried one, they didn't want any more.  That's why I need to have excuses (bake sales, etc) to make stuff like this!  I like making stuff like this in the fall. 
Mini Pumpkin Cupcakes with Cream Cheese Frosting
adapted from Cooking Classy

1 cup all-purpose flour
1 tsp baking powder
1/2 tsp baking soda
1/4 tsp salt
1 tsp cinnamon
1/4 tsp nutmeg
1/4 tsp ginger
1/2 cup packed light brown sugar
1/3 cup granulated sugar
1/3 cup butter, melted and whisked to cool slightly
1/3 cup applesauce, at room temperature
1 large egg
1 large egg yolk
1 tsp vanilla extract
3/4 cup + 2 Tbsp canned pumpkin puree
2 1/2 Tbsp buttermilk (I used 1/2 tbsp lemon juice; the rest milk)
1 recipe Cream Cheese Frosting, recipe follows
44 pumpkin candies or candy corns, optional


1.  Preheat oven to 350 degrees. In a mixing bowl, whisk together flour, baking powder, baking soda, salt, cinnamon, nutmeg and ginger, set aside.

2.  In a separate large mixing bowl, using and electric hand mixer on low speed, blend together brown sugar, granulated sugar, butter and applesauce until well combined and smooth, about 1 minute. Mix in egg, egg yolk and vanilla. Add pumpkin puree and buttermilk and mix until well blended.

3.  Slowly add dry ingredients and mix just until combined. Fill paper lined mini muffin cups 2/3 full (about 1 slightly heaping Tbsp in each) and bake in preheated oven 10 - 12 minutes until toothpick inserted into the center of cupcake comes out clean. Allow to cool completely then frost with Cream Cheese Frosting.   I used a Wilton 1M tip to pipe a decorative swirl.  Top each cupcake with a pumpkin candy or candy corn, if desired. Store in an airtight container.

Cream Cheese Frosting:
4 oz. cream cheese or Neufchatel, softenend
1/4 cup butter, softened
2 cups powdered sugar

1/4 teaspoon cinnamon
1/2 tsp vanilla extract

1.  Combine cream cheese and butter in a mixing bowl and using an electric hand mixer on medium speed, blend together until light and fluffy. Add in powdered sugar, cinnamon and vanilla and blend on low speed until combined, then increase to medium and whip until smooth and fluffy.
**This post and photos are property of http://dishingwithdish.blogspot.com/ **

Wednesday, October 24, 2012

Orange Halloween Macarons


I was pretty excited how these Macarons turned out.  They are not pumpkin-flavored; just a plain shell colored orange with powdered food coloring.  If you wanted pumpkin flavor you could add some pumpkin pie spice; I'm not sure how much though.  I did a dark chocolate ganache filling so it would be close to a black color for Halloween.  One needs to used powdered food coloring in the shell, rather than liquid or gel, or the macarons might have too much liquid and not turn out.  I wasn't sure how much to add, so I used a scant teaspoon, and probably could have gotten away with less, but they turned out well. 
My daughter helped me make these and even helped pipe them out.  We want to make pistachio ones next!  Happy Halloween!

Orange Halloween Macarons
Shells adapted from here and here

110 g almonds meal/flour
200 g powdered sugar
1 scant teaspoon powdered orange food coloring
50 g granulated sugar
100 g egg whites (about 3 egg whites), aged (left out) a day at room temperature

1. Line 2 baking sheets with parchment paper or silicone mats.

2. Pulse almond flour, powdered sugar, and powdered food coloring in a food processor until evenly mixed.

3. In the bowl of a stand mixer fitted with a whisk attachment, whip the egg whites until foamy, then gradually add the granulated sugar and continue to whip until a shiny, stiff, glossy meringue forms (but not dry).

4. Remove the bowl from the stand mixer, and add the almond mixture. Using a rubber spatula, briskly and quickly fold the almond meal into the egg whites. After a few brisk strokes, slow down and then gently incorporate the rest into the batter.You want a batter that flows and "ribbons" for at least 5 seconds.

5. Pour the batter into a pastry bag fitted with a large round tip (I use Wilton 12). Pipe the batter into 1 1/2-inch rounds, spacing them about 1-inch apart. Whack the baking sheets on the counter a few times, then allow to sit at room temperature for about 1 hour, or until a hard shell forms.  (While you wait, prepare ganache, below.)

6. Meanwhile, preheat the oven to 280 degrees. Bake the macarons 10-12 minutes, depending on size.  (Should be dry and lift away easily from parchment when done.)  Allow to cool completely on the pan before using a small spatula to remove them. Match the cookies according to size and pipe filling on half, using the other half to form a sandwich.

Dark Chocolate Ganache

6 oz. mini semi-sweet chocolate chips
3/4 cup heavy cream

1.  Place chocolate in a heatproof bowl.  In a small saucepan, over medium heat, heat and stir the cream until it barely comes to a simmer.  Immediately pour over chocolate in bowl and cover bowl.  Let stand for 5 minutes. 

2.  Then, whisk until combined and smooth.  It might take a little bit, but it should turn dark, smooth, and shiny.  Set aside to cool until needed.  I set it in the fridge, since it needs to be on the thick side for the filling. 

**This post and photos are property of http://dishingwithdish.blogspot.com/ **

Saturday, October 13, 2012

Meringue Ghosts

I spotted these little guys via Peabody and was so excited- I had exactly 4 egg whites in my fridge from making ice cream, and I love making fun little seasonal treats like this.  Plus, my kids and I LOVE meringues!!  These ones are so delicious they just melt in your mouth.  They were kind of messy to make, because all I could find was a too-short piping bag, so the meringue mixture kept squeezing out the top, but if you use a bag that's long enough, it should be fine.  These are so cute!!  Happy Halloween!
Meringue Ghosts
from Skinnytaste

4 large egg whites, room temperature
1/4 tsp cream of tartar
1 cup superfine sugar (or put sugar in food processor/blender for 30 seconds until fine)
1/2 tsp pure vanilla extract
miniature chocolate chips for the eyes

1.  Preheat oven to 200°. Place  rack in th center of the oven. Line a baking sheet with parchment paper. Have a pastry bag fitted with a 1/2 inch plain round tip.

2.  In your mixing bowl, using the whisk attachment, beat the egg whites on low-medium speed until foamy. Add the cream of tartar and continue to beat until you get very stiff peaks. Beat in vanilla extract.  Add the sugar, a little at a time, and continue to beat until the meringue holds very stiff peaks. Beat in the vanilla extract. (Note: The meringue is done when it holds stiff peaks and when you rub a little between your thumb and index finger it does not feel gritty. If it feels gritty the sugar has not fully dissolved so keep beating until it feels smooth between your fingers.)

3.  Before placing the meringue ghosts on the cookie sheet, place a little of the meringue on the underside of each corner of the parchment paper to prevent the paper from sliding.  Transfer the meringue to the pastry bag. Holding the bag perpendicular to the baking sheet, pipe with even pressure, 2-3 inch high mounds of meringue.  Carefully press two miniature chocolate chips into each meringue ghost for the eyes, and a third chip for a mouth.  (Note- I did not put "eyes" on all the ghosts, leaving some naked.  It was just too much for me.  I also skipped the mouth on some, leaving them with only eyes). 

4.  Bake the meringues for approximately 1 1/4 - 1 1/2 hours or until they are dry and crisp to the touch and easily separate from the parchment paper.  Turn off the oven, slightly open the door, and leave the meringues in the oven to finish drying several hours, or even overnight.  Keeps for several days at room temperature.  Note:  Makes anywhere from 36-50; maybe more.  Mine made more than 50.  They just kept coming!! 
**This post and photos are property of http://dishingwithdish.blogspot.com/ **