Showing posts with label Asian. Show all posts

Friday, June 3, 2022

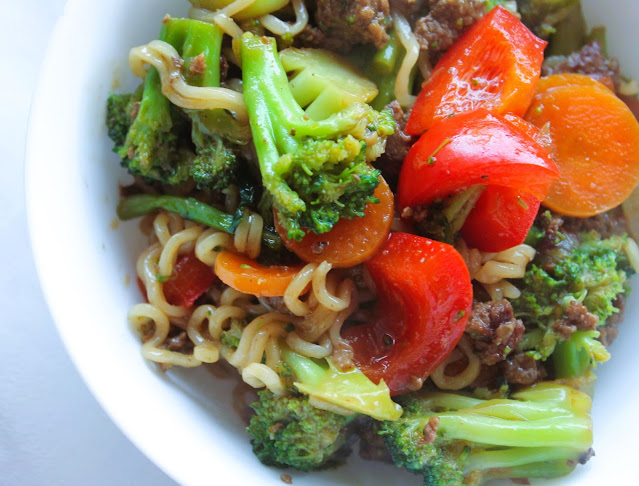
Ramen Noodle Stir Fry

I loved this Ramen Noodle Stir Fry. It was pretty easy to make (I keep a lot of Asian condiments on hand), tasty, and felt healthy with the veggies. I used a bag of frozen broccoli florets and was really happy with the turnout- and it saved a lot of time. I can't wait to make this again- the leftovers were great, too. 

I graduated with my Bachelor's in Education today!! Tomorrow, my oldest son graduates from High School.  Good times. 

Ramen Noodle Stir Fry 
adapted from Carlsbad Cravings 

3 (3 oz.) ramen packets (9 ounces total), seasonings discarded
drizzle of toasted sesame oil (or a neutral oil)
1 pound lean ground beef 
1 small onion, chopped (half large onion)
3 cups medium broccoli florets (I used a bag of frozen broccoli florets)
2 thinly sliced carrots
1 red bell pepper chopped into 1/2” pieces
1 tablespoon freshly grated ginger, or 1 tsp ground
4-6 garlic cloves, minced or 1 tsp powder
chopped green onions for garnish (optional)

SAUCE
3/4 cup low sodium chicken broth
1/3 cup reduced sodium soy sauce
3 tablespoons Asian sweet chili sauce (like Mae Ploy)
2 tablespoons oyster sauce (Lee Kum Kee or Kikkoman)
1 tablespoon rice vinegar
1 tablespoon brown sugar
1 tablespoon cornstarch
2 teaspoons Asian hot chili sauce, optional (I didn't include)

1. Cook ramen in boiling water for 2 minutes (they will cook a bit more later). Rinse with cool water and toss with a drizzle of sesame oil to prevent the noodles from sticking. Set aside. (I skipped the oil but there is the danger of them sticking here.)

2. Whisk Sauce ingredients together in a medium bowl; set aside.

3. Heat a large wok, heavy bottom stainless steel pan or cast-iron skillet over medium high heat. Add ground beef and onions, and cook until the beef is almost cooked through. Add broccoli, carrots, bell peppers, garlic and ginger and cook an additional 2 minutes.

4. Stir in the sauce and bring to a simmer. Simmer for about 1 minutes, until thickened. Add the ramen and toss until evenly coated and the noodles are cooked to your liking, about one minute. Taste and season with additional chili sauce, salt and pepper as needed. Garnish with green onions if desired.

**This post and photos are property of http://dishingwithdish.blogspot.com/ *

Monday, June 8, 2020

Easy Korean Beef Bowl

First, I want to say that I stand with those hurting in the US and all over the world about racial injustice.  I hope non-minorities are taking time to educate themselves right now.  Talk to others, read articles, watch documentaries or shows on the subject.  We can all do better! 

Ok, now onto the recipe.  This is a quick, easy and flavorful meal.  I used ginger paste for the ginger and had everything on hand to make this.  Make sure you use reduced-sodium soy sauce for this, otherwise it would be too salty.  If you don't like the taste of sesame oil, feel free to use any oil you have on hand.  Feel free to add extras to this, such as fresh or cooked veggies or sauces.
Easy Korean Beef Bowl
adapted from Allrecipes

1 pound lean ground beef
5 cloves garlic, crushed
1 tablespoon freshly grated ginger
2 teaspoons toasted sesame oil
1/3 cup reduced-sodium soy sauce
1/3 cup light brown sugar
1/4 teaspoon crushed red pepper, optional
6 green onions, chopped, divided (or chives)
4 cups hot cooked rice
1 tablespoon toasted sesame seeds

1.  Heat a large skillet over medium-high heat. Add beef and cook, stirring and crumbling into small pieces until browned, 5 to 7 minutes. Drain excess grease.

2.  Add garlic, ginger, and sesame oil, stirring until fragrant, about 2 minutes. Stir in soy sauce, brown sugar, and red pepper. Cook until some of the sauce absorbs into the beef, about 7 minutes. Add 1/2 of the chopped green onions or chives.
3.  Serve beef over hot cooked rice; garnished with sesame seeds and remaining green onions or chives.
 **This post and photos are property of http://dishingwithdish.blogspot.com/ **

Monday, October 1, 2018

Stir-Fry Sauce

 I really loved this stir-fry sauce.  I've only used it on veggies.  I stir-fry a bunch of my fave veggies in a wok until just tender and then add this sauce.  Cook for only about a minute until the sauce thickens, then serve over rice.  You can use this for meat + veggies, too.  I need to try that next time.  It's so good on just veggies though- and a great way to get more veg in your life.

Stir-Fry Sauce
adapted from Sam the Cooking Guy

2 tablespoons rice vinegar
1/4 cup soy sauce
1/4 cup chicken broth, vegetable broth or even water
1 tablespoon sriracha (and/or Thai sweet chili sauce)
2 tablespoons sugar
1 tablespoon cornstarch

1.  Combine all ingredients in a small bowl or Tupperware and mix well with a whisk or fork.

2.  Stir fry about 4 cups any combination of diced vegetables and/or seafood, chicken or beef.  When just done, add 1/2 to 2/3 (I just used all of it so I had extra sauce for my rice) of sauce, stir and let thicken slightly – about a minute and serve.  

**This post and photos are property of http://dishingwithdish.blogspot.com/ **

Wednesday, January 24, 2018

Gingery Poached Egg Soup


This was a quick, easy, and nourishing light meal I made on a Sunday afternoon.  My husband and youngest son enjoyed it with me.  I really liked all the flavors together.  I added some fresh lemongrass.  I think this was my first time using Bok Choy.  I used the whole bunch of it.  It weighed less than 12 oz, but it was fine.
Gingery Poached Egg Soup
adapted from The Kitchn

1 tablespoon toasted Asian sesame oil or vegetable oil
5 (1/4-inch-thick) slices fresh ginger
2 cloves garlic, very thinly sliced
6 cups low-sodium chicken or vegetable broth
2 tablespoons soy sauce
12 ounces regular bok choy, Shanghai bok choy, or Napa cabbage
4 large eggs
Thinly sliced scallions, for garnish (optional)

1.  Heat the oil in a Dutch oven or wide pot over medium-high heat until shimmering. Add the ginger and garlic and cook, stirring constantly, until the garlic is just golden-brown around the edges, about 1 minute.

2.  Carefully add the broth and soy sauce (it may sputter) and bring to a boil. Meanwhile, trim the stem ends from the bok choy or cabbage. If using Napa cabbage or large bok choy, cut into 1 1/2-inch pieces.

3.  Add the bok choy or cabbage to the boiling soup, stir to combine, and bring back to a boil. Lower the heat to maintain a simmer and crack the eggs into the soup, keeping the eggs as far apart from each other as possible. Simmer undisturbed until the whites are set but the yolks are still runny, 3 to 4 minutes. Serve immediately, topped with scallions if desired.
*This post and photos are property of http://dishingwithdish.blogspot.com/ **

Wednesday, September 20, 2017

Ground Pork & Zucchini Stir-Fry

This was a quick and easy recipe that was also delicious.  The original recipe called for sambal oelek, which is similar to Sriracha sauce.  I used a sweet Thai chili-garlic sauce instead, so the kids would enjoy this more.  But feel free to use sambal oelek, or Sriracha in this.
Ground Pork & Zucchini Stir-Fry
adapted from The Kitchn

For the sauce:
3 tablespoons tamari or soy sauce
1 tablespoon grated or minced fresh ginger
1 tablespoon sambal oelek, Sriracha, or Asian chili-garlic sauce (can use sweet)
2 teaspoons Asian sesame oil

For the stir-fry and serving:
1 pound zucchini (about 3 medium)
2 tablespoons canola or vegetable oil, divided
1 pound ground pork (NOT sausage)
Salt
Freshly ground black pepper
1/4 cup thinly sliced scallions
Cooked white or brown rice, for serving

1.  Make the sauce: Stir all the ingredients together in a small bowl and set aside.

2.  Make the stir-fry: Slice each zucchini in half lengthwise, then slice each half into 1/2-inch-thick half-moons.

3.  Heat a flat-bottomed wok or large frying pan over medium-high heat until a drop of water vaporizes immediately on contact. Drizzle 1 tablespoon of the oil around the pan, add the ground pork, and season with salt and pepper. Let cook undisturbed for 30 seconds, then break the pork into small, bite-sized pieces and continue stir-frying until it's cooked through and golden-brown, about 5 minutes. Transfer the pork to a paper towel-lined plated and drain the pan of excess fat.

4.  Drizzle the remaining 1 tablespoon of oil in the pan, spread the zucchini out in one even layer, and let cook undisturbed for 30 seconds. Stir-fry the zucchini until browned and just tender, about 5 minutes more.

5.  Return the pork to the skillet, add the sauce, and stir-fry until the sauce is well-incorporated and the zucchini begins to look glossy, about 30 seconds more. Garnish with the scallions and serve over rice. (Serve extra chili-garlic sauce at the table.)
**This post and photos are property of http://dishingwithdish.blogspot.com/ **

Wednesday, September 13, 2017

Thai Massaman Beef Curry II

I already have a recipe on here for Massaman, which I love, but I wanted to try this new recipe- it uses a different method and a few different ingredients.  I love them both.  I was able to sear the beef in this recipe and stick everything in the crockpot for a few hours.  The beef got super tender and the delicious juices didn't evaporate (something that's happened to me using my other recipe).  I just made some rice in my rice cooker before we ate, and dinner was super easy.  (Note: Made this again 2/23 with no searing, just dumping everything in, and it was just fine. I wouldn't bother searing next time.) 

This summer in the States, my son ordered Massaman at a Thai restaurant and it was the envy of the table.  Lol.  It was SO good!  So of course I had to make it at home, again.


Thai Massaman Beef Curry
adapted from Taste (Australia)

1 tablespoon oil
1 brown (yellow) onion, cut into large wedges
1/3 cup (100g) massaman curry paste
1/2kg (about 1 lb) beef (a tougher cut like round steak) cut into 5cm pieces OR use stir-fry steak
1 garlic clove, crushed
1 tablespoon finely grated ginger or ginger paste (OR use ginger/garlic paste for both)
400ml can coconut milk
1/2 cup (125ml) beef stock
1 cinnamon stick
1 long red chilli, thinly sliced, optional
2 bay leaves
2 tablespoons palm sugar (or sub brown sugar)
2 tablespoons lime juice
1 tablespoon fish sauce
400g potatoes, chopped (about 1 lb)
1/3 cup (45g) roasted unsalted peanuts
Steamed jasmine rice, to serve
Coriander (cilantro) sprigs, to serve
Lime wedges, to serve

SLOW COOKER: Dump all ingredients into the crockpot, except peanuts, rice, cilantro, and lime wedges.  (Can omit the oil.)  Stir together.  Turn crockpot to LOW and cook about 6 hours, or until potatoes and meat are tender. Serve with peanuts, rice, cilantro and lime wedges. 

STOVETOP: Heat the oil in a large heavy-based pan over medium-low heat. Add the onion and cook for 5 mins. Add massaman paste and cook for 1 min or until fragrant. Add the beef and cook, stirring, for 3 mins or until browned. Add the garlic and ginger and cook for 1 min.  Add coconut milk, stock, cinnamon, chilli, bay leaves, palm sugar, lime juice, fish sauce, and potato to the pan and bring to the boil. Reduce heat to low. Cover and simmer for 1 1/2 hours or until the beef is very tender.  Add the peanuts at this point, or use later as a garnish.  Divide the steamed jasmine rice among serving bowls. Top with the curry and serve with coriander and lime wedges.
**This post and photos are property of http://dishingwithdish.blogspot.com/ **

Sunday, July 30, 2017

Thai Basil Fried Rice


I made this fried rice recently to go with some other Thai food for a Thai-themed dinner.  We also had Massaman Beef Curry and Tom Kha Gai Soup.  We had an extra kid over that day and he loved the food too.  I want to make this meal again soon!

Thai Basil Fried Rice- Khao Pad Horapa
adapted from Rachel Cooks Thai

3 cloves garlic, chopped finely
1 red Thai chili pepper, chopped finely
1/2 cup chicken, cut into thin, bite-sized pieces
1/4 cup red bell pepper (or red jalapeno) slices
1/4 cup onion slices
1/4 cup green beans, cut into 1” pieces
1/2 cup Thai basil leaves
1 Tablespoon oyster sauce
1 teaspoon thick dark soy sauce (sweet soy sauce- like Healthy Boy brand)
2 teaspoons thin soy sauce
2 cups pre-cooked jasmine rice, left out for 1-2 hours

1.  Prepare the ingredients by finely chopping the garlic and red Thai chili. Slice the chicken into thin, bite-sized pieces. Slice the green beans, red bell pepper, and onion into thin strips.

2.  Heat a wok until very hot and then add 1-2 Tablespoons of canola oil (or any other mild oil of your choice). Add the finely chopped garlic and chilis and stir fry until the garlic is golden brown.
Add the chicken pieces and stir fry until it is cooked through. This should take 3-5 minutes, depending on how thick your chicken pieces are. Then add the long beans and red bell peppers, quickly followed by all of the sauces.

3.  Once the long beans and peppers are close to done, add the onion slices and stir fry for 30 seconds to a minute until they are translucent, but still slightly firm.

4.  Finally, add the rice and mix together with all of the other ingredients. Once the sauces have been mixed thoroughly with the rice, add the Thai basil and turn off the heat. Give everything one more toss and then serve.
**This post and photos are property of http://dishingwithdish.blogspot.com/ **

Saturday, July 8, 2017

Thai Basil Chicken


I loved this dish so much.  I found some Thai Basil at my Italian grocery store.  It's just regular Thai basil- not Thai Holy Basil, which you're supposed to use in this dish, but it worked out wonderfully anyway.  I found this recipe online after asking my Thai friend what I should do with the Thai basil plant.

We loved the crispy fried egg with this! I forgot to buy chilies, so I used my Italian chili oil to fry the eggs in and add a little spicy.


Thai Basil Chicken
adapted Eating Thai Food

1 egg
2 tablespoons of oil for frying (I used hot pepper oil)

For the basil chicken:
1 chicken breast (or any other cut of boneless chicken, about 200 grams)
5 cloves of garlic
4 – 10 Thai chilies – when you fry the chilies, they aren’t as spicy
1 tablespoon oil for frying
1 teaspoon of oyster sauce
1/2 teaspoon light soy sauce
1 splash of dark sweet soy sauce
1/2 teaspoon sugar
1 handful of Thai holy basil leaves
Hot cooked jasmine rice, for serving

1.  First, fry the egg:
Heat about 2 tablespoons of oil in a wok or frying pan on high-medium heat.  When the oil is hot and sizzling, drop in the egg. Let it sizzle and bubble up, and at the same time, splash some of the hot oil onto the top of the egg (don't flip the egg, unless you really want to).

After the egg looks about right to your cooked likeness (I like mine runny), take it out, drain the excess oil, and put it on a plate for later.

2.  Basil chicken:
Cut the chicken into small bite sized pieces.

Rinse and peel the garlic and chilies, and pound them in a mortar and pestle (alternatively you can just mince them with a knife). They don't need to be super fine, you just want to bring out the oils and flavors from the garlic and chilies.

Pluck a good sized handful of holy basil leaves off the stems.  

Heat your wok on high heat, and add about 1 tablespoon of oil to the pan.  When the oil is hot, add the chilies and garlic. Stir fry them for about 20 seconds or so until they get really fragrant, but don't let them burn or get too dry.

Toss in your chicken. Keep stir frying continuously. At this stage you want to continue to stir and cook your chicken until it's just about fully cooked all the way through (depending on the size pieces of chicken and how hot your fire is, it should take about 2 - 3 minutes). If it starts to get dry, add just a tiny splash of water.

Add 1 teaspoon of oyster sauce, ½ teaspoon light soy sauce, ½ teaspoon sugar, and finally a splash of dark soy sauce. Keep stir frying for about another 30 seconds.

Grab a handful of holy basil, toss it into the pan, fold it into the chicken, and then immediately turn off the heat (if you're using an electric stove, you'll want to remove the pan from the burner). The holy basil really only needs to cook for about 5 seconds, and it will continue to wilt and cook from the existing heat of the chicken. This step is important because if you cook the basil for too long, it loses some of its glorious flavor and gets slightly chewy.  Serve over cooked rice.


**This post and photos are property of http://dishingwithdish.blogspot.com/ **

Thursday, June 15, 2017

Vietnamese Meatball Banh Mi Sandwiches

My husband and I LOVED these sandwiches.  They were so, so good!!  All of the flavors together- creamy, spicy mayo, crunchy, sweet/salty picked veggies, the rich meatballs, the cilantro- oh my gosh- SO good!!!  I really need to make these again ASAP.  I used a bake-at-home baguette for the bread, and it was perfect.

This is only my second Vietnamese recipe on here.  I need to try more! I love the flavors. So fresh and flavorful.  Next time I'd throw some fresh mint leaves on with the cilantro.

Vietnamese Meatball Banh Mi Sandwiches
adapted from Mel's Kitchen Cafe

SPICY DRESSING:
2/3 cup mayonnaise or plain Greek yogurt (I used a mix)
1 tablespoon hot sauce (like sriracha) or sweet Thai chili sauce
1 green onion, white and green parts finely chopped

RELISH:
2 large carrots, coarsely grated or cut into thin matchsticks
1 English cucumber, coarsely grated or cut into thin matchsticks
2 tablespoons sugar
2 tablespoons rice vinegar
1/2 teaspoon coarse kosher salt
1 teaspoon sesame oil

MEATBALLS:
2 pounds ground pork, ground turkey or beef, or a combination
1/4 cup chopped fresh basil or 2 teaspoons dried
4 garlic cloves, finely minced
2 green onions, finely chopped
1 tablespoon fish sauce
1 tablespoon hot chili sauce or sweet Thai chili sauce
1 1/2 tablespoons sugar
1 tablespoon cornstarch
1 teaspoon pepper
1/2 teaspoon salt
1-2 teaspoons sesame or vegetable or coconut oil, for browning

SANDWICHES:
4 to 6 (6-inch) baguettes, or cut a long one into pieces
Bunch of fresh cilantro
Fresh mint leaves, optional

1.  In a small bowl, whisk together all the ingredients for the dressing. Cover and refrigerate. This can be made several days in advance.

2.  For the relish, toss together the carrots and cucumber. In a small bowl, whisk together the sugar, vinegar, salt and sesame oil. Pour over the vegetables. Cover and refrigerate. The relish can be made a day or so in advance.

3.  For the meatballs, preheat the oven to 400 degrees F. In a large bowl, combine the ground pork (or turkey), basil, garlic, green onions, fish sauce, hot sauce, sugar, cornstarch, salt and pepper. Scoop the mixture into 1- to 2-inch meatballs. Heat the oil in a large 12-inch nonstick skillet over medium heat until hot and rippling. Add the meatballs in a single layer and brown on all sides.

4.  Transfer the browned meatballs to a foil-lined baking sheet and repeat with remaining meatballs (adding additional oil if necessary). Bake the meatballs for 15 minutes. (Some greasy red-tinted juices might be on baking sheet- it's from the Sriracha).  Remove from the oven (I like to place the cooked meatballs one by one on a layer of paper towels to absorb any excess grease). 

5.  To assemble the sandwiches, slice the buns or baguettes in half. Spread the dressing on the top half of the bread. Layer cilantro to taste on the bottom half. Place 3 or so meatballs (will depend on how big you made them) on top of the cilantro. Drain the relish and place a heaping spoonful on top of the meatballs. Press on the sandwich top and devour.

**This post and photos are property of http://dishingwithdish.blogspot.com/ **

Monday, April 10, 2017

Vietnamese Chicken Salad

I loved this salad- and so did my husband.  I sent half with him to work and ate the other half.  This made for very large servings; if serving this with other food, the salad would go much further than two.  The fresh herbs and bell pepper made it taste so refreshing, and with all the other flavors, it was awesome.

A friend shared this recipe with me and mentioned it went very well with Trader Joe's Thai Lime & Chili Almonds (or cashews).  I threw some on there and enjoyed those very much.
Vietnamese Chicken Salad
Adapted from Edible Boston
Makes 2 huge servings, or a few smaller ones

DRESSING:
¼ cup warm water
3 tablespoons fresh lime juice
2 tablespoons sugar
1–2 tablespoons Asian fish sauce (to taste)
1 tablespoon vegetable oil
1 garlic clove, minced
1 small red chile, seeded and minced

SALAD:
½ medium head Napa cabbage, washed and sliced thin
2 cups shredded cooked chicken (I used rotisserie chicken)
2 cups fresh cilantro, mint and/or basil leaves (don't leave these out- I used cilantro + basil)
2 carrots, shredded
½ red bell pepper, sliced thin
¼ cup toasted chopped peanuts (OR TJ's Thai almonds or cashews)

1.  For the dressing, mix all ingredients together in a small bowl and divide evenly between 2 dressing-sized containers. For the salad, toss all the ingredients together in a large bowl, divide evenly between 2 to-go containers and pack dressing containers on top. To serve, pour the dressing over the salad and toss to combine.
(These directions are for packing for on the go- if serving at home, just pour dressing over whole salad, toss, and serve.)
 **This post and photos are property of http://dishingwithdish.blogspot.com/ **

Wednesday, August 17, 2016

Indonesian Chicken Soup- Soto Ayam

 I love chicken soups from around the world.  I need to try more, but one favorite is Portuguese Canja. My Thai friend also made some really good soups for me when she lived here.  This soup, Soto Ayam, is simmered with kaffir lime leaves, fresh lemongrass, ginger and other herbs.  The flavor of this soup is awesome.  You can enhance it with garnishes like fried shallots, hard-boiled eggs, chopped cilantro, mint, and basil, and Sriracha or other hot pepper sauce.

Indonesian Chicken Soup- Soto Ayam
adapted from NY Times

1 free-range chicken, about 3 pounds, quartered (or buy pre-cut chicken pieces)
2 stalks fresh lemon grass, bruised with the handle of a heavy knife and tied in a knot
6 kaffir lime leaves, fresh, frozen or dried (optional)
1 teaspoon kosher salt, more to taste
1 teaspoon black peppercorns
1 ½ tablespoons coriander seeds
2 teaspoons cumin seeds
5 shallots, peeled and halved
3 cloves garlic, peeled
2 teaspoons finely minced fresh turmeric, or 1 1/2 teaspoons ground turmeric**
2 tablespoons finely minced ginger
3 tablespoons oil
4 ounces glass noodles or thin dried rice noodles, called vermicelli, bihun or bun (Filipino rice pancit noodles work well)
1 tablespoon fresh lime juice
2 tablespoons chopped celery leaves, mint, Thai (or regular) basil or cilantro leaves
2 shallots, thinly sliced and fried in vegetable oil until brown (optional)
Quartered limes
chili paste (such as sambal) for serving (or Sriracha)
Cooked white rice (optional)
Hard-boiled eggs, sliced, for serving

1.  Place chicken in a medium pot with lemon grass, lime leaves (if using), salt and 2 quarts water. Bring to a boil over high heat. Skim off any foam and reduce heat to a simmer. Cover and simmer until chicken is tender, about 45 minutes, skimming as needed to make a clear broth. Remove chicken pieces from broth and set aside. Remove and discard lemon grass and lime leaves; reserve stock in pot. When chicken is cool enough to handle, discard skin and bones and shred meat into bite-size pieces.

2.  Meanwhile, combine peppercorns, coriander seeds and cumin seeds in a small food processor. Pulse until ground. Add halved shallots, garlic, turmeric and ginger and pulse to a thick paste. Add a little water if needed. (My paste was always kind of chunky, but it was ok- you cook it so it does break down a little.)

3.  Heat oil in a medium saucepan over high heat. When very hot, add spice paste and cook, stirring until paste is cooked and beginning to separate from the oil, about 5 minutes.  Add cooked spice paste and chicken meat to stock. Bring to a simmer and cook 10 minutes.

4.  Cook noodles according to package directions. Turn off heat under soup and stir in lime juice. Taste for salt.

5.  To serve, divide noodles in large soup bowls. Ladle chicken pieces and soup on top and sprinkle with celery leaves or herbs, and fried shallots, if using. Pass lime and sambal at the table.
Eat from soup bowl, or serve a scoop of rice on a side plate, sprinkled with more shallots, and put a mouthful of noodles and chicken on rice. Combine on a spoon, dab with sambal, and eat.
*I tried this both with noodles and jasmine rice, and found the rice easier to eat.  It was very tasty both ways.  
**I found the turmeric at my local international foods store.  It was SUPER cheap- a bag for only 1 Euro.  I also found the rice noodles there.  Some may also have the Kaffir lime leaves and lemongrass.
**This post and photos are property of http://dishingwithdish.blogspot.com/ **

Friday, March 25, 2016

Thai Massaman Curry with Beef


I've had a container of Massaman Curry sitting in my pantry for a few months now, unopened.  I finally put an end to that the other week when I made this beef curry.  It was very good!  Massaman Curry is Thai, but inspired by Indian flavors.  You can make your own curry paste but why would you, when you can buy really good stuff and save yourself so much work?  ;)  (I have made my own yellow curry paste before, but I wouldn't again.... I have some of that (storebought) in my pantry now too.)  This recipe braises for a while, so you can use a tough cut of meat.  I think I used chuck steaks and they were great.
Note: This uses tamarind paste.  I have some my Thai friend gave me from Thailand.  :)  (Thanks!) I've heard you can use lime juice as a sub, to get that sourness, or just leave it out.

Also- this recipe needs to cook for at least 1.5 hours, so plan ahead.
Thai Massaman Curry with Beef
adapted from the Kitchn

For the braise:
1 pound beef chuck roast, cut into large bite-sized chunks
1 cup coconut milk
1 cup chicken or beef stock

For the curry:
1 tablespoon coconut or neutral oil
4 tablespoons massaman curry paste (storebought or homemade)
1/2 cup coconut milk, stirred (just use the rest of the can)
2 large potatoes, cut into bite-sized chunks
1/4 teaspoon tamarind paste (or 1 tablespoon tamarind water), plus more to taste
Sugar (or palm sugar), to taste
Fish sauce, to taste
1/2 cup dry-roasted peanuts
Cooked rice, for serving

1.  Braise the beef: Place the beef in a heavy Dutch oven or other heavy-bottomed pot with a lid. Pour the coconut milk and stock over top. Bring to a gentle simmer over medium-high heat, then turn the heat down and cover. Braise on very low heat for 1 1/2 to 2 hours, until the beef is tender and just holding its shape.

2.  Lift the cooked beef out of the braising liquid. Strain the liquid into a bowl and reserve.

3.  Finish the curry: Wipe out the pot used for braising the beef and replace it on the stove. Heat the oil over medium-high heat and add 4 tablespoons of massaman curry paste. SautĆ© the paste for a couple of minutes, until fragrant.

4.  Add the coconut milk and the braising liquid to the curry paste. Bring it up to a gentle simmer, then add the beef chunks and potatoes. Season the curry with the tamarind, a few splashes of fish sauce, and some sugar. Bring back to a low simmer, then reduce heat to medium-low and cover. Cook for about 20 to 30 minutes, until the potatoes are tender.

5.  Taste and adjust seasonings in the curry, adding more fish sauce, sugar, or tamarind, until the curry is a perfect balance of gentle spiciness, saltiness, tanginess, and sweetness. Stir in the peanuts and serve with coconut rice.
**This post and photos are property of http://dishingwithdish.blogspot.com/ **

Friday, March 11, 2016

Thai-Inspired Grilled Chicken with Peanut Sauce

A friend made this dish for my family last summer and we all loved it!  I got the recipe and meant to make it right away, but I just got around to it about two weeks ago.  We still liked it- especially my 4-year old, who stuffed his face, which he never does!  Unless it's candy or Thai or Indian food, he's just not that interested.  He loves Thai and Indian food though.  He can't get enough.
Instead of threading the chicken through skewers, I copied what my friend did and we grilled this on a veggie grilling thingy- just layed the chicken out on that and flipped it as needed.  We had grilled bell peppers on the side.

Thai-Inspired Grilled Chicken with Peanut Sauce
adapted from The Splendid Table and JP

3 pounds skinless, boneless chicken breasts, cut into 1-inch cubes
Marinade:
1/4 cup soy sauce
3 tablespoons firmly packed dark brown sugar
2 tablespoons fresh lime juice
2 tablespoons oil
1 tablespoon curry powder
2 garlic cloves, minced
1 teaspoon finely minced fresh ginger
1/2 teaspoon ground cardamom
Peanut Sauce, for serving (recipe follows)

1. Place the chicken in a medium bowl. Whisk all the marinade ingredients together in a separate bowl. (Or put everything in a large ziplock bag.) Pour the marinade over the chicken and massage the meat with your hands for 1 minute to coat the cubes well. Cover the bowl with plastic wrap and marinate in the refrigerator for at least 1 hour or as long as overnight.
2. Spray a grill rack with nonstick cooking spray and set the heat to high or use a grill pan. Use a veggie grilling tray on your grill. When the grill is ready, cook the chicken for 8 to 10 minutes, turning the chicken over half-way through. Remove the chicken from the grill and allow it to rest for a few minutes before serving.

Easy Peanut Dipping Sauce
from JP
serves 4, can increase for more servings

4T creamy peanut butter
4-5T warm water or more, to desired consistency
4 tsp hoisin sauce
4 tsp sweet chili sauce
1 tsp Thai red curry paste
1 T of lime juice

1, In a small bowl, whisk all ingredients together.
**This post and photos are property of http://dishingwithdish.blogspot.com/ **

Monday, June 8, 2015

Fresh Bamboo Shoot Red Curry (+ Basil Stir Fry)


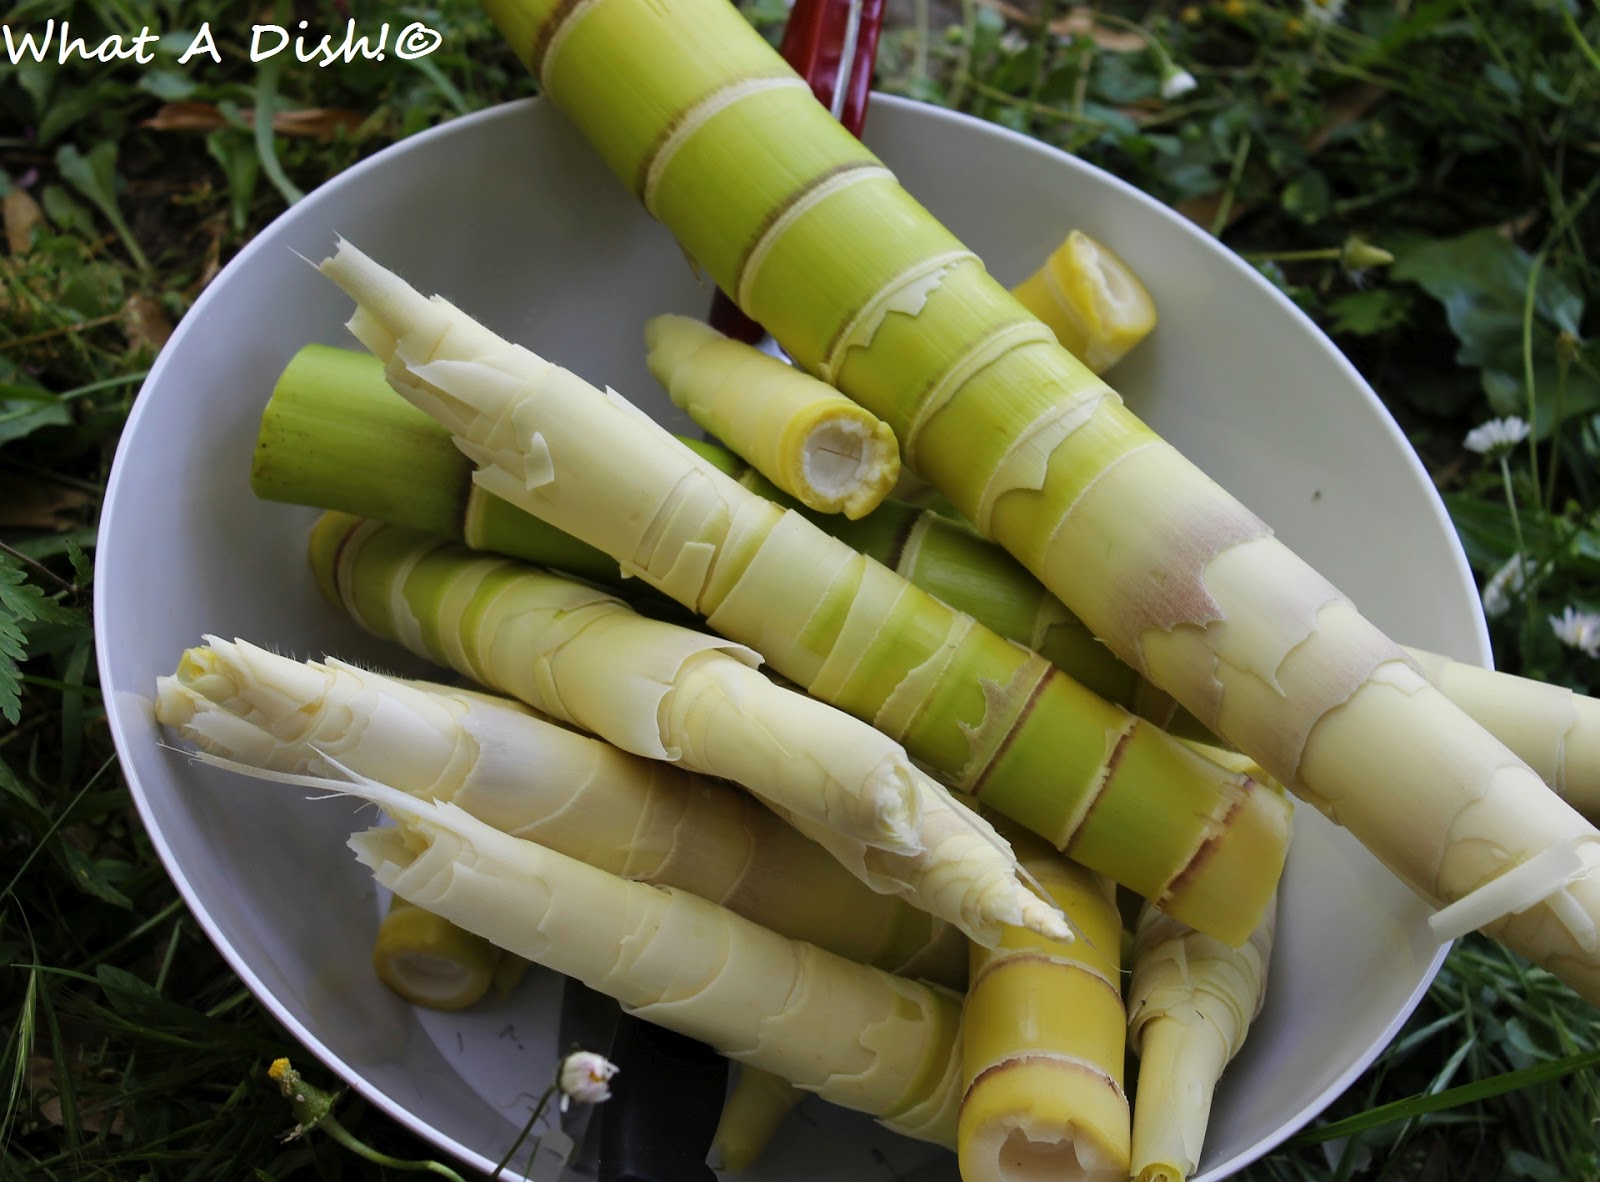
About one month ago, a friend from Thailand came over and she helped me harvest, process, and then cook the fresh bamboo shoots that were starting to show up in my yard.  They pop out of the ground like round swords, but are actually tender and very easy to just break off.  You peel the bamboo, and then chop it, and boil it twice until tender.  This also gets rid of any trace levels of cyanide that might be in the bamboo (some plant foods contain natural levels of cyanide.  Only some bamboo species contain it, but you should boil to make sure).
Bamboo shoots plucked right from my lawn.
Peeled bamboo shoots, ready to be chopped.  We didn't use the larger green parts; just the more tender top parts.
All chopped up.  You can chop lengthwise, or into coins.
Boiling.  Boil twice, (drain after each time) each time for about 10 minutes or more.
Thai Basil Stir Fry with Bamboo Shoots, above
Fresh Bamboo Shoot Curry 
from my friend P.W.

fresh bamboo shoots 
one can coconut milk
Thai red curry paste
favorite veggie, such as a bell pepper
chicken, about 1 breast
fresh basil, chopped
fish sauce
palm sugar
white rice, for serving

1. Prepare the bamboo shoots.  Peel all the outer skin off.  Only use the tender parts.  If the bottom is not tender, discard it.  Chop up the tender part of the bamboo.  Fill a large pot with salted water, and bring to a boil.  Add the chopped bamboo shoots about boil for 10-15 minutes. Drain.  Fill the pot with salted water again, and bring to a boil again. Add the bamboo shoots and boil for another 5-10 minutes.  Drain.  

2.  In a large skillet, add the cream from the top of the can of coconut milk.  Add as much red curry paste as you want and let it cook into the coconut cream.  Add the chicken, bamboo shoots, any other veggies, and the rest of the coconut milk from the can.  Cook until everything is cooked through, adding palm sugar, fish sauce, and fresh basil to taste.  Enjoy over steamed white rice.

Chicken basil stir fry, pictured right, and bamboo chicken red curry, pictured left.

Thai Basil Chicken Stir Fry
from my friend P.W.

oil
prepared bamboo shoots (see #1 in recipe above)
boneless chicken, cut into strips
fresh basil
oyster sauce
steamed rice, for serving

1.  Heat the oil in a large skillet.  Add the chicken and prepared bamboo shoots, and cook and stir until the chicken is cooked through.  Add the oyster sauce to taste, and the fresh basil.  Serve with steamed rice.  


**This post and photos are property of http://dishingwithdish.blogspot.com/ **