Showing posts with label jam/spreads. Show all posts

Wednesday, August 3, 2022

Lingonberry-Buttermilk No-Churn Ice Cream


Here's a new recipe for the popular no-churn ice cream. I have a few on my blog, all using a combo of heavy cream and sweetened condensed milk to get a nice ice cream texture without the use of a home ice-cream maker. This recipe is supposed to have strawberry ice cream, but I didn't have any- I had some IKEA Lingonberry jam in the fridge, so I used that instead. Use any of your favorite jam (I think a berry jam would be best here, but go ahead and experiment). The corn syrup in here gives the ice cream a smoother texture- I've never used it in a no-churn recipe before, but I really liked what it did. It did make it pretty sweet, but hey, it's ice cream. 

Lingonberry-Buttermilk No-Churn Ice Cream 

adapted from Cook's Country

2 cups heavy cream, chilled

1 cup (NOT one can) sweetened condensed milk

1/2 cup buttermilk

1/4 cup light corn syrup

2 tablespoons sugar

1 teaspoon lemon juice1/4 teaspoon salt

1/2 teaspoon vanilla extract

1/3 cup lingonberry or strawberry jam

1. Process cream in blender until soft peaks form, 20-30 seconds (less for a Vitamix). Scrape down sides of blender jar and continue to process until stiff peaks form, about 10 seconds longer (less for a Vitamix). Using a rubber spatula, stir in condensed milk, buttermilk, corn syrup, sugar, lemon juice, salt and vanilla. Process until thoroughly combined, about 20 seconds, scraping down sides of blender jar as needed.

2. Pour cream mixture into 8 1/2 by 4 1/2 inch loaf pan. Dollop jam over top and swirl into cream mixture using tines of fork. Press plastic wrap flush against surface of cream mixture. Freeze until firm, at least 6 hours. Before serving, let sit at room temp 5-10 minutes to soften (will freeze very hard). 

                                            **This post and photos are property of http://dishingwithdish.blogspot.com/ **

Friday, July 3, 2020

Texas Roadhouse Rolls & Cinnamon Butter

These rolls were so fun to make.  My husband and I used to like TR about 20 years ago.  We took the kids back about 7 years ago and it was all too fried and salty for me anymore.  But the rolls are good!!  It was fun to make them at home, too.  You roll the dough out in a rough rectangle and trim the edges to make a perfect rectangle, then cut into squares.  I cut the cinnamon honey butter in half and it wasn't enough for my fam- lol.  I tried two recipes for these during lockdown, and this was the better one.  I cut the recipe in half to make just one pan of rolls- the original recipe makes quite a lot. 


Texas Roadhouse Rolls & Cinnamon Butter
adapted from Jo Cooks

2 tsp active dry yeast
1/4 cup warm water
1/2 tsp sugar (to activate the yeast)
1 cups milk scalded and cooled to lukewarm
1 1/2 tbsp butter unsalted, melted and slightly cooled
1/4 cup sugar
3 1/2 cups all-purpose flour up to 4+ cups
1 egg
1 tsp salt
1 tbsp butter, for brushing over the finished rolls

Cinnamon Honey Butter:
1 stick butter, softened
1/4 cup honey
1 tsp cinnamon

1.  Add the yeast, warm water and sugar to the bowl of your mixer and lightly whisk. Let it sit for about 10 to 5-10 minutes until the yeast dissolves and starts to foam.  To the bowl of your mixer add the milk, butter, sugar, eggs and salt. Lightly mix everything together, using the dough hook of your mixer, for about 1 minute. Add the flour, 1 cup at a time, and mix. Add enough flour to form a soft dough. 

2.  Add additional flour as needed and mix until the dough comes clean from the sides of the bowl. You could use anywhere from 3 to 4 cups, depending on your environment. Place the dough in an oiled bowl and cover with a clean damp kitchen towel. Let rise in a warm place until double in bulk.

3.  Spray a baking sheet with cooking spray.  Punch down the dough and turn it onto a floured surface. Roll out the dough so that it’s about 1/2 inch in thickness, then cut off the ends to have a perfect rectangle.  Cut it out into squares or rectangles. Use the dough scraps and form into extra rolls (or roll).  You should get about 15-18. Place onto the prepared baking sheets. Let the rolls rise until doubled in size. (30-45 min.)

4.  Preheat your oven to 350 F degrees.  Bake the rolls for about 15 to 20 minutes or until golden brown. Brush immediately with melted butter.

5.  While the rolls are baking, prepare the cinnamon honey butter by whisking all the ingredients together.
Serve the rolls with the cinnamon honey butter.
  **This post and photos are property of http://dishingwithdish.blogspot.com/ **

Friday, August 31, 2018

Mirabelle Plum Jam


I love this recipe from David Lebovitz.  I made his Red Plum & Strawberry Jam last year, but didn't get around to blogging about it (I think I didn't get a chance to take pics, but maybe they're around somewhere.  If so, I'll post that recipe too).

Anyway, I first made this with just regular yellow plums from my wild yard.  But then, I realized that we have a plum tree that I'm pretty sure is a Mirabelle plum tree!  I made the jam again with those plums and it was even better than the regular yellows.  It tastes honeyed.  I added vanilla and I loved that addition.  I made extra and put it in the freezer, so I hope it freezes well.

Note: this recipe also works with regular yellow plums.


David Lebovitz's Mirabelle Plum Jam
adapted from David Lebovitz

1 pound (450g) mirabelle plums
2/3 cups (130g) sugar
1 teaspoon freshly squeezed lemon juice
optional: 1/2 to 1 teaspoon kirsch, eau-de-vie or vanilla extract

1. Pit the mirabelles. I found the best way to do this was use my cherry pitter.  My plums were small enough.  After pitting, I cut each one in half.

2. Put the pitted plums in a non-reactive saucepan. Add enough water so it’s about 1/4-inch (a scant 1cm) deep in the pan. Cover and cook over medium heat, until the mirabelles are cooked through, about 8 to 10 minutes. (At this point, you can choose to blend some of the mixture up with an immersion blender.  I did this with one batch, and left one batch "whole".  If you don't blend, it's still very good and more like preserves, as it's very chunky.  Both ways are good, though.)

3. Add the sugar and lemon juice and continue to cook the mirabelles over medium heat, stirring frequently, until the liquid looks syrupy and thick. If you want to check it for doneness, you can turn it off and put a dab on a chilled plate in the freezer and check it in a few minutes, when it’s cold: if it wrinkles when you nudge it, it’s done. If using a candy thermometer, the jam will set at around 218-220ºF (103-104ºC). (I found mine set around 210-212.)

4. Remove from heat, add the kirsch, eau-de-vie or vanilla, if using, and balance the flavor with a little bit more lemon juice, if desired. (When cool enough to taste.) Pour the jam into a clean jar, cover, and refrigerate until ready to eat.

Storage: The jam will keep in the refrigerator for at least two weeks. (I stuck one jar in the freezer, but haven't pulled it out yet to see how well it freezes.)

**This post and photos are property of http://dishingwithdish.blogspot.com/**

Friday, June 24, 2016

Mulberry, Raspberry & Blueberry Freezer Jam


In a grocery store parking lot around here, there are a few big mulberry trees.  They have sweet fruit; there are a lot of mulberry trees around here where the fruit is more sour/tasteless.  My neighbor said the sour ones are called "white mulberries".  But I forgot what the "sweet" ones are called.  Anyway, the sweet ones are more rare here.  There's wild white trees up around where I live, but I went to the grocery store parking lot recently and harvested some there.  I wanted to make jam.  I knew I didn't get enough to make a batch, so I bought some fresh raspberries to use as well.  It turns out I didn't have enough of those, either, so I threw in a few blueberries.  Hence, mulberry, raspberry and blueberry jam was born.  :)


Mulberry, Raspberry & Blueberry Freezer Jam
adapted from Ball

mulberries, raspberries and blueberries- enough to equal 1 2/3 cups crushed fruit
2/3 cup sugar
2 Tablespoons Ball RealFruit Instant Pectin (pic below)

1.  Crush fruit.  Crush one layer at a time using a potato masher.  A large dinner plate works well to set it on as you're crushing.  Measure out exactly 1 2/3 cups of crushed fruit.

2.  Stir sugar and pectin together in a large bowl. Add crushed fruit; stir three minutes.  Ladle into clean freezer containers and let stand 30 minutes.  Store in the fridge.  If storing longer than 2 weeks, store in the freezer.  Enjoy.

**This post and photos are property of http://dishingwithdish.blogspot.com/ **

Monday, October 6, 2014

Fig Jam Brownies

I spotted this recipe at Taste of Beirut and wanted to make them right away because I had just made this Fig & Balsamic Jam.  These brownies were good; mine turned out more cakey, but with a delicious flavor.  (The blog owner responded with some advice about that, see note, below, in recipe.) I used dark cocoa powder so these were intensely chocolate, which went well with the sophisticated flavor of fig.  My kids loved these; I didn't tell them they were fig jam brownies until after they were all gone, just in case, but they seemed to take it in stride, and said "cool!"  (Most of them love fresh figs).  

Fig Jam Brownies
adapted from Taste of Beirut

2 large eggs
3/4 cup brown sugar
3 tablespoons fig jam
6 ounces unsalted butter
6 tablespoons cocoa powder
3/4 cup all-purpose flour*
1 teaspoon baking powder
1/2 teaspoon salt

1. Beat the eggs with the sugar in a mixing bowl till thick, pale-colored and the mixture forms a ribbon. Meanwhile, gently melt the butter over the stove (or in the microwave); mix in the cocoa till combined. Cool a bit then add to the egg mixture along with the jam.. Add the flour mixed with the baking powder and salt. (If you want fudgy brownies, decrease the flour by 1/4 cup.)

2. Pour into a brownie pan lined with baking paper and bake in a preheated 350F oven for about 20 minutes. Cool and serve.

**This post and photos are property of http://dishingwithdish.blogspot.com/ **

Friday, September 19, 2014

Fig & Balsamic Jam


We have a few fig trees in our new yard here.  They were ripe when we moved in (over a month ago!) but we were so busy we didn't do much with them, except eat a few (two of our sons love fresh figs).  There were so many they couldn't keep up, though, and sadly, a lot of them rotted on the tree. Then, a friend who also lives in Italy posted on Facebook that she made some fig jam with her neighbor's figs, and I thought it would be a shame to let all of mine go to waste. So she inspired me to make jam the very next day.  I hope I'm not posting this too late; this was made about 2 weeks ago, and I think the fig season is over now, here, at least. Hopefully somebody can still use this recipe.  :)  
I was going to make the same recipe my friend posted, but I didn't have enough fresh lemon juice on hand.  So I had the idea to search for a Balsamic Vinegar jam recipe and was happy to find this one! It smelled pretty "earthy" when it was boiling away, but it tastes awesome; not earthy, and not even vinegary; it's nice and sweet.  The Balsamic adds a really nice flavor.  I also added a few cinnamon sticks to the mixture.

This jam is really good on bread, but I also want to try it paired with different cheeses.  Fig jam always reminds me of fall.  :)  My 3-year old absolutely LOVES this jam.
Fig & Balsamic Jam
adapted from Food

2 lbs fresh figs, (any variety) stems removed and coarsely chopped (do not peel)
1 1/2 cups granulated sugar
1/2 cup balsamic vinegar (use a good-quality sweet balsamic)
2 cinnamon sticks
2 tablespoons fresh lemon juice

1.  Combine the figs, sugar, balsamic vinegar, and a cinnamon sticks in a large saucepan and attach a candy thermometer to the pan (optional). Bring to a simmer over medium-high heat, then lower the heat to maintain a gentle simmer and cook, stirring to break up the large pieces of fig, until the jam reaches 220 degrees F. Remove from the heat. (I just cooked until about 215, because it was super thick already.  I would just cook to whatever consistency you like in jam.  At 215, the jam is not runny at all.)   At this point, you can choose to puree with a stick blender or leave chunky.  I made this 8/2015 and pureed it and I really, really prefer the smooth, pureed version.

2.  Remove the cinnamon sticks and stir in the lemon juice to taste. Spoon the jam into a canning jar or other storage container, cover, and let cool to room temperature, then refrigerate for up to 1 month. (Store in the freezer for longer, probably up to one year.)
**This post and photos are property of http://dishingwithdish.blogspot.com/ **

Friday, May 30, 2014

Avocado-Feta Toast with Za'atar

avo5W
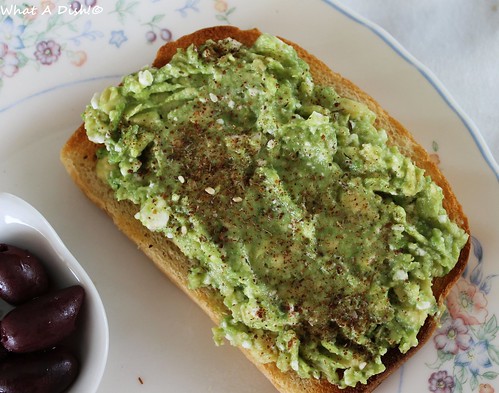
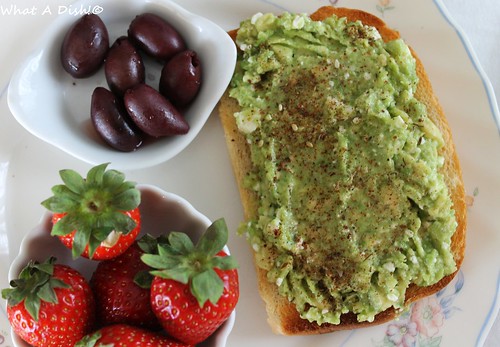
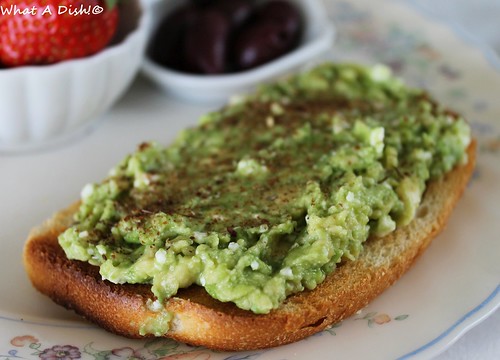
This was a DELICIOUS lunch.  Just SO good.  The website I got this from, Aggieskitchen.com, doesn't seem to be currently working, so I can't link it, but I hope the website comes back; I've gotten a lot of good recipes from there.  You just mash a half of an avocado with a bit of crumbled feta, spread it on a hot piece of hot toast, and top with Middle-Easter Za'atar seasoning.  I ate this with Kalamata olives and fresh strawberries; I just enjoyed this so much.

(The movers packed most of our stuff today and yesterday, but I still have some recipes saved up to post here.  I won't really be "cooking" for a while now.)
avo3W
Avocado-Feta Toast with Za'atar
from Aggieskitchen.com
makes 1 serving

1 slice favorite bread, toasted
1/2 avocado, diced
1 oz feta, crumbled (or to taste- I used about 1 TBS.)
a big pinch of za'atar
sliced tomato, optional (I didn't have, but would be so good)
coarse salt and fresh ground pepper

1.  In a small bowl, gently smash your avocado with a fork. Add in your crumbled feta and gently combine. Spread your avocado and feta mixture evenly onto toast. Sprinkle with za'atar. Top with tomato slices and season with salt and pepper as desired.
avoW
*This post and photos are property of http://dishingwithdish.blogspot.com/ **

Monday, June 24, 2013

Strawberry Freezer Jam (Using Ball RealFruit Instant Pectin)

My fam loves strawberry freezer jam, and I love this new method to make it- I use Ball Instant Pectin and it calls for WAY less sugar than Sure-Jell, which I can't even buy here anyway.  (I buy mine from Amazon, but I saw it at WalMart in the States last summer.)  It's so easy too; you don't even have to cook the pectin like other recipes.  Just stir together sugar and pectin, add crushed fruit, and stir for three minutes.  I love it!  
To make this jam, we used delicious, fresh, local strawberries from the Farmer's Market mentioned in this post.   The berries alone were delicious.  And of course, we had to get doughnuts as big as our heads again. 

**NOTE- Ball discontinued it's Instant Pectin in 2024. This recipe will not work with a pectin you have to cook. Please use the correct recipe for the pectin you are using. Recipes are usually included in the pectin packet. I'm leaving this recipe up because I want to; don't use this recipe with the incorrect pectin and leave a nasty comment. For the love.**

Strawberry Freezer Jam (Using Ball RealFruit Instant Pectin)
adapted from Ball
makes about 2 cups; easily doubled

1 2/3 cups crushed strawberries (measure exactly)
2/3 cup granulated sugar (measure exactly)

1.  Stir sugar and pectin in a large bowl.  Add fruit; stir 3 minutes.  Ladle jam into clean freezer containers; let stand 30 minutes.  Enjoy or freeze for up to one year.  
**This post and photos are property of http://dishingwithdish.blogspot.com/**

Friday, June 14, 2013

Homemade Butter (Two Recipes-From Scratch & Semi-Homemade)

A while ago, we made two kinds of butter for fun.  The kids had been begging me to make homemade butter in a jar using just cream, so we made that.  I also made a homemade spreadable butter, using just butter and canola oil.  You can keep this in the fridge and it stays soft and spreadable.  
When making the from scratch butter (pictured above), you just shake cream in a jar, as you may already know.  Slowly, it starts to thicken and then separate.  It also turns yellow, which is really cool!  One thing you have to do is drain the buttermilk, or the butter will quickly spoil.  I kneaded the butter in a bowl of really cold water (using a wooden spoon) for quite a while, because there were many pockets of liquid.  That was something I hadn't know about before.  It really helped get rid of all the buttermilk and help the butter come together, though.  

Homemade Butter (from Scratch)
adapted from here

heavy cream
salt, if desired
jars with tight-fitting lids

1.  Pour your cream into jars.  Don't fill the jars too full.  Shake, shake shake.  (It will feel like forever.)

2.  After a while, the cream will start to thicken, separate, and turn yellow.  Shake until it becomes pretty solid and there is liquid in the jar.

3.  Drain the liquid (buttermilk) and save for another recipe, if desired.  (We used it in pancakes but it was nothing like purchased buttermilk and didn't work very well.)  Fill a glass or metal bowl with very cold water.  Place the chunk of butter in the bowl, and with a wooden spoon, "knead" the butter to get rid of any liquid pockets.  Keep rinsing with very cold water (like from the fridge) until the water runs clear.  Your butter is now ready.  Add salt now, if desired, and store in the fridge.

Spreadable Butter (Semi-Homemade)
adapted from Live Pretty
easily doubled

1 stick (1/2 cup) salted butter, softened
2 tablespoons canola oil

1.  Whip butter (preferably in a stand mixer) until smooth.  While mixing, slowly add in canola oil.  Place in an airtight container and store in the fridge.  

**This post and photos are property of http://dishingwithdish.blogspot.com/ **

Friday, December 28, 2012

Vanilla & Cinnamon Sunflower Butter


Sunflower Butter
It's always fun to make your own nut butters at home.  I try to stick with sunflower butters now, because using peanuts of other nuts are too hard on my food processor.  Sunflower seeds are much gentler.  This sunflower butter is infused with vanilla bean and roasted cinnamon.  This was good- I used salted sunflower seeds though, and it was a little too salty because of this.  Next time, I would use non-salted (and add a pinch of salt) or just lightly salted.  And, do not add any additonal salt if using salted seeds!  Another fun recipe to try is this Chocolate Sunflower Seed Butter

Sunflower Butter

Vanilla & Cinnamon Sunflower Butter
adapted from 101 Cookbooks

2 cups / 225 g raw sunflower seeds*
1/4 cup / 60 ml sunflower oil, divided
1/2 teaspoon fine grain sea salt, plus more as needed (do NOT add salt if using salted seeds)
2 tablespoons vanilla bean paste (OR seeds scraped from 2 vanilla beans)
3 teaspoons ground cinnamon (I used roasted)
zest of 1/2 a lemon, or to taste, optional

1.  Toast the sunflower seeds in a 325F / 165C oven, on a rimmed baking sheet, until fragrant and golden.  Stir them once or twice to ensure even roasting. Let cool for ten minutes.

2.  Puree the seeds in a food processor along with 1 tablespoon sunflower oil, and the sea salt (if using). As the motor runs drizzle in another 2 tablespoons of sunflower oil. Scrape down the sides once or twice along the way, you're aiming for an even, creamy consistency, and it may take some time. Once the mixture starts to look smooth, add the vanilla paste and cinnamon, and pulse to incorporate. At this point, evaluate the consistency, if your sunflower seed butter is on the thick side, drizzle in the remaining tablespoon of oil while the processor is running. Taste, and add more salt if needed (and the lemon zest. if using), as well.  Makes about 1 1/2 cups / 380 g.

*If sunflower seeds are already roasted, skip this step.

**This post and photos are property of http://dishingwithdish.blogspot.com/**


Thursday, September 6, 2012

Strawberry-Raspberry Freezer Jam

I tried a new-to-me pectin; this Ball Instant Pectin, the other day, to make this jam.  (Pictured below).   I was able to order it online, but I saw it in some stores in the States, too, this summer (um... Walmart....).  I think it was cheaper in the stores, too.  I'm just happy to get it at all!  It uses a lot less sugar than some other kinds.  And you don't have to heat up anything at all to make this; just mix sugar, pectin, and chopped fruit, and you're pretty much done!  I used frozen raspberries for this recipe, and loved how it turned out.  I let them thaw in the fridge first, and used all the juices and everything.  I'm so happy to know I can use frozen raspberries for jam!! 

I doubled the batch, according to the package directions (apparently it's ok to double batches using this pectin, but don't increase it any more than that).  I had wanted to use half raspberries, half strawberries, but to my my dismay, one 12-oz package of frozen raspberries only equalled about exactly one up, after thawing and mashing.  So I guess I should buy more next time! 

Anyway, I'll post the regular batch (NOT double, like I did) recipe below.

Strawberry-Raspberry Freezer Jam
adapted from Ball Pectin

1 cup strawberries, hulled and crushed*
2/3 cup raspberries, crushed**
2/3 cup granulated sugar
2 Tablespoons Ball Instant Pectin

1.  Stir sugar and pectin together in a large bowl.  Add prepared fruit; stir 3 minutes.  Ladle jam into clean freezer jars or containers.  Let stand for 30 minutes; enjoy.

2.  Store in fridge for a few weeks.  If not using right away, store in freezer.  This recipe doubles very easily.
*Fruit is measured after being chopped/crushed.  Measure very precisely.
**Frozen raspberries may be used.  Thaw (in fridge) and do not drain before using.  I have not tried frozen strawberries, but those may work as well!
**This post and photos are property of http://dishingwithdish.blogspot.com/ **

Tuesday, July 3, 2012

Strawberry-Blueberry Freezer Jam

I've already made two batches of freezer jam this summer; regular strawberry, and more recently, this Strawberry-Blueberry combination.  I really loved this one.  It's the first time I've been able to do blueberry successfully- I just didn't know what I was doing before, I think. 

I love eating this with plain Greek yogurt- shown above.  I always eat it with my granola, too.  It's always good on waffles or pancakes, as well, or just plain toast.

Yes, this jam has a lot of sugar, like many freezer jams.  I recently found some other pectin and it appears one can use less sugar with that, but I haven't used it yet.  My mom was nice enough to send me some SureJell pectin, and I've been happily using that.  So SureJell is what this recipe calls for.  If you want to make it with another brand, find another recipe, because this one probably won't work with another brand of pectin. 

Strawberry-Blueberry Freezer Jam
from Kraft

1-1/2 cups crushed fresh strawberries (measured after crushing)
cup crushed blueberries (measured after crushing)

4-1/2 cups sugar
3/4 cup water
1 pkg. SURE-JELL Fruit Pectin (yellow box)

1.  Rinse 6 clean (1-cup) (or 3 clean 2-cup) plastic containers and lids with boiling water (or wash in top rack of dishwasher). Dry thoroughly. Mix fruit in large bowl. Stir in sugar. Let stand 10 min., stirring occasionally. 

2.  Mix water and pectin in small saucepan. Bring to boil on high heat, stirring constantly. Cook and stir 1 min. Add to fruit mixture; stir for 3 min. (A few sugar crystals may remain.) 
   
3.  Fill all containers immediately to within 1/2 inch of tops. Wipe off top edges of containers; immediately cover with lids. Let stand at room temperature 24 hours. Refrigerate up to 3 weeks or freeze up to 1 year. (If frozen, thaw in refrigerator before using.)    


**This post and photos are property of http://dishingwithdish.blogspot.com/ **

Tuesday, October 11, 2011

Spiced Fig & Plum Jam- No Pectin Needed!

This jam is delicious!  There are a ton of fresh figs here right now; people are selling them out of their yards and they're at farmer's markets all over the island (well, all 4 outdoor markets that I know of... lol).  I've never made anything with them before; my kids like eating them raw and so we usually buy some every fall for that, but don't do much else with them.  I was perusing the blog Not Without Salt and noticed this recipe, and knew I wanted to make it right away- since I'm obsessed with jam and want to make something with local figs, this was perfect!
I have not been able to get pectin here for a while now, so this recipe was perfect in that it does not require pectin!  You just cook the fruit long enough for it to thicken and gel- I assume there is some natural pectin involved here, in the fruits' skin.  When I made this, I did not use the fig peel, but I have since found out that using the peels is just fine; they should cook down enough.  Just cut off the stem and the bottom part.  I left the skin of the plums on; I'm sure this provided some of the gorgeous color.  
This jam has ginger, cardamom, and cinnamon (in the form of a cinnamon stick) included.  I love the flavor of these spices combined with the fruit- my husband says it tastes like Christmas!  I like the fact that it's a nice autumn-y jam; I've already made my share of summer ones.  I also like that there's a lot less sugar in this recipe than in the freezer jams I usually make (and love, but still). 
As far as storage, I did not can this.... I don't really know how and don't have the equipment.  The recipe made a smallish amount anyway, so I figure if we can't go through it in a few weeks, I'll just stick it in the freezer.  I've already used quite a bit of it, though.  I included some lemon juice when I made this, which I think helps preserve it.  But I'm not sure.  I also added it for flavor.

To help you tell when the jam is done, look at this link on making jams without pectin.  I did the plate test, but I actually found this link AFTER making the jam. I'd use the temp test next time, just to make things easier on myself.  

Spiced Fig & Plum Jam
adapted from Not Without Salt

3 tart plums, roughly chopped
1 pound fresh figs, roughly chopped (stemmed)
1 cup sugar (I used raw sugar)
splash of lemon juice
1/4 teaspoon ginger
2 cardamom pods, smashed, or 1/4 teaspoon ground cardamom
1 cinnamon stick
pinch sea salt

1.  Add all ingredients to a medium sauce pan with a small splash of water. Cook and stir on medium until reduced and when placed on a plate that has been placed in a freezer, is the consistency of a slightly loose jam. About 15-20 minutes or so.  The jam should be thickened and everything should be cooked down nicely.  Store in the fridge.  (I kept the cinnamon stick in).
**This post and photos are property of http://dishingwithdish.blogspot.com/**/

Monday, September 19, 2011

Homemade Peanut Butter

I've tried in the past to make plain homemade peanut butter, but always ended up with a large, hard lump of grainy peanuts that wasn't exactly peanut butter.  (I have successfully made both chocolate and white chocolate pb though.... I think the chocolate helps the creaminess department).  When I was recipe surfing on the internet a few weeks ago, I came across a blog that mentioned one had to process peanuts in the food processor for a long time to get creamy peanut butter instead of grainy peanut mess.... like 10-15 minutes.  So, not long after reading that blog, I set out to try homemade peanut butter again!
Use a food processor.... I'm not sure how a blender would work here.  Also, don't let your food processor run for a long period of time without stopping it to rest, or you might burn out your motor.  I let it run about 30 seconds at a time, max.  Even with that, my processor's motor was getting pretty hot by the end  I think it took about 8-9 minutes for me to make peanut butter.  I'm actually scared to do this often because I don't want to ruin my food processor.  (I have a Kitchenaid one and love it!)  So, if you try this, just be careful. 

Your peanuts will go through several stages- sandy, grainy, a big blob that moves slowly around your food processor.... just stop frequently, scrape down the sides and bottom, and stir it around and break it up.  Eventually, it will be smooth and creamy- real peanut butter!!!  I adeded a bit of sunflower oil to help it along.  I also added some honey for sweetness, but I didn't add enough to taste it; probably only 2 teaspoons or so.  Add more if you want!

Homemade Peanut Butter
What a Dish!

1 1/2 to 2 cups roasted peanuts, lightly salted
1-2 teaspoons sunflower or canola oil
honey, to taste, optional

1.  Place peanuts in processor and process, breaking them up into grainy pieces.  Add the oil and honey, if using, and process for 8-15 minutes, stopping the maching every 30 seconds or so to give it a rest.  Stir and break up the peanuts with a long spoon during every few breaks.  Process until you have smooth and creamy peanut butter!
**This post and photos are property of http://dishingwithdish.blogspot.com/**