Showing posts with label Carlsbad Cravings. Show all posts

Tuesday, July 11, 2023

Carnitas Bowls

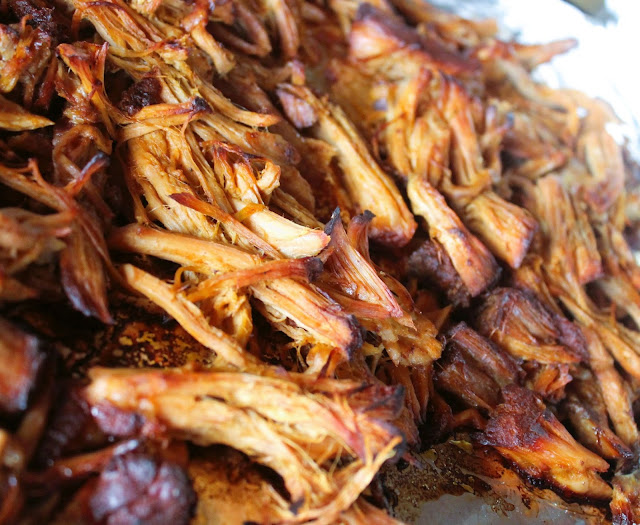
I made this Carnitas recipe again recently, but instead of using it as a taco filling, we made Carnitas bowls with the meat, rice, sauteed veggies, pickled red onions, salsa, cilantro-lime dressing, jalapenos, and fresh cilantro. So good and flavorful! There is a lot of prep, but you can do a lot of things ahead of time. 
Carnitas Bowls 
adapted from here

4-5 lbs pork shoulder/pork butt trimmed of excess fat (can use smaller, too)
1 tablespoon olive oil
1/4 cup orange juice
2 tablespoons lime juice
1 teaspoon liquid smoke
2 bay leaves
1 onion, chopped
1 jalapeno, deveined, deseeded, chopped, optional

Wet Spice Rub:
3 tablespoons olive oil
2 tablespoons tomato paste
1 tablespoon reduced sodium soy sauce
1/4 cup brown sugar, packed
1 tablespoon ground cumin
2 tsps EACH dried oregano, salt
1 tsp EACH chili powder, garlic powder, onion powder
1/2 tsp EACH smoked paprika, pepper
1/2-1 teaspoon ground chipotle chili pepper (optional; adds heat)

Toppings:
Warm cooked rice
Sauteed peppers and zucchini (or fave veggies)
Fresh or jarred salsa
Cilantro-Lime Dressing (scroll down) OR sour cream
Pickled jalapenos
Fresh cilantro

1. Heat 1 tablespoon olive oil over high heat in a large nonstick skillet. Using tongs or 2 forks, sear pork on all sides until lightly browned. Transfer pork to a large plate or cutting board until cool enough to handle. (If I'm feeling super lazy I skip this searing part.... because it does get seared or broiled at the end. You can choose to do this, or just dump it all in the crockpot without searing.) 

2. Meanwhile, whisk together all of the Wet Spice Rub ingredients in a medium bowl. When pork is cool enough, massage Wet Spice Rub evenly all over, then transfer pork to slow cooker. Add orange juice, lime juice, liquid smoke, and 2 bay leaves to slow cooker. Top pork with onions and optional jalapeno. Cook on LOW for 8 to 10 hours or on high for 5-6 hours OR until pork is fall apart tender and easily shreds with a fork.

3. Remove pork from slow cooker to cutting board, shred, and add back to slow cooker and toss with juices. Cook on low for 20 minutes. Meanwhile, preheat oven to 450 degrees F. Line a large baking sheet with foil.

4. After 20 minutes, remove pork (do NOT discard juices in slow cooker) and add shredded pork to baking sheet in an even layer. Drizzle with some of the remaining juices (about 1/4 cup) and bake for 15 minutes then broil to desired crispiness, watching closely so meat doesn’t burn (about 5-10 minutes). Drizzle with additional juices and toss. Another way to crisp the meat up is to sear in batches in a non-stick skillet on the stove.  (Or use a counter-top griddle.) 

5. Serve warm over rice with sauteed veggies, pickled red onions, salsas/sauces, pickled jalapenos and fresh cilantro. (Or other fave toppings!)
**This post and photos are property of http://dishingwithdish.blogspot.com/**

Thursday, May 11, 2023

Sweet Pulled Pork


Yum. I finally tried another Sweet Pork recipe; my first one being in 2009. I used to make that one all the time, but then stopped for some reason. I spotted this one on Carlsbad Cravings and wanted to give it a try. Like all of the recipes on that site, this is super flavorful and there is a lot involved if you want to add even more flavor (making some Cilantro-Lime Ranch), BUT, you can prep a lot ahead of time. One should make the dressing ahead of time so it thickens and becomes more flavorful. I have a good recipe for Cilantro-Lime Ranch already that goes with my old Sweet Pork recipe, but I tried this one and it was also wonderful. I used green salsa in place of the tomatillos. 

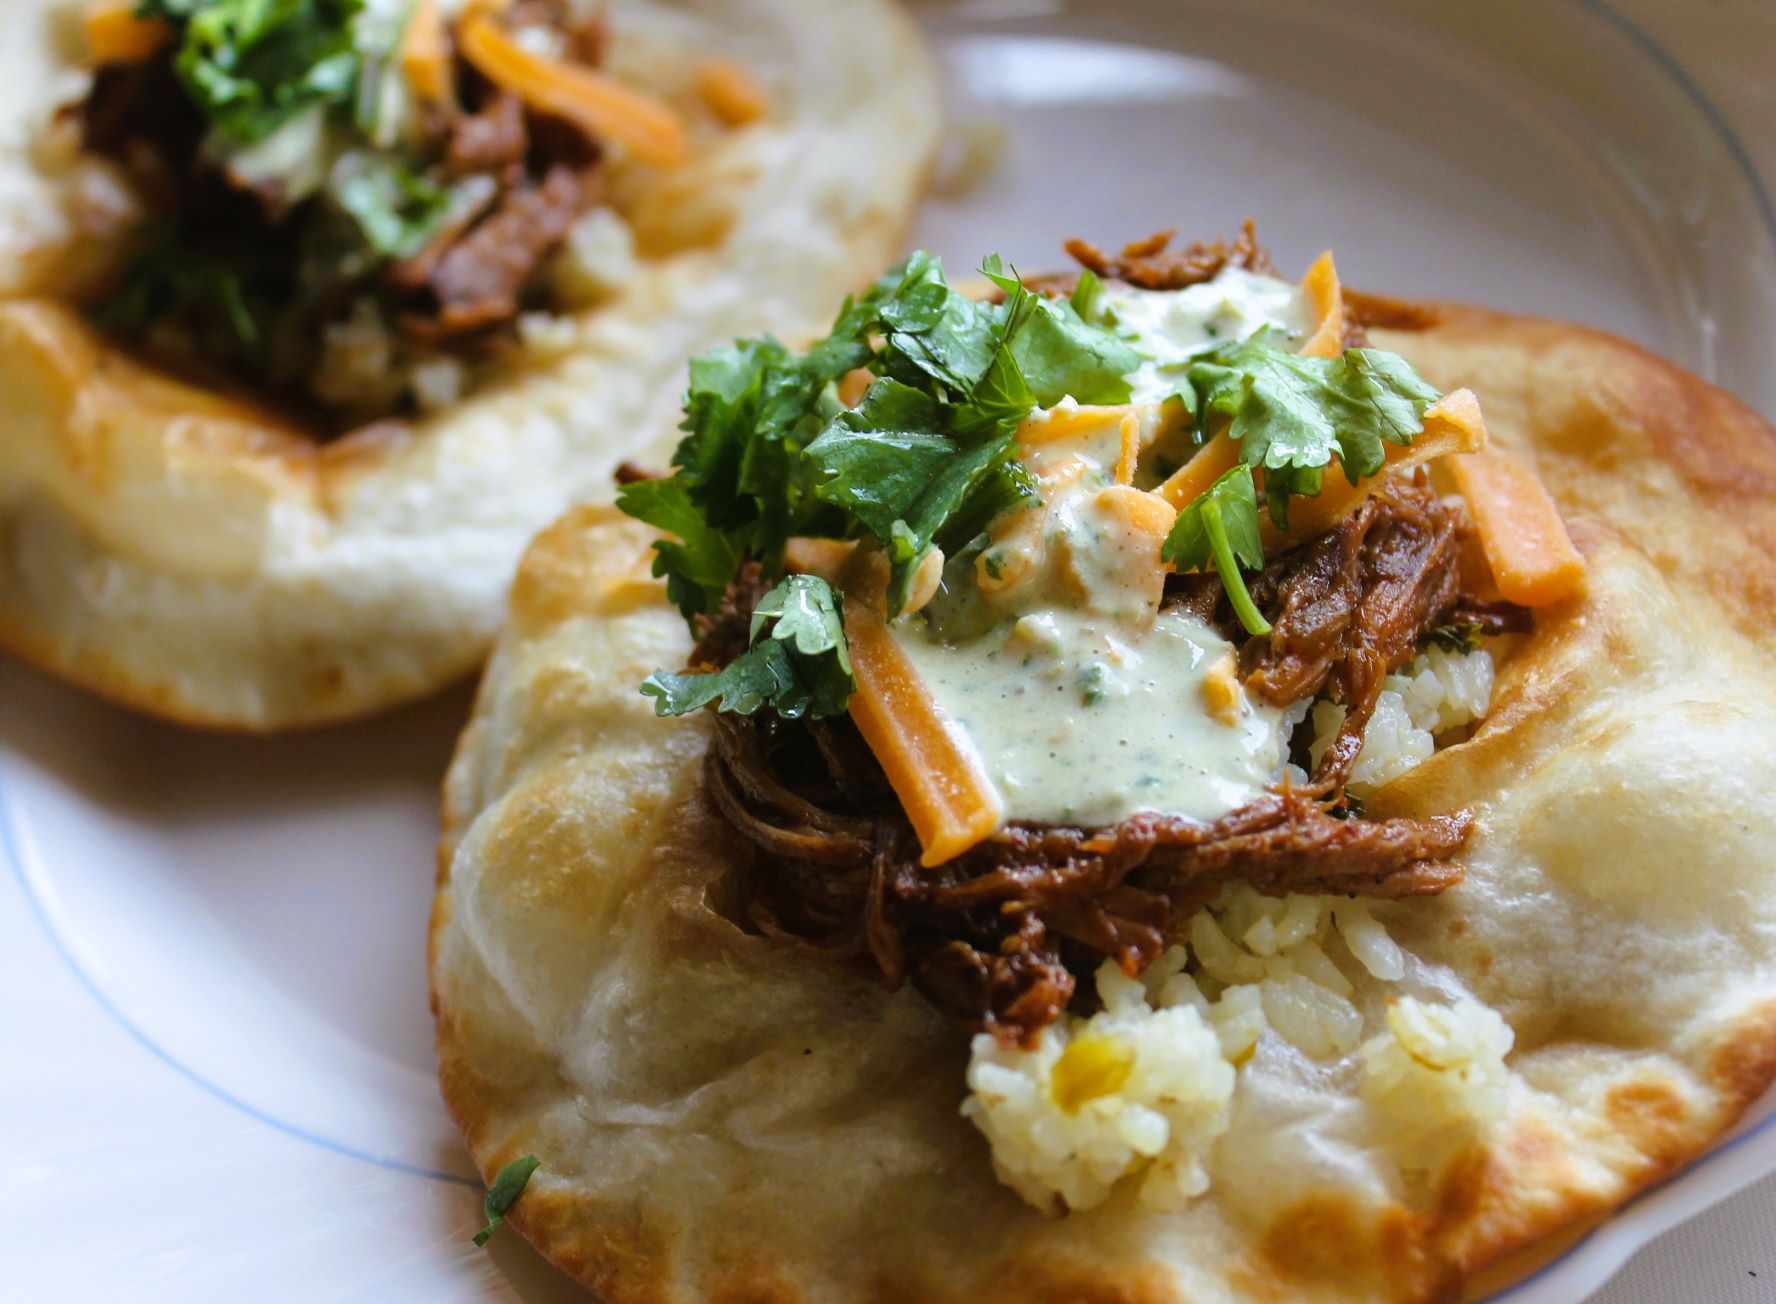
The first night, we ate the pork and sauce in tacos (1st pic). The second night, we used the leftover meat with leftover Cilantro Lime Rice in the best rice bowls I have ever had in my life. (Other pics.)  (Click on this recipe and scroll all the way to the bottom for the Cilantro Lime Rice recipe- made in a rice cooker.) We topped the bowls with the leftover Cilantro Lime Ranch (recipe below) fresh cilantro, pickled jalapenos, and sliced avocados. Omgosh- I absolutely loved this meal. It was SO GOOD. I love sweet pork tacos but maybe I'll make this again just for rice bowls. 

Note: For the enchilada sauce, I used the leftovers from this recipe. But you can use a small can. 

Sweet Pulled Pork  
adapted from Carlsbad Cravings

4-5 lbs boneless pork shoulder (pork butt) trimmed of excess fat
1 1/2 Tablespoons EACH chili powder, garlic powder
1 ½ – 2 teaspoons chipotle chili powder
1 1/2 tsp EACH salt, onion powder, smoked paprika, cumin
3/4 teaspoon pepper

SLOW COOKER PHASE 1
3/4 cup Coke, NOT diet
1/2 cup mild salsa
1/3 cup packed brown sugar
1 4 oz. can mild diced green chilies

SLOW COOKER PHASE 2
3/4 cup enchilada sauce
1/4-1/2 cup packed brown sugar
1 4 oz. can mild diced green chilies
All remaining Mixed Spices
salt to taste
Hot sauce to taste

1.  Mix all of the mixed spices together in a resealable container. Set aside. Lightly grease slow cooker with nonstick cooking spray. Set aside. Transfer pork to slow cooker. Separate out 1 ½ tablespoons spices to use after the pork is cooked. Rub all remaining spices evenly over all sides of pork (it will seem like a lot but use all of it).

2.  Add all Slow Cooker Phase 1 Ingredients to the pork. Cook on LOW for 6-8 hours or until pork is tender enough to shred. Shred pork into larger sections in crock pot and continue to cook on LOW for 30 minutes.

3.  Transfer all of the slow cooker contents to a strainer to drain off excess liquid from pork. Transfer pork to cutting board and shred into smaller pieces and discard any excess fat. Add pork back to slow cooker (along with any accumulated green chiles, etc.) then stir in all of Phase 2 ingredients starting with just 1/4 cup brown sugar. Cook another 15-30 minutes on LOW or until heated through OR just keep on the warm setting if you aren’t serving immediately. Taste and add additional brown sugar for sweeter, hot sauce for spicier or more enchilada sauce for saucier.

4.  Serve in tacos, enchiladas, burrito bowls, etc. with Cilantro Lime Dressing (recipe below) along with Cilantro Lime Rice and any toppings you desire.

Cilantro Lime Dressing
adapted from Carlsbad Cravings

1/3 cup packed cilantro
1 tomatillo, husks removed and roughly chopped (or a few TBS green salsa)
1 jalapeno deveined, seeded, roughly chopped, or some pickled slices
1garlic clove, peeled
1/2 cup real mayonnaise
1/2 cup sour cream; may sub Greek yogurt
1 1/2 teaspoons lime juice 
1 tablespoon dry ranch seasoning mix (I used Penzey's buttermilk dressing mix)
1/4 teaspoon smoked paprika optional 
Milk as needed

1.  Add all of the ingredients to a blender puree until smooth, scraping sides down as needed. Add milk, a tablespoon at a time to reach desired consistency. Chill before serving. Dressing will thicken in the refrigerator. Keeps well for 5-7 days in the fridge. 

**This post and photos are property of http://dishingwithdish.blogspot.com/ **

Monday, May 1, 2023

Crispy Baked Chicken Tacos + Cilantro Lime Rice

These tacos were so tasty, with a great crisp texture, as well. I want to use this method with other filling and make crispy baked tacos galore. This recipe made 10 crispy tacos, which was enough for my fam to have 2 each, and everyone wanted more. This recipe used homemade red enchilada sauce, homemade Cilantro Lime Rice (optional; recipe at bottom of this post) and a homemade cilantro sour cream dressing. I'll include all recipes below. (Note: you'll only need about 1/2 recipe of the enchilada sauce... I used the rest in a new Sweet Pork recipe.... I'll post that one later.  OR, you could just make 1/2 recipe.)  I made the enchilada sauce the day before, and de-boned a rotisserie chicken the day before, so that when it came time to make dinner, I just had to assemble everything. One could use a can of red enchilada sauce, but I've never enjoyed the flavor of the canned stuff. If you do though, by all means, try it in this recipe!

One could make these for Cinco de Mayo!! 

Crispy Baked Chicken Tacos 
adapted from Carlsbad Cravings

1/2 recipe Homemade Enchilada Sauce, recipe follows
4 cups shredded chicken (I used rotisserie chicken)
12 soft white corn tortillas
2 cups favorite shredded cheese (I used cheddar)

Cilantro Lime Sauce
1 cup sour cream or plain Greek yogurt
2 tablespoons lime juice
1-2 tablespoons milk
1/2 cup packed cilantro, finely chopped (measure before chopping)
2-4 tablespoons chopped pickled jalapenos (optional)
1/2 tsp EACH garlic powder, onion powder, dried parsley, dried chives, dried dill
salt, pepper to taste

Red Enchilada Sauce (make 1/2 recipe if not needing it for another recipe):
3 tablespoons all-purpose flour
3 tablespoons chili powder NOT cayenne pepper
1 tsp EACH ground cumin, garlic powder, onion powder, ground coriander
1/2 tsp EACH smoked paprika, salt, dried oregano
1/4 teaspoon cayenne pepper optional for spicier
2 tablespoons unsalted butter
2 tablespoons vegetable oil or other neutral oil
1/4 cup tomato paste
3 cups reduced sodium chicken broth
1 teaspoon unsweetened cocoa powder
1 teaspoon sugar
a pinch of cinnamon
1 teaspoon apple cider vinegar

Optional Toppings: 
Guacamole
Pico de Gallo
Pickled Red Onions
Hot Sauce

1.  Cilantro Lime Ranch: Whisk all of the ingredients together in a medium bowl. Refrigerate until ready to serve. I made this a day ahead.

2.  Enchilada Sauce. Whisk the flour and all seasoning together in a small bowl (through oregano or optional cayenne pepper); set aside. Melt the butter in the vegetable oil in a large cast iron skillet over medium heat. Whisk in the flour mixture and cook while whisking for 2 minutes. Whisk in the tomato paste until completely combined and continue to cook for 1 minute. Reduce the heat to low, then gradually whisk in the chicken broth. Continue to whisk until smooth and the lumps are dissolved. Whisk in cocoa powder, sugar and cinnamon. Bring the sauce to a simmer and continue to simmer, whisking often, until it thickens to your desired consistency, about 5-7 minutes. Keep in mind the sauce will thicken a little as it cools. Remove from heat and stir in apple cider vinegar. Taste and adjust seasonings as desired with additional salt, cayenne, sugar or vinegar. If the sauce thickens too much, simply whisk in additional chicken broth, a little at a time until it reaches desired consistency.

3.  Preheat the oven to 425 F. Chicken: Add desired amount of sauce to the shredded chicken in a large bowl (more or less depending on how "saucy" you like your tacos) and stir to combine.

4.  Prep tortillas: Working in 2 batches, place 6 tortillas between two damp paper towels and microwave for 30-60 seconds, or until pliable. Lightly brush the top of the tortillas with olive oil then flip over (the oiled side should now be face down, touching the baking sheet so it gets crispy).

5.  Assemble: Add a layer of cheese to the bottom half of the tortilla and top it with about 1/4 to 1/3 cup chicken. Fold the tortillas over in half and lightly press so they stay folded, you may need to flip the whole taco over so it stays. Repeat with remaining tortillas.

6.  Bake: Bake at 425 degrees F for 8 minutes, flip the tacos over and bake an additional 8 minutes. If the tortillas aren’t crispy, then flip and bake an additional 5 minutes OR until crispy. Stuff with desired toppings and eat. If desired, serve with Cilantro Lime Rice, recipe below.

Cilantro Lime Rice (Rice Cooker)
adapted from Carlsbad Cravings 

1 cup white rice (I used jasmine)
1 1/2 cups chicken broth
1 teaspoon garlic powder
1 teaspoon cumin
1 teaspoon onion powder
dash cayenne pepper
1 4-oz can diced green chiles (I used Hatch)

1.  Add rice, chicken broth (check amount according to your rice cooker), 1 teaspoon garlic powder, 1 teaspoon ground cumin, 1 teaspoon onion powder, dash of cayenne pepper, and 3 tablespoons mild diced green chiles.

2.  Set rice cooker to cook setting. Once rice is cooked, stir in butter to melt and season with salt and pepper to taste. Stir in 2 tablespoons lime juice and ½ cup loosely packed cilantro, chopped. Serve with tacos.
**This post and photos are property of http://dishingwithdish.blogspot.com/ **

Saturday, April 15, 2023

Thai Drunken Noodles

There is no alcohol in this noodle dish, but different stories about the name. The dish is very flavorful and full of veggies. One can do lots of prep work the night or morning before, if needed, so this has the potential to come together very quickly. This pic was taken with the leftovers; in the process of re-heating on the stove, some of the noodles broke up, but it was still tasty. (Best way to reheat- in a small non-stick pan/skillet with some water added as it cooks slowly, while stirring with a silicone spatula.)
Thai Drunken Noodles
adapted from Carlsbad Cravings

CHICKEN
12 ounces chicken thighs, chopped into bite size pieces
1 tablespoon reduced sodium soy sauce
1 teaspoon toasted sesame oil
1 teaspoon cornstarch

SAUCE
3 tablespoons oyster sauce
3 tablespoons reduced sodium soy sauce
2 tablespoons dark brown sugar (may sub light)
1 tablespoon fish sauce
1 tablespoon rice vinegar
1 teaspoon molasses *don’t skip!
1/2 tsp EACH ground coriander, ground ginger
1/4 teaspoon pepper

NOODLE STIR FRY
3 tablespoons vegetable or peanut oil, divided
8 ounces wide rice noodles, fresh or dried
2-3 Birdseye/Thai chili peppers, deseeded and finely chopped, optional (I left out)
½ medium white onion, thinly sliced
1 red bell pepper, thinly sliced
6 ounces baby corn, halved
4 cloves garlic, minced
1 cup Thai basil leaves, loosely packed (may sub regular basil)
½ cup grape tomatoes, halved

1. Chicken: Whisk together 1 tablespoon soy sauce, 1 teaspoon sesame oil and 1 teaspoon cornstarch in a medium bowl. Add chopped chicken and toss to evenly coat; set aside.

2.  Noodles (skip this step if using fresh noodles): Place the wide rice noodles in a large bowl and pour boiling water over top until completely submerged and give them a good stir. Let them soak until softened, pliable, and limp but not fully tender/still al dente, stirring occasionally so they don’t stick together, about 12-15 minutes (less for thinner noodles). Rinse noodles in cold water, while separating any stubborn noodles with your fingers. Drain and toss with 1 teaspoon sesame oil. Set aside.

3.  Sauce: Whisk all of the Sauce Ingredients together in a medium bowl; set aside.

STIR FRY
4.  Heat 2 tablespoons vegetable oil in a wok over high heat or large nonstick skillet over medium-high heat. Once very hot, add chicken, onion, and chilies and cook for 2-3 minutes. Add bell peppers, corn and garlic and stir fry 2-3 minutes.

5.  Leave the chicken mixture in the pan. IF USING A WOK, add 1 Tablespoon additional oil and heat over high heat. IF USING A NONSTICK SKILLET, heat 1 teaspoon additional oil over medium-high heat (the oil helps prevent the noodles from sticking).

6.  Add the noodles and sauce to the pan and toss to combine. Spread the noodles over the surface of the pan and let them sit without touching for about 30 seconds. Flip the noodles and spread them out again; repeat 2-3 times until the noodles soak up the sauce, start to caramelize and reach desired tenderness.
Add the tomatoes and basil and toss to combine. Stir fry another 1 minute. Serve immediately.

**This post and photos are property of http://dishingwithdish.blogspot.com/ **

Thursday, February 9, 2023

Thai Red Curry with Beef

I totally meant to make this the intended way- with chicken- but I had a package of stir-fry beef in the fridge, already cut-up and ready to go. I could not resist the ease of just throwing that in and not having to cut raw meat. I hate cutting raw meat. I was pleasantly surprised to realize this tasted super, super amazing with the beef. I might like this better than my fave Panang Beef Curry.  I don't know..... the flavors on this Red Curry were just amazing. So perfect. I'm still thinking about it and I made it almost 2 weeks ago. It IS a bit more work than my Panang, since this one requires chopping veggies.  But, because of said veggies, it also feels like a healthier dish. You've got to try this one. I used Thai Kitchen red curry paste and it was not too spicy at all. I want to try this with chicken soon and see which one I prefer. (PS: Some of the pics look like ground beef, but it's not... it's thinly sliced steak.)

Thai Red Curry with Beef  
adapted from Carlsbad Cravings

1 1/2 tablespoons coconut oil
1 pound thinly sliced steak (such as stir-fry steak) OR 1 pound chicken breasts, sliced thin
1/2 large onion, chopped
2 tablespoons red curry paste
1 red bell pepper, thinly sliced then chopped into 2” pieces
1 orange or yellow bell pepper thinly sliced then chopped into 2” pieces
1 small zucchini, sliced
2 teaspoons freshly grated ginger
4 garlic cloves, minced (I used garlic/ginger paste for the ginger + garlic)
1 13.5 oz. can quality coconut milk
1 tablespoon Asian/Thai Sweet Chili Sauce (like Mae Ploy)
2 tablespoons reduced-sodium soy sauce
2 tablespoon fish sauce
2 tablespoons lime juice
1 tablespoon coconut palm sugar OR brown sugar
1 kaffir lime leaf OR 1 bay leaf
1/2 teaspoon dried basil
1/4 teaspoon salt more or less to taste
1/4 teaspoon pepper
sriracha to taste/Asian chili sauce (optional)

GARNISH
fresh basil
fresh cilantro
fresh lime juice
Steamed Rice, for serving

1.  Heat oil over medium high heat in large nonstick skillet. Add chicken or beef, onion and red curry paste and cook just until meat is no longer pink. Add bell peppers, zucchini, ginger and garlic and sautĆ© 1 minute. Add the coconut milk. Add all remaining ingredients (expect Garnishes).

2.  Bring to a boil, then reduce to a simmer for 5 minutes or until the sauce thickens and the vegetables reach desired crisp-tenderness. Discard kaffir lime/bay leaf. Garnish with additional optional fresh basil, cilantro, lime juice and Sriracha to taste. Serve with rice.
**This post and photos are property of http://dishingwithdish.blogspot.com/ **

Monday, January 30, 2023

Mexican Street Corn (Elotes) Dip

Oh wow, I absolutely loved this dip. I made it for our dinner a bit ago, just because I wanted to- no special occasion, except my local store had delicious tortilla chips- the kind made from whole fried tortillas- usually impossible to find here. They were wonderful with this dip. The brand was Cazo de Oro. They reminded me of Juanita's tortilla chips sold in the NW. Sadly, they are all gone now, and I can't find more. I added some Trader Joe's "Everything But the Elote" seasoning mix to this recipe, making it even better. (I added that in lieu of the salt/pepper.) 

PS: I used canned corn for this, per the recipe, and it was wonderful. This might be the first time I've ever used canned corn (besides creamed corn, for recipes). It didn't have the "canned corn" taste like I feared, and the original recipe stated canned corn held up better for this recipe than frozen. I used one can white, one can yellow.  I also used Japanese Kewpie Mayo; which I think made this even more divine! Use what you have, though.  


Mexican Street Corn (Elotes) Dip
adapted from Carlsbad Cravings

12 ounces cream cheese, softened
1 cup sour cream
1/2 cup mayonnaise
2 tablespoons lime juice
1 ½ teaspoons chili powder
1 teaspoon ground cumin
1/2 tsp EACH salt, pepper OR 1 tsp TJ's "Everything But the Elote Seasoning"

ADD LATER
4 oz. can diced green chiles, drained (I used Hatch green chilis- yum)
4 oz. can diced jalapeno peppers, drained (or less to taste)
1/2 cup cilantro, chopped (measure before chopping)
1/4 cup thinly sliced green onions
1 cup shredded sharp cheddar cheese
2 cups shredded Pepper Jack cheese, divided
1/2 cup cotija cheese, crumbled, divided (OR use crumbled Feta)
1 tablespoon olive oil
2, 15 oz. cans sweet corn, drained, rinsed, air-dried for a bit (I used one can white, one can yellow)
2 cloves garlic, minced

1. Preheat oven to 350 degrees F.  Add cream cheese, mayonnaise, sour cream, lime juice and all seasonings to a large bowl. Stir until combined (use a handheld mixer if desired to make it extra creamy).  Stir in green chilies, jalapenos (add to taste), cilantro, green onions, cheddar, 1 cup Pepper Jack cheese, and ¼ cup Cotija/Feta; set aside.

2.  Heat oil in a large cast iron skillet over a medium-high heat. Add the corn and cook for 5-7 mins, until slightly charred. Add garlic and sautĆ© for 30 seconds. Transfer corn to the cream cheese mixture and stir to combine.

3.  Spoon mixture into an ungreased 2-qt. baking dish or 10” skillet and spread into an even layer. Evenly top with remaining 1 cup pepper Jack and ¼ cup Cotija/Feta cheese.  Bake uncovered at 350 degrees for 15-20 minutes or until cheese is hot and bubbly. Garnish with additional cilantro, Cotija and jalapenos or hot sauce if desired. Serve with your favorite tortilla chips.


**This post and photos are property of http://dishingwithdish.blogspot.com/ **

Wednesday, July 6, 2022

Baked Feta Pasta (TikTok Inspired Pasta)

I've had this recipe bookmarked to try for a long time- the infamous TikTok Feta Pasta. I think I'm over a year late, but whatever. This pasta combines some of my favorite flavors- feta, tomato, and pesto, with another love- pasta. (I'm not sure if pesto is included in the original recipe, but it's a lovely addition. If you don't have pesto, just make this recipe without-it'll still be wonderful). You'll need a block of feta for this, not the crumbled variety (I think it would dry out way too much). Combine with 12 oz of pasta (or less); a pound would render this recipe way too dry. A kitchen scale is handy to have for recipes like this, OR you might be lucky and find a 12 oz. box of pasta in the store, like I did. :) 

Baked Feta Pasta (TikTok Inspired) 
adapted from Carlsbad Cravings 

8-12 ounces medium dry pasta like gemilli, rotini, fusilli (I use 12 oz- it's plenty saucy this way, but if you want it even saucier, use less pasta)
2 pints cherry tomatoes, rinsed (20-25 ounces)
½ cup chopped sun dried tomatoes in oil (optional- I've never done this but want to next time)
¼ cup basil pesto
2 tablespoons olive oil + more for drizzling
½ tsp EACH dried oregano, dried parsley
¼ tsp EACH dried thyme, salt, pepper
1 7-8 oz. block feta (not crumbled)
2 cloves garlic, minced
2-3 tablespoons chopped basil

1.  Preheat oven to 425 degrees F.  Add the tomatoes, sun-dried tomatoes (if using), pesto, olive oil, oregano, parsley, salt, pepper, thyme and red pepper flakes. Stir all of the ingredients together until evenly coated.  Make room in the center of the dish and add the feta. Drizzle the top of the feta with olive oil.

2.  Bake uncovered for 35 minutes or until the until the feta is soft/melty and tomatoes are bursting. Meanwhile, chop the garlic and basil and cook the pasta in salted water according to the package directions (plan on adding the pasta to the boiling water 10 minutes before the feta and tomatoes are done). Before draining the pasta, reserve 1 cup of the pasta cooking water for later. Remove the dish from the oven and immediately add the garlic and basil and stir for 30 seconds so the residual heat can cook the garlic.

3.  Using a silicone spatula or large serving spoon, press down on the feta cheese to break it down and make it creamy; then stir everything together until completely combined to create the sauce. Add the pasta and toss to evenly coat with the sauce. For a creamier pasta (recommended), stir in desired amount of reserved pasta water ¼ cup at a time until it reaches desired consistency.  Taste and season with additional salt if needed. 

**This post and photos are property of http://dishingwithdish.blogspot.com/ **

Saturday, July 2, 2022

Loaded Ground Beef Nachos


These nachos were delicious. There are a lot of different things to prepare, but you can chop toppings, etc ahead of time. I loved the ground beef mixture, but not everyone in my fam did, and it makes a lot. However, leftovers are good, too. The nacho cheese sauce is something I'll make again just on its own sometime soon to eat with tortilla chips for some un-fancy nachos. I like that it uses evaporated milk; it makes it more stable and you don't have to worry about separation. It's combined with cornstarch, so you don't have to make a roux with this recipe. I bet one could keep the cheese sauce warm in a small crockpot set to low- I'll have to try it sometime. 


Loaded Ground Beef Nachos 
adapted from Carlsbad Cravings

GROUND BEEF AND BEANS
1 pound lean ground beef
1 1/2 teaspoons chili powder
1 tsp EACH ground cumin, onion powder, garlic powder
1/2 tsp EACH smoked paprika, dried oregano, salt
¼ teaspoon pepper
dash -¼ teaspoon cayenne pepper (optional, to taste)
1 16 oz. can refried beans
1/2 cup salsa  (medium for more of a kick)
1/4 cup sour cream
1/4 cup water

QUESO BLANCO
1 12 oz. can evaporated milk
2 teaspoons cornstarch
1 cup sour cream full fat please
2 oz. freshly, finely shredded Pepper Jack or Monterrey Jack cheese (1 cup loosely packed, ½ cup packed)
2 oz. freshly, finely shredded mozzarella cheese, (may sub Monterrey Jack cheese) (1 cup loosely packed, ½ cup packed)
2 oz. freshly, finely shredded sharp cheddar cheese (1 cup loosely packed, ½ cup packed)
3 tablespoons canned mild chopped green chiles
1-3 tablespoons canned diced jalapeno peppers
1 tablespoon juice from the jalapenos can
1 tsp EACH chicken bouillon, chili powder
½ tsp EACH ground cumin, onion powder, garlic powder, salt, pepper

SUGGESTED TOPPINGS
14 ounces thick/sturdy tortilla chips
Sour cream
Guacamole
Pico de gallo or chopped tomatoes and cilantro
Sliced olives
Pickled jalapenos
Green onions
Chopped Tomatoes

1.  Prepare toppings: Have all the toppings ready to go so you can quickly assemble the nachos as soon as you add the cheese sauce.

2.  Cheese Sauce (Queso Blanco):  Whisk evaporated milk and cornstarch together in a medium saucepan until smooth. Once combined, bring to a simmer, whisking constantly. Once it begins to simmer (bubbling on the sides but not boiling), reduce heat to low.  Whisk in sour cream until completely smooth.  While the heat still on low, stir in cheeses about ¼ cup at a time, whisking constantly until smooth/melted before adding more cheese. Once cheese is entirely melted, stir in all remaining ingredients, adding more or less jalapenos to taste. (If the dip seems thick/stringy, it means the cheeses aren't completely melted yet; just keep stirring.) The Queso Blanco will stay creamy but thicken as it cools. Stir occasionally to mix in the skin that forms on top. You can re-heat dip in the microwave or gently on the stove at any point to warm up/thin. You can also thin the dip further by stirring in milk to reach desired consistency.

3.  Brown beef: Brown beef in a large skillet over medium heat until almost cooked through; drain grease. Stir in all of the spices/seasonings, followed by refried beans and salsa until well incorporated, followed by sour cream. Heat through, then stir in water, 1 tablespoon at a time until it reaches a thick but somewhat spreadable consistency. You don't want it thin or it will make the nachos soggy.

4.  Serving: Have the toppings, beef mixture, cheese sauce, and tortilla chips on the table and let everyone make their own plate of nachos with whatever they desire. 

**This post and photos are property of http://dishingwithdish.blogspot.com/ **

Friday, June 3, 2022

Ramen Noodle Stir Fry

I loved this Ramen Noodle Stir Fry. It was pretty easy to make (I keep a lot of Asian condiments on hand), tasty, and felt healthy with the veggies. I used a bag of frozen broccoli florets and was really happy with the turnout- and it saved a lot of time. I can't wait to make this again- the leftovers were great, too. 

I graduated with my Bachelor's in Education today!! Tomorrow, my oldest son graduates from High School.  Good times. 

Ramen Noodle Stir Fry 
adapted from Carlsbad Cravings 

3 (3 oz.) ramen packets (9 ounces total), seasonings discarded
drizzle of toasted sesame oil (or a neutral oil)
1 pound lean ground beef 
1 small onion, chopped (half large onion)
3 cups medium broccoli florets (I used a bag of frozen broccoli florets)
2 thinly sliced carrots
1 red bell pepper chopped into 1/2” pieces
1 tablespoon freshly grated ginger, or 1 tsp ground
4-6 garlic cloves, minced or 1 tsp powder
chopped green onions for garnish (optional)

SAUCE
3/4 cup low sodium chicken broth
1/3 cup reduced sodium soy sauce
3 tablespoons Asian sweet chili sauce (like Mae Ploy)
2 tablespoons oyster sauce (Lee Kum Kee or Kikkoman)
1 tablespoon rice vinegar
1 tablespoon brown sugar
1 tablespoon cornstarch
2 teaspoons Asian hot chili sauce, optional (I didn't include)

1. Cook ramen in boiling water for 2 minutes (they will cook a bit more later). Rinse with cool water and toss with a drizzle of sesame oil to prevent the noodles from sticking. Set aside. (I skipped the oil but there is the danger of them sticking here.)

2. Whisk Sauce ingredients together in a medium bowl; set aside.

3. Heat a large wok, heavy bottom stainless steel pan or cast-iron skillet over medium high heat. Add ground beef and onions, and cook until the beef is almost cooked through. Add broccoli, carrots, bell peppers, garlic and ginger and cook an additional 2 minutes.

4. Stir in the sauce and bring to a simmer. Simmer for about 1 minutes, until thickened. Add the ramen and toss until evenly coated and the noodles are cooked to your liking, about one minute. Taste and season with additional chili sauce, salt and pepper as needed. Garnish with green onions if desired.

**This post and photos are property of http://dishingwithdish.blogspot.com/ *

Monday, April 19, 2021

Corn & Sausage Chowder

I loved this flavorful corn & sausage chowder.  It was pretty easy to make too.  I reduced the recipe a bit, and it was still huge... we had leftovers for a few days.  I'll re-write the recipe the way I did it, below.  
Corn & Sausage Chowder
adapted from Carlsbad Cravings

1 tablespoon olive oil
1 lb. hot bulk Italian sausage (if using links, remove casings)
1 medium yellow onion chopped
1 cup chopped carrots
2 1/2 cups Yukon gold potatoes peeled and diced into 1/4-1/2” cubes
2-3 cloves garlic minced
red pepper flakes to taste, optional
1/3 cup all-purpose flour
2 14.75 oz. cans cream style corn
2 cups corn fresh or frozen (not thawed) 
2 teaspoons chicken bouillon
1 teaspoon dried parsley
1/2 tsp EACH dried oregano, dried thyme, salt
1/4 teaspoon pepper1
1 bay leaves
4 cups low sodium chicken broth
1 cup half and half, light cream, or heavy cream

1.  Heat one tablespoon oil in a large soup pot/Dutch oven over medium heat-high. Add sausage, onion, and carrots and cook until sausage is cooked through and onions are tender.  Add potatoes, garlic, red pepper (if using) and sautĆ© 30 seconds.

2.  Sprinkle in flour and cook an additional 1 minute while stirring (it will be thick).

3.  Stir in creamed corn, corn, chicken bouillon, bay leaves and all seasonings. Whisk in chicken broth.
Cover and bring to a boil.  Uncover and reduce to a simmer. Simmer, uncovered, for 15-20 minutes or until potatoes are very tender, stirring occasionally so the bottom doesn’t burn.

4.  Stir in half and half/cream and heat through. Discard bay leaves. Taste and season salt/pepper to taste if desired.
**This post and photos are property of http://dishingwithdish.blogspot.com/**

Sunday, September 20, 2020

Stovetop Chicken Fajitas


We loved this fajita recipe.  I made it months ago- lol- but haven't had a chance to post it.  The pics could be better, but don't let that stop you- these are delicious with so much flavor.  Try to make the Chipotle Crema with this- it really adds such great flavor.  
Stovetop Chicken Fajitas
adapted from Carlsbad Cravings

2 large chicken breasts sliced horizontally to create 4 fillets (1 1/2 pounds)
1/2 red onion, thinly sliced
3 bell peppers, thinly sliced (any mix of colors)
8-12 flour tortillas

Chicken Fajita Marinade:
2 tablespoons olive oil
3 tablespoons brown sugar
2 tablespoons orange juice
2 tablespoons lime juice
2 tablespoons reduced sodium soy sauce
1 tablespoon Dijon mustard
1 tablespoon chili powder
1 1/2 teaspoons ground cumin
1 tsp EACH garlic pwdr, onion pwdr, salt
1/2 tsp EACH smoked paprika, chipotle chili pwdr, dried oregano
1/4 teaspoon pepper
2 teaspoons liquid smoke

Chipotle Lime Crema (optional):
1 cup sour cream
2 tablespoons mayonnaise
1-2 tablespoons lime juice, to taste
1/2 teaspoon salt
1/4 - 1/2 teaspoon chipotle chili powder
1/4 cup packed cilantro, finely chopped
Filling/Topping Ideas

cheese
Guacamole/chopped avocados
Recipe Avocado Crema
salsa
Chopped tomatoes
black beans
cilantro
Freshly squeezed lime juice

1.  Marinade: In a large freezer bag, whisk together all of the Chicken Fajita Marinade ingredients. Remove 2 tablespoons to use later for vegetables. Add chicken to freezer bag and toss to coat. Marinate in the refrigerator 6 hours up to overnight (longer the better).

2.  Chipotle Lime Crema (optional): Whisk together all of the ingredients. Refrigerate in an airtight container until ready to use.

3.  Chicken: When ready to cook, let chicken sit at room temperature for 15-30 minutes. Heat 1 tablespoon olive oil in a large skillet over medium high heat. Once very hot, dab excess marinade off chicken and add to skillet. Cook chicken undisturbed for 2-3 minutes, or until nicely browned (or blackened if you prefer) on one side. Turn chicken over, cover, and reduce heat to medium. Cook for approximately 2-4 more minutes (depending on thickness of chicken), or until chicken is cooked through. Remove to a cutting board, tent with foil and let rest 5 minutes before slicing across the grain into strips.

4.  Vegetables: Meanwhile, Add 1 tablespoon oil to the leftover juices in the skillet along with reserved 2 tablespoons marinade. Heat over medium high heat. Add onions and saute 1 minute. Add bell peppers and saute for 3-4 minutes or until crisp-tender. Add sliced chicken and toss to coat.

5.  Assemble: Layer tortillas with Chicken Fajita mixture and desired toppings. Top with Chipotle Lime Crema.

**This post and photos are property of http://dishingwithdish.blogspot.com/ **

Wednesday, June 24, 2020

Slow Cooker Ropa Vieja

I've never had Ropa Vieja before- a well-known Cuban dish- so I don't know if this is authentic or not.  I really enjoyed the flavor of this though, and it was super easy to put together, cooking all day in the slow cooker.  We enjoyed this with rice and black beans. 
Slow Cooker Ropa Vieja
adapted from Carlsbad Cravings

3 lbs. chuck roast
2 Tablespoons oil
1 red onion sliced ¼-inch thick
1 28 oz. can crushed tomatoes
1 cup low sodium beef broth
2 Tablespoons low sodium soy sauce
1 Tablespoon apple cider vinegar
1 teaspoon liquid smoke
1 Tablespoon beef bouillon or better than bouillon
1 Tablespoon EACH dried oregano, ground cumin
1 tsp EACH smoked paprika, ground coriander, all spice
1/2 teaspoon salt
1/2-1 teaspoon ground chipotle chili pepper
6 cloves garlic minced
1 bay leaf
1 red bell pepper sliced ¼-inch thick
1 green or orange/yellow bell pepper sliced ¼-inch thick
ADD LATER
3/4 cup pimiento-stuffed Spanish olives drained and halved

1.  Heat oil in a large cast iron skillet over medium high heat. Using tongs, sear meat on all sides until browned and transfer to a 6 qt. (or larger) slow cooker.  Add sliced onions to the skillet and sautĆ© over medium-high heat for 5 m minutes; set aside (don’t add to crockpot yet).  Add crushed tomatoes through bay leaf to the crockpot and stir to combine, flipping the roast over to coat. Top beef with red onions and bell peppers.  Cover and cook on low for 8-10 hours or on high for 4-6 hours OR until roast is super tender and easily sheds with a fork.

2.  Once tender, shred roast and discard excess fat. Stir in the olives and let rest 15-30 minutes to absorb some of the juices. Taste and season with additional salt and/or ground chipotle chili pepper. Serve with rice and black beans.

 **This post and photos are property of http://dishingwithdish.blogspot.com/ **

Friday, June 12, 2020

Easy Caramel Sauce


Yum- I loved this caramel sauce.  I have a few caramel sauce recipes on here already, but they're all different and so, so good.  Lol.  This reminds me of this caramel sauce, in that it uses simple ingredients that you just cook together on the stove.  No candy thermometer, no cooking plain sugar alone first, no corn syrup.  It's not grainy, either.  It's perfect.
Easy Caramel Sauce 
adapted from Carlsbad Cravings

3/4 cup butter
1 1/2 cups light brown sugar, packed
2 tablespoons water
1/4 teaspoon salt
1/2 cup evaporated milk plus more as needed depending on desired consistency
1 tablespoon vanilla extract

1.  Add butter, brown sugar, water, and salt to medium saucepan and heat over medium-low heat, stirring until butter melts.

2.  Bring to a boil then reduce to a vigorous simmer, whisking constantly until thickened, approximately 5-7 minutes. The caramel sauce will thickens more as it cools. 

3.  Remove from heat and stir in 1/2 cup evaporated milk (it will bubble) and vanilla. Add additional evaporated milk to reach desired consistency, if needed.
**This post and photos are property of http://dishingwithdish.blogspot.com/ **

Thursday, May 7, 2020

Slow Cooker Carnitas


These were so good!  I already have two other Carnitas recipes, but I think I like this recipe the best- because it's the easiest, but still has outstanding flavor.  For my other recipes, you have to cube the raw pork butt, which is a huuuuge pain in.... the butt.  Ja ja ja!!! (Ha ha ha!!)  For this one, you cook it in the slow cooker and then shred.  I think the end results are the same- no reason to cube.  I'd use this method on my older recipes, too.  You do sear the roast first on the stove, but on one of my other recipes there was cutting + searing.  I loved the end result, but it was too hard to make regularly.  Not anymore though!

Slow Cooker Carnitas
adapted from Carlsbad Cravings

4-5 lbs pork shoulder/pork butt trimmed of excess fat (can use smaller, too)
1 tablespoon olive oil
1/4 cup orange juice
2 tablespoons lime juice
1 teaspoon liquid smoke
2 bay leaves
1 onion, chopped
1 jalapeno, deveined, deseeded, chopped, optional

Wet Spice Rub:
3 tablespoons olive oil
2 tablespoons tomato paste
1 tablespoon reduced sodium soy sauce
1/4 cup brown sugar, packed
1 tablespoon ground cumin
2 tsps EACH dried oregano, salt
1 tsp EACH chili powder, garlic powder, onion powder
1/2 tsp EACH smoked paprika, pepper
1/2-1 teaspoon ground chipotle chili pepper (optional; adds heat)

1.  Heat 1 tablespoon olive oil over high heat in a large nonstick skillet. Using tongs or 2 forks, sear pork on all sides until lightly browned. Transfer pork to a large plate or cutting board until cool enough to handle.

2.  Meanwhile, whisk together all of the Wet Spice Rub ingredients in a medium bowl. When pork is cool enough, massage Wet Spice Rub evenly all over, then transfer pork to slow cooker. Add orange juice, lime juice, liquid smoke, and 2 bay leaves to slow cooker. Top pork with onions and optional jalapeno. Cook on LOW for 8 to 10 hours or on high for 5-6 hours OR until pork is fall apart tender and easily shreds with a fork.

3.  Remove pork from slow cooker to cutting board, shred, and add back to slow cooker and toss with juices. Cook on low for 20 minutes. Meanwhile, preheat oven to 450 degrees F. Line a large baking sheet with foil.

4.  After 20 minutes, remove pork (do NOT discard juices in slow cooker) and add shredded pork to baking sheet in an even layer. Drizzle with some of the remaining juices (about 1/4 cup) and bake for 15 minutes then broil to desired crispiness, watching closely so meat doesn’t burn (about 5-10 minutes). Drizzle with additional juices and toss. (If you have leftovers---- they are SO good warmed up on the stove in a non-stick skillet.  They get all crispy in places that way. I can't figure out how to broil in my Euro oven, so i actually preferred the stovetop method.)  

5.  Serve warm in tortillas, on rice, salad, etc. with favorite toppings.


**This post and photos are property of http://dishingwithdish.blogspot.com/ **